
The Power of Non-Starchy Vegetables: 7 Delicious Recipes to Supercharge Your Health
In the quest for a healthier lifestyle, one of the key ingredients to success is a diet rich in non-starchy vegetables. These veggies, low in carbohydrates and high in essential nutrients, offer a wide array of health benefits. But how do you make them a delicious and integral part of your daily meals? In this article, we’ll explore seven non-starchy vegetables and provide mouthwatering recipes that will make you savor their goodness. Let’s dive into the world of vibrant, nutritious, and scrumptious non-starchy vegetables.
Introduction
Maintaining a balanced diet can be challenging, especially when you’re aiming to cut down on carbohydrates. But fear not! Non-starchy vegetables are here to save the day. These veggies are not only low in carbs but also packed with vitamins, minerals, and dietary fiber. They can aid in weight management, improve blood sugar control, and reduce the risk of chronic diseases. Plus, they add vibrant colors, textures, and flavors to your plate.
In this article, we’ll introduce you to seven non-starchy vegetables that deserve a spot in your kitchen. We’ll provide easy-to-follow recipes that showcase the versatility and deliciousness of these veggies. So, let’s embark on a culinary journey that’s both nutritious and delightful.
Recipe 1: Roasted Asparagus with Lemon and Parmesan
Ingredients
- 1 bunch of fresh asparagus
- 2 tablespoons of olive oil
- Zest of 1 lemon
- 2 tablespoons of grated Parmesan cheese
- Salt and freshly ground black pepper to taste
- 1 lemon, cut into wedges for garnish (optional)
Directions
Preheat the Oven:Begin by preheating your oven to 400°F (200°C). This ensures it’s nice and hot for roasting the asparagus.
Prepare the Asparagus:Take your fresh bunch of asparagus and rinse it under cold water. Then, snap off the tough, woody ends by holding each spear and bending it until it naturally breaks. This usually happens near the base of the spear.
Toss with Olive Oil:Place the trimmed asparagus spears on a baking sheet. Drizzle them with 2 tablespoons of olive oil, ensuring they are evenly coated. You can use your hands or a spatula to gently toss them in the oil.
Zest the Lemon:Zest the entire lemon directly over the asparagus. The lemon zest adds a lovely citrusy aroma and flavor to the dish.
Season with Parmesan:Sprinkle the grated Parmesan cheese over the asparagus. The cheese will add a rich, savory element to the dish.
Season with Salt and Pepper:Season the asparagus with salt and freshly ground black pepper to taste. You can be as generous or as conservative with the seasoning as you like, depending on your preferences.
Toss and Spread:Use your hands or a spatula to gently toss the asparagus, ensuring the olive oil, lemon zest, Parmesan, salt, and pepper are evenly distributed.
Roast in the Oven:Place the baking sheet with the seasoned asparagus in the preheated oven. Roast for about 10-12 minutes or until the asparagus is tender yet still crisp. The cooking time may vary slightly depending on the thickness of the asparagus spears.
Optional Lemon Wedges:If desired, you can add lemon wedges to the baking sheet during the last few minutes of roasting. These wedges will become slightly caramelized and intensify the lemony flavor.
Serve Hot:Remove the roasted asparagus from the oven. Arrange them on a serving platter, garnishing with any roasted lemon wedges.
Enjoy:Serve your Roasted Asparagus with Lemon and Parmesan hot as a side dish or a flavorful addition to your main course.
This dish is a delightful combination of tender-crisp asparagus with the bright zing of lemon and the savory richness of Parmesan cheese. It’s a simple yet elegant way to enjoy this non-starchy vegetable. So, follow these easy steps, and in no time, you’ll have a delicious side dish ready to savor.
Click Here To Buy Our Healthy Cookbook For Only $27 Today!Instructions
Preheat your oven to 400°F (200°C).
Trim the tough ends of the asparagus and place them on a baking sheet.
Drizzle olive oil over the asparagus and toss to coat evenly.
Sprinkle lemon zest, lemon juice, and grated Parmesan cheese over the asparagus.
Season with salt and pepper.
Roast in the preheated oven for 10-12 minutes, or until the asparagus is tender and slightly crispy.
Serve hot and enjoy the zesty goodness of roasted asparagus.
Flavorful Insight:The lemon zest adds a burst of citrusy freshness, while Parmesan cheese provides a savory depth to the asparagus. It’s a delightful way to savor this non-starchy gem.
Recipe 2: Zucchini Noodles with Pesto
Ingredients
- 2 medium-sized zucchinis
- 1 cup of fresh basil leaves
- 1/4 cup of pine nuts
- 2 cloves of garlic
- 1/2 cup of grated Parmesan cheese
- 1/2 cup of high-quality olive oil
- Salt and freshly ground black pepper to taste
Directions
Prepare the Zucchini Noodles:Begin by transforming your zucchinis into noodles. You can use a spiralizer to create long, spaghetti-like strands from the zucchinis. If you don’t have a spiralizer, you can also use a julienne peeler to achieve a similar effect. Place the zucchini noodles in a large bowl.
Create the Pesto:In a food processor, combine the following ingredients:
Fresh basil leaves
Pine nuts
Peeled garlic cloves
Grated Parmesan cheese
Start Blending:Pulse the ingredients in the food processor until they are finely chopped and well combined.
Stream in the Olive Oil:With the food processor running, gradually stream in the high-quality olive oil. This will help create a smooth and creamy pesto sauce.
Season with Salt and Pepper:Stop the food processor and season the pesto with salt and freshly ground black pepper to taste. Give it a quick pulse to ensure the seasoning is evenly distributed.
Toss the Zucchini Noodles:Pour the freshly made pesto sauce over the zucchini noodles in the large bowl.
Mix Thoroughly:Use tongs or two forks to gently toss the zucchini noodles in the pesto sauce. Make sure the noodles are evenly coated with the flavorful pesto.
Taste and Adjust:Taste the zucchini noodles and pesto mixture. If desired, you can add a bit more salt, pepper, or grated Parmesan cheese to suit your taste.
Serve Immediately:Zucchini noodles are best when served fresh. Plate your Zucchini Noodles with Pesto and garnish with additional grated Parmesan cheese if desired.
Enjoy:Enjoy this light and vibrant dish as a healthy and low-carb alternative to traditional pasta. It’s bursting with the flavors of basil, garlic, and Parmesan cheese.
This Zucchini Noodles with Pesto recipe is not only delicious but also a fantastic way to incorporate more vegetables into your diet. The zucchini noodles absorb the pesto’s rich flavors, creating a satisfying and carb-friendly dish. So, follow these simple steps, and you’ll have a delightful meal ready to enjoy in no time.
Instructions
Using a spiralizer, transform the zucchinis into noodles.
In a food processor, combine basil, pine nuts, garlic, and Parmesan cheese.
While the processor is running, slowly pour in the olive oil until the pesto is well blended.
Season with salt and pepper.
Toss the zucchini noodles with the pesto sauce until they are evenly coated.
Serve as a fresh and carb-friendly alternative to pasta.
Flavorful Insight:Zucchini noodles, often known as “zoodles,” are a low-carb revelation. They absorb the vibrant flavors of the pesto, making this dish a healthy and satisfying choice.
Recipe 3: Cauliflower Mash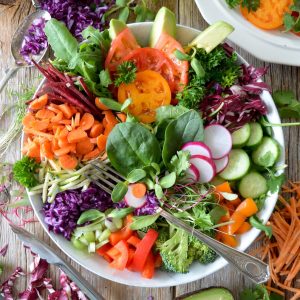
-
Ingredients
- 1 head of cauliflower, chopped into florets
- 2 cloves of garlic, peeled
- 2 tablespoons of butter
- Salt and pepper to taste
- Chopped chives for garnish (optional)
Directions
Steam the Cauliflower:Start by steaming the cauliflower florets and garlic cloves until they are tender. You can use a steamer basket or a microwave-safe dish with a lid for this. It typically takes about 10-15 minutes, depending on the size of the florets.
Drain and Pat Dry:Once the cauliflower and garlic are tender, remove them from the steamer and allow them to drain any excess moisture. You can also use paper towels to gently pat them dry if needed.
Combine with Butter:In a food processor, combine the steamed cauliflower, peeled garlic cloves, and 2 tablespoons of butter. The warmth of the cauliflower will help melt the butter.
Season with Salt and Pepper:Season the mixture with salt and pepper to taste. The amount of seasoning can vary depending on your preferences, so start with a pinch of each and adjust accordingly.
Blend Until Smooth:Blend the ingredients in the food processor until you achieve a smooth, mashed potato-like consistency. This may take a few minutes, and you might need to stop and scrape down the sides of the processor bowl to ensure everything is well mixed.
Check for Consistency:Check the consistency of your cauliflower mash. If it’s too thick for your liking, you can add a small amount of warm milk or cream and blend again until you reach your desired creaminess.
Optional Garnish:If desired, garnish your cauliflower mash with chopped chives for a pop of color and flavor.
Click Here To Buy Our Healthy Cookbook For Only $27 Today!Serve Hot:Your creamy Cauliflower Mash is now ready to serve. It’s best served hot as a side dish or a healthier alternative to traditional mashed potatoes.
Enjoy:Savor the rich and savory flavors of this cauliflower mash. It’s a fantastic way to enjoy the creamy texture of mashed potatoes without the starchy carbs.
This Cauliflower Mash recipe is a game-changer for those looking to reduce their carb intake while still enjoying a classic comfort food. The garlic adds depth, and the butter provides a velvety richness to this dish. Follow these straightforward steps, and you’ll have a delicious side dish ready to grace your dinner table.
Instructions
Steam the cauliflower florets and garlic cloves until they are tender.
Drain any excess moisture from the cauliflower.
In a food processor, combine the steamed cauliflower, garlic, butter, salt, and pepper.
Blend until the mixture reaches a smooth, mashed potato-like consistency.
Garnish with chopped chives if desired.
Serve this creamy cauliflower mash as a side dish or a low-carb alternative to mashed potatoes.
Flavorful Insight:Cauliflower mash is a revelation for those looking to cut carbs. It’s creamy, flavorful, and incredibly satisfying without the starchy guilt.
Recipe 4: Stir-Fried Broccoli with Garlic and Ginger
-
Ingredients
- 1 pound of fresh broccoli florets
- 2 cloves of garlic, minced
- 1-inch piece of fresh ginger, minced
- 2 tablespoons of soy sauce
- 1 tablespoon of sesame oil
- 1 tablespoon of vegetable oil
- Sesame seeds for garnish (optional)
Directions
Prepare the Broccoli:Begin by preparing the broccoli florets. Wash them thoroughly and cut them into bite-sized pieces, ensuring they are of similar size for even cooking.
Heat Vegetable Oil:Heat the vegetable oil in a large skillet or wok over medium-high heat. Allow the oil to become hot but not smoking.
Add Garlic and Ginger:Once the oil is hot, add the minced garlic and minced ginger to the skillet. Stir-fry for about 30 seconds or until the garlic and ginger become fragrant. Be careful not to burn them.
Add Broccoli:Add the prepared broccoli florets to the skillet. Stir-fry the broccoli in the garlic and ginger-infused oil for about 3-4 minutes, or until the broccoli turns bright green and is tender-crisp. Stirring frequently will ensure even cooking.
Drizzle Soy Sauce:Drizzle the soy sauce over the stir-fried broccoli. The soy sauce adds a savory umami flavor and a rich color to the dish.
Add Sesame Oil:Pour the sesame oil over the broccoli. Sesame oil contributes a nutty aroma and flavor that enhances the overall taste of the dish.
Toss and Combine:Toss the broccoli in the skillet to evenly coat it with the soy sauce and sesame oil. Continue to stir-fry for an additional 2 minutes, allowing the flavors to meld together.
Check for Doneness:Taste a piece of broccoli to check for doneness. It should be tender yet still have a slight crispness.
Optional Garnish:If desired, garnish the stir-fried broccoli with sesame seeds for added texture and presentation.
Serve Hot:Remove the skillet from heat. Transfer the Stir-Fried Broccoli with Garlic and Ginger to a serving dish.
Enjoy:Serve this quick and flavorful stir-fried broccoli as a delicious side dish or as a main course accompanied by your choice of protein.
This Stir-Fried Broccoli with Garlic and Ginger recipe is a delightful way to enjoy the fresh, vibrant flavors of broccoli with a hint of aromatic garlic and ginger. The soy sauce and sesame oil infuse the dish with savory goodness. Follow these simple steps, and you’ll have a delicious and nutritious side dish ready to grace your dinner table.
Instructions
Heat vegetable oil in a large skillet or wok over medium-high heat.
Add minced garlic and ginger, and stir-fry for about 30 seconds until fragrant.
Add broccoli florets and continue stir-frying for 3-4 minutes, or until the broccoli turns bright green and tender-crisp.
Drizzle soy sauce and sesame oil over the broccoli and stir-fry for an additional 2 minutes.
Garnish with sesame seeds if desired.
Serve this quick and flavorful stir-fried broccoli as a side dish or a main course with some protein.
Flavorful Insight:The garlic and ginger infuse
the broccoli with aromatic flavors, while the soy sauce adds a savory punch. It’s a simple yet irresistible way to enjoy this non-starchy delight.
Recipe 5: Spinach and Mushroom Salad with Balsamic Vinaigrette
-
Ingredients:
- 4 cups of fresh spinach leaves
- 1 cup of sliced mushrooms
- 1/4 cup of red onion, thinly sliced
- 1/4 cup of crumbled feta cheese
- 1/4 cup of balsamic vinaigrette dressing
- Salt and freshly ground black pepper to taste
Directions
Prepare the Spinach:Begin by rinsing the fresh spinach leaves under cold running water. Drain them well and place them in a large salad bowl.
Slice the Mushrooms:Clean the mushrooms with a damp cloth or paper towel to remove any dirt. Slice them thinly and add them to the salad bowl with the spinach.
Thinly Slice the Red Onion:Peel and thinly slice the red onion. You can soak the sliced onion in cold water for a few minutes to mellow its sharpness if desired. Drain and add it to the salad bowl.
Add Feta Cheese:Crumble the feta cheese over the salad ingredients in the bowl. Feta cheese adds a creamy and tangy element to the salad.
Drizzle with Balsamic Vinaigrette:Pour the balsamic vinaigrette dressing over the salad. Balsamic vinaigrette offers a delightful balance of sweetness and acidity.
Season with Salt and Pepper:Season the salad with a pinch of salt and freshly ground black pepper to taste. Keep in mind that feta cheese can be salty, so adjust the seasoning accordingly.
Toss and Coat:Gently toss all the salad ingredients together to ensure they are well coated with the balsamic vinaigrette dressing. Use salad tongs or two forks for this.
Taste and Adjust:Taste a small portion of the salad and adjust the seasoning or dressing if needed. You can add more balsamic vinaigrette if you prefer a stronger dressing flavor.
Serve Immediately:Your Spinach and Mushroom Salad with Balsamic Vinaigrette is now ready to serve.
Enjoy:Serve this refreshing and flavorful salad as a side dish or a light, healthy meal. It’s a perfect balance of greens, earthy mushrooms, and the sweet-tangy notes of balsamic vinaigrette.
This Spinach and Mushroom Salad with Balsamic Vinaigrette recipe is not only delicious but also a nutritious and vibrant addition to any meal. The combination of spinach, mushrooms, and feta cheese creates a medley of flavors and textures. Follow these straightforward steps, and you’ll have a delightful salad ready to enjoy in no time.
Instructions
In a large salad bowl, combine fresh spinach, sliced mushrooms, and thinly sliced red onion.
Crumble feta cheese over the salad.
Drizzle balsamic vinaigrette dressing.
Toss all the ingredients until they are well coated.
Season with salt and pepper to taste.
Serve this refreshing spinach and mushroom salad as a nutritious side or a light meal.
Flavorful Insight:This salad combines the earthy richness of mushrooms with the freshness of spinach, all tied together with the tangy sweetness of balsamic vinaigrette.
Recipe 6: Green Bean Almondine
-
Ingredients
- 1 pound of fresh green beans, trimmed
- 2 tablespoons of butter
- 1/4 cup of sliced almonds
- 1 tablespoon of fresh lemon juice
- Salt and freshly ground black pepper to taste
Directions
Prepare the Green Beans:Start by washing and trimming the fresh green beans. Remove the stem ends and any tough strings.
Steam the Green Beans:Fill a large saucepan with about an inch of water and bring it to a boil. Place a steamer basket or insert into the saucepan and add the trimmed green beans. Cover with a lid and steam the green beans for about 4-5 minutes, or until they are tender-crisp. They should be bright green and still have a slight crunch.
Drain and Set Aside:Once the green beans are steamed to your liking, remove them from the saucepan and drain any remaining water. Set the steamed green beans aside.
Toast the Almonds:In a separate skillet, heat 2 tablespoons of butter over medium heat. Add the sliced almonds to the skillet. Toast the almonds, stirring frequently, until they turn a golden brown color and become fragrant. This usually takes about 2 minutes.
Combine with Green Beans:Return the steamed green beans to the skillet with the toasted almonds. Toss them together, ensuring the green beans are coated with the butter and almonds.
Add Lemon Juice:Drizzle 1 tablespoon of fresh lemon juice over the green beans and almonds. The lemon juice adds a bright and zesty flavor.
Season with Salt and Pepper:Season the dish with salt and freshly ground black pepper to taste. Be mindful of the salt, especially if you prefer less sodium in your dishes.
Toss and Combine:Gently toss the green beans, toasted almonds, lemon juice, salt, and pepper together in the skillet. Make sure the flavors are evenly distributed.
Check for Doneness:Taste a green bean to check for doneness and seasoning. Adjust the salt, pepper, or lemon juice if needed.
Serve Hot:Remove the skillet from heat and transfer your Green Bean Almondine to a serving dish.
Enjoy:Serve this elegant and flavorful side dish immediately. It’s a delightful combination of crispy green beans, toasted almonds, and a hint of citrus from the lemon juice.
Green Bean Almondine is a classic side dish that adds a touch of sophistication to any meal. The toasted almonds provide a nutty crunch, while the lemon juice brightens the flavors. Follow these simple steps, and you’ll have a delicious and visually appealing dish ready to impress your guests or elevate your weeknight dinner.
Instructions
Steam the green beans until they are tender-crisp, about 4-5 minutes.
In a skillet, melt butter over medium heat.
Add sliced almonds and sauté until they turn golden brown, about 2 minutes.
Add the steamed green beans and lemon juice to the skillet.
Toss to coat the green beans with the buttery almond mixture.
Season with salt and pepper.
Serve this elegant green bean almondine as a delightful side dish.
Flavorful Insight:The buttery, toasted almonds elevate the green beans to a whole new level of deliciousness. It’s a side dish that combines elegance with simplicity.
Recipe 7: Cucumber Salsa
-
Ingredients
- 2 cucumbers, diced
- 1 red onion, finely chopped
- 2 tomatoes, diced
- 1/4 cup of fresh cilantro, chopped
- 2 cloves of garlic, minced
- Juice of 2 limes
- Salt and freshly ground black pepper to taste
Directions
Prepare the Cucumbers:Begin by washing and peeling the cucumbers if desired. Cut them into small dice. You can remove the seeds for a less watery salsa, but it’s optional.
Chop the Red Onion:Finely chop the red onion. If you prefer a milder onion flavor, you can soak the chopped onion in cold water for a few minutes to reduce its sharpness. Drain and set aside.
Dice the Tomatoes:Dice the tomatoes into small pieces. Remove the seeds and excess pulp if you prefer a thicker salsa.
Mince the Garlic:Peel and mince the garlic cloves. If you’re a garlic enthusiast, you can add more cloves for a stronger garlic flavor.
Chop the Cilantro:Chop the fresh cilantro leaves. Cilantro adds a refreshing herbal note to the salsa.
Combine the Ingredients:In a large bowl, combine the diced cucumbers, finely chopped red onion, diced tomatoes, minced garlic, and chopped cilantro.
Squeeze the Lime Juice:Squeeze the juice of two limes over the mixture. Lime juice provides a zesty and tangy element to the salsa.
Season with Salt and Pepper:Season the cucumber salsa with salt and freshly ground black pepper to taste. Be mindful of the salt, especially if you’re serving the salsa with salty tortilla chips.
Toss and Combine:Gently toss all the ingredients together, making sure the lime juice, salt, and pepper are evenly distributed. Use a spatula or a large spoon for this.
Check for Seasoning:Taste a small spoonful of the cucumber salsa and adjust the salt, pepper, or lime juice to suit your preferences.
Serve Fresh:Your homemade Cucumber Salsa is now ready to be enjoyed. Serve it fresh as a refreshing condiment or a delightful side dish.
Enjoy:Savor the crispness of the cucumbers, the bright acidity of the lime juice, and the vibrant flavors of this refreshing salsa.
Cucumber Salsa is a versatile and light condiment that pairs well with tortilla chips, grilled meats, or as a topping for tacos and salads. Follow these simple steps, and you’ll have a delicious and cooling salsa ready to elevate your next meal or snack.
Instructions
In a large bowl, combine diced cucumbers, chopped red onion, diced tomatoes, chopped cilantro, and minced garlic.
Squeeze the juice of two limes over the mixture.
Season with salt and pepper to taste.
Toss all the ingredients together until they are well combined.
Serve this zesty cucumber salsa as a refreshing condiment or a tasty side dish.
Flavorful Insight:The crisp cucumbers, zesty lime juice, and fresh cilantro create a salsa that’s bursting with flavor. It’s a delightful way to enjoy the crispness of cucumbers.
Conclusion
Non-starchy vegetables are the unsung heroes of a balanced diet. They not only contribute to your health but also offer a delightful spectrum of flavors and textures. These seven recipes have showcased the potential of non-starchy vegetables to transform your meals into delicious and nutritious experiences.
Incorporate these recipes into your culinary repertoire, and let the vibrant colors and fresh flavors of these veggies brighten your plate. Whether you’re looking to reduce carbs or simply savor the goodness of vegetables, these dishes have got you covered. So, roll up your sleeves, head to the kitchen, and embark on a journey of healthy, mouthwatering cuisine with non-starchy vegetables as your trusty companions. Your taste buds and your body will thank you!
World Trade Center Footage | Webex Costs | Virtual Data Rooms | Structures Annuity Settlement | Sell Annuity Payment | Neuson | Online Classes | Nunavut Culture | Online College Course | Motor Replacements | Motor Insurance Quotes | Mortgage Adviser | Met Auto | Tax credit | Help desk software | Home refinancing | Urgent care | Marketing integration | Debt relief | Bitcoin | Fitness center software | Insurance | Gas | Electricity | Weight loss | Sell house for cash | Automotive repair | Loans | Internet marketing | Mortgage | Attorney | SEO specialist | Lawyer | Donate | Conference Call | Treatment | Degree | Software | Credit | Classes | Investing | Recovery | Trading | Rehab | Hosting | Cord Blood | Claim | Automotive warranty | Paintless dent repair | Mesothelioma Law Firm | Massage School Dallas Texas | Low Credit Line Credit Cards | Life Insurance Co Lincoln | Insurance Companies | Injury Lawyers | How to Donate A Car in California | Home Phone Internet Bundle | Holland Michigan College | Royalty-Free Images Stock | Register Free Domains | Psychic for Free | Ph.D. in Counseling Education | Personal Injury Lawyers | Personal Injury Law Firm | PaperPort Promotional Code | Online Stock Trading | Online Motor Insurance Quotes | Donate your Car for Money | Online Colleges | Health Records, Personal Health Record | Hard drive Data Recovery Services | Donate Old Cars to Charity | Forex Trading Platform | Forensics Online Course | Donate Car to Charity California | Donate Car for Tax Credit | Car Insurance Quotes PA | Email Bulk Service | Donating Used Cars to Charity | Donating a Car in Maryland | Donate Your Car Sacramento | Online Criminal Justice Degree | Donate Your Car for Kids | Futuristic Architecture | Donate Cars in MA | Data Recovery Raid | Mesothelioma | A car accident lawyer | Personal injury lawyer | AC repair | Lawsuit settlements | Car insurance | Flood recovery | Water damage restoration | Rehab doctors | Online degree | Online master’s degree | Doctoral programs | Hail car insurance