
7-Bottom Round Roast in the Slow Cooker
You’ve mastered the art of cooking a perfect 7-Bottom Round Roast in your slow cooker, and you’re hungry for more culinary adventures. Well, you’re in luck! In this article, we’re not only going to dive deeper into the magic of slow cooking this cut of meat, but we’re also going to explore three more delectable recipes.
The allure of slow-cooked meals lies in the gentle, patient way they unfold into savory perfection. The 7-Bottom Round Roast is a culinary masterpiece when prepared in a slow cooker, and its flavors are the result of a harmonious marriage between time and ingredients. In this guide, we’ll walk you through cooking a delectable 7-Bottom Round Roast in your slow cooker and offer a bonus of two additional recipes to tantalize your taste buds.
Recipe 1: Savory 7-Bottom Round Roast
The Perfect Comfort Food
Ah, the roast. There’s something about it that just feels like home, don’t you think? It’s that meal that draws everyone together. You know the scene: family and friends crowding around the table, forks ready, eyes on the prize waiting for that first, juicy bite. If you’re on the hunt for a roast that delivers both flavor and tenderness, let me introduce you to the Savory 7-Bottom Round Roast. Trust me, this one’s a keeper.
I can practically smell it now hours in the oven, the air filled with a cozy, mouthwatering aroma. The roast, all golden-brown on the outside, just begging to be carved. And the best part? The whole thing comes together with hardly any effort, yet the result is nothing short of spectacular.
Calculate Recipe Calories
What’s a 7-Bottom Round Roast?
Okay, let’s start with the basics. What on earth is a “7-bottom round roast” anyway? Well, it might not be as famous as a rib-eye or tenderloin, but this cut of beef deserves your attention. It comes from the lower part of the cow’s rear leg, which means it’s lean and firm. But don’t let that fool you lean doesn’t equal tough when you use the right cooking methods. With slow roasting, this cut becomes tender and bursting with flavor.
The “7-bottom” name comes from how the meat is trimmed, giving it multiple layers of muscle that respond beautifully to slow, gentle cooking. It’s a flavorful, budget-friendly option for a special dinner, and honestly, once you try it, you’ll want to keep it in your rotation.
The Ingredients You’ll Need
Now, I’m not going to overwhelm you with a list of 100 ingredients. This roast is about simplicity. Let the few basics shine, with maybe one or two surprise ingredients that will really bring out the best in the beef. Here’s what you’ll need:
For the Roast:
- 3-4 lbs of 7-bottom round roast – The star of the show. Ask your butcher for a well-trimmed piece.
- 2 tablespoons olive oil – For that perfect sear.
- 4 cloves garlic – Minced, of course.
- 1 medium onion – Roughly chopped into large pieces.
- 1 tablespoon Worcestershire sauce – That deep, savory flavor we all love.
- 1 cup beef broth – Essential for keeping the roast moist and juicy.
- Fresh thyme and rosemary – Trust me, these herbs are your best friends here.
- Salt and black pepper – Don’t hold back on seasoning. It makes all the difference.
- 1 tablespoon Dijon mustard – Adds a touch of tanginess that balances the richness.
For the Veggies (Optional, but Highly Recommended):
- 4 large carrots – Peeled and chopped.
- 2 large potatoes – Cut into chunks.
- 1 cup Brussels sprouts – Halved.
- 1 cup parsnips – Peeled and chopped.
Step-by-Step: How to Make This Roast Perfect
Step 1: Season the Roast
First, dry your roast with a paper towel. This might sound simple, but it’s key. Drying it off ensures the seasoning sticks better, and you get that beautiful crust. Once dry, rub the roast all over with salt, pepper, garlic powder, onion powder, and Dijon mustard. Don’t skip any spots get it nice and covered. Let the roast sit at room temperature for about 20 minutes. This ensures it cooks evenly.
Step 2: Sear the Meat
This step? Non-negotiable. Searing your roast before roasting it is crucial for that rich, savory flavor. Heat the olive oil in a heavy-bottomed skillet over medium-high heat. Once it’s hot, sear the roast on all sides until it’s golden brown. This should take about 3-4 minutes per side. Don’t rush this is where the magic happens.
Step 3: Prep the Roasting Pan
While the roast is getting that perfect sear, preheat your oven to 325°F (165°C). Grab a roasting pan or Dutch oven, and arrange your veggies inside. Toss the carrots, potatoes, Brussels sprouts, and parsnips with a little salt, pepper, and fresh thyme and rosemary. These veggies will cook in the juices from the roast, becoming incredibly tender and packed with flavor.
Step 4: Roast the Meat
Now that everything’s prepped, it’s time to throw it all in the oven. Place the seared roast on top of the veggies. Scatter the chopped garlic and onions around the meat. Pour in the beef broth and Worcestershire sauce to keep everything moist and flavorful. Cover the pan with a lid or aluminum foil.
Roast for about 2-2.5 hours, or until the internal temperature of the roast reaches 130°F (54°C) for medium-rare, or 145°F (63°C) for medium. I use a meat thermometer because let’s be honest it makes things so much easier.
Step 5: Rest the Roast
Once the roast is done, take it out of the oven and let it rest for about 10-15 minutes. I know it’s tempting to dive right in, but trust me letting it rest is important. It lets the juices redistribute throughout the meat, making every slice juicy and tender.
Step 6: Slice and Serve
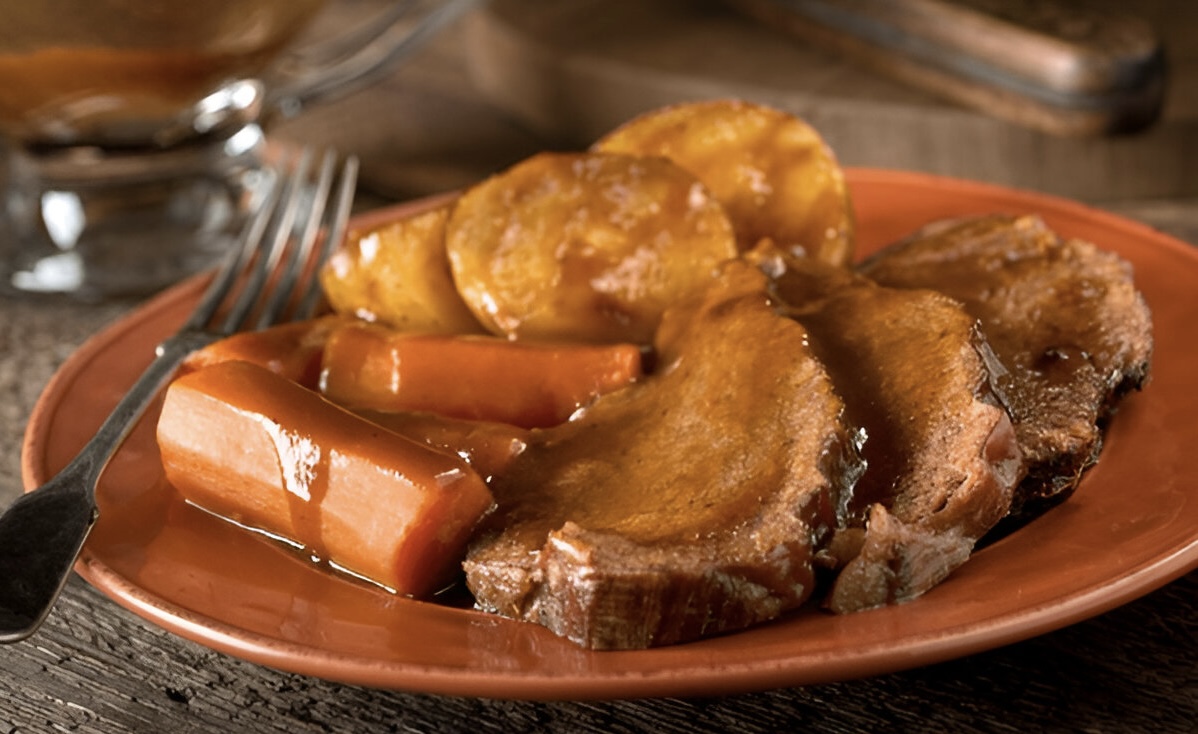
Once rested, slice the roast thinly against the grain. The slices should be tender and full of flavor. Serve them alongside your roasted veggies and spoon some of those savory pan juices over the top. This step? Totally worth it.
Tips to Make This Roast Even Better
- Sear the meat well: This step is non-negotiable. It adds a deep, rich flavor that makes the roast unforgettable.
- Low and slow: Don’t rush it. Slow-roasting keeps the meat tender and juicy.
- Herbs are key: Fresh thyme and rosemary are everything. Use them generously.
- Roast some veggies: These side dishes aren’t just an afterthought. The veggies soak up all that beefy goodness and become the perfect complement.
Why You’ll Love This Roast
There’s something special about a roast dinner, right? The smell filling your house, the satisfaction of carving that juicy roast, the warmth of the meal it’s all part of the experience. With the Savory 7-Bottom Round Roast, it’s more than just the beef. It’s about those layers of flavor, the caramelized veggies, and that feeling you get when you serve up a meal that feels like a celebration.
Whether you’re feeding a crowd or enjoying a quiet Sunday dinner, this roast is a winner. It’s the kind of meal that makes people pause and ask, “What’s that incredible smell?” And when they take that first bite? Oh, you’ll get the nod of approval and that’s better than any compliment.
Pairing Ideas
A great roast deserves great sides and drinks, right? Here’s what I recommend:
- A glass of red wine: Something bold like Cabernet Sauvignon or Merlot pairs perfectly with the richness of the beef.
- Mashed potatoes: You can never go wrong with creamy mashed potatoes to soak up those beefy juices.
- A fresh green salad: Something light, like arugula or spinach with a tangy vinaigrette, balances the richness of the roast.
- Crusty bread: You’ve got all those delicious juices don’t forget the bread to mop it up!
The Bottom Line
The Savory 7-Bottom Round Roast is everything you want in a roast rich, tender, flavorful, and guaranteed to please everyone around the table. It’s simple, but with a little love and care, it transforms into something extraordinary. Whether it’s a holiday, a weekend feast, or just a meal because you feel like it this roast will be a go-to. Now, all you need is a hungry crowd to share it with. Enjoy!
Recipe 2: Spicy 7-Bottom Round Roast Tacos
A Flavor Explosion!
If you’re like me, food is more than just fuel for the body it’s an experience. Every meal is a chance to explore new flavors, to make something memorable. Tacos are the perfect canvas for that. But when I set out to make tacos, I didn’t want the usual, run-of-the-mill kind. I craved something bold, something that would slap me awake and remind me why I fell in love with cooking in the first place. And that’s when I found this recipe for Spicy 7-Bottom Round Roast Tacos.
It all started one lazy Sunday afternoon when I had a 7-bottom round roast sitting in my fridge. I wanted something hearty, yet full of spice. After some thinking (and maybe a little hunger-induced creativity), I decided to transform that humble roast into something spectacular. Spoiler alert: It worked.
Let me walk you through this culinary adventure. These tacos are all about bold flavors, slow-roasted beef, crispy tortillas, and just the right kick of heat. It’s the kind of meal that’ll have you saying, “Wow, I need to make this again.” Ready? Let’s dive in.
Ingredients
Before we roll up our sleeves and get cooking, here’s everything you’ll need. Nothing too crazy just a few simple ingredients that come together to create a symphony of flavors.
For the 7-Bottom Round Roast:
- 1 (4-5 lb) 7-bottom round roast
- 2 tablespoons olive oil
- 2 teaspoons chili powder
- 2 teaspoons smoked paprika
- 1 teaspoon cayenne pepper (adjust to your heat preference I love a good kick!)
- 1 teaspoon ground cumin
- 1 teaspoon onion powder
- 1 teaspoon garlic powder
- ½ teaspoon black pepper
- 1 teaspoon salt (or to taste)
- 1 cup beef broth (for that juicy, tender roast)
- 2 tablespoons fresh lime juice
- 3-4 sprigs fresh cilantro (for garnish, and because cilantro just makes everything better)
For the Taco Assembly:
- Corn tortillas (trust me, they’re the way to go, but flour works too)
- 1 small red onion, finely chopped
- 1-2 jalapeños, thinly sliced (seeds removed if you’re not looking to blow your taste buds away)
- 1 ripe avocado, diced
- Fresh cilantro leaves (for garnish)
- Crumbled queso fresco or Cotija cheese (optional, but why not?)
- Your favorite salsa (store-bought or homemade it’s all good)
- Lime wedges (to add that perfect final zing)
Instructions
1. Prepping the Roast
The secret to a great roast? Low and slow. We’re working with a tougher cut of meat here, but with a little patience, you’ll end up with something magical.
Step 1: Seasoning the Roast
Start by rubbing the roast with olive oil. You want to coat it evenly, just enough to let the spices stick. Then, grab the spices: chili powder, smoked paprika, cayenne pepper, cumin, onion powder, garlic powder, black pepper, and salt. Toss them together in a small bowl, then rub them all over the roast. Get it nice and coated every bite needs to pack flavor.
Let the roast sit for a few minutes while you prep your pan. That way, the spices get a chance to marinate with the meat.
Step 2: Searing the Meat
Now, heat up a heavy skillet (my cast iron is my best friend for this) over medium-high heat. Add a splash of olive oil and wait until it’s sizzling hot. Carefully place the roast in the skillet, and sear each side for about 2-3 minutes. This step is crucial. The sear locks in all the flavor and juices. Don’t skip it!
Step 3: Roasting
Once the roast is beautifully seared, transfer it to a roasting pan or Dutch oven. Pour in the beef broth, which will keep everything nice and moist. Squeeze in the lime juice because, well, lime just makes everything better. Cover the pan tightly with foil, pop it in the oven, and roast it at 300°F (150°C) for about 3-4 hours. The roast is done when it’s tender enough to pull apart with a fork.
While it’s roasting, take a break. Catch up on your favorite shows, or prep your toppings. The best part? The smell wafting through your kitchen as the roast slowly turns into something delicious.
2. Shredding the Roast
Once the roast is out of the oven, let it rest for about 10 minutes. It might be tempting to dive in immediately, but patience here is key. When you finally shred the meat, it will be juicy, tender, and perfect for tacos.
I use two forks to shred the meat, and if it’s cooked right, it practically falls apart. But here’s a little trick: Don’t just leave the meat as-is. Drizzle some of the leftover juice from the pan over the shredded beef, and toss in a handful of fresh cilantro. That extra lime juice really helps brighten the flavors.
3. Assembling the Tacos
Now for the fun part. Assembling these tacos is like building a masterpiece. Warm up your tortillas (on the stove or in the oven, your choice). I like mine a little crispy on the outside but soft enough to hold all that goodness inside.
Step 1: Layering the Ingredients
Start by adding a generous portion of the tender shredded beef to each tortilla. Then, sprinkle on some finely chopped red onions, add a few slices of jalapeños for a kick, and top it off with some diced avocado. The creamy avocado balances out the spice perfectly.
Step 2: Garnishing and Serving
Time for the magic touches. Sprinkle on fresh cilantro, add a little crumbled queso fresco (because cheese makes everything better), and don’t forget that lime wedge. A quick squeeze of lime right before you take that first bite is the perfect way to seal the deal. I like to add a little salsa too because, why not? Salsa is the final cherry on top.
Recipe 3: Roast Beef and Mushroom Gravy
Comfort Food at Its Best
When I’m craving something hearty, comforting, and just downright satisfying, I always find myself going back to a classic: roast beef with mushroom gravy. There’s just something about perfectly roasted beef paired with a rich, velvety mushroom gravy that takes this dish to the next level. It’s like a warm hug from the inside, and trust me, it’s a total crowd-pleaser every time.
I’ve been making this dish for years, and along the way, I’ve tweaked it to make it even better. But the essentials have always stayed the same: a juicy, perfectly cooked roast beef, and a rich mushroom gravy that turns it from delicious to unforgettable. If you want to wow your family or treat yourself to a comforting dinner, this recipe is one you’ll want to try.
Let me walk you through it.
What You’ll Need
For the Roast Beef:
- 3-4 lb boneless roast beef (I usually go for top sirloin or rib roast because they’re tender and flavorful)
- 2 tablespoons olive oil (for searing)
- 2 teaspoons salt
- 1 teaspoon black pepper
- 3-4 cloves garlic, smashed
- 1 onion, quartered
- 1 tablespoon fresh rosemary (or 1 teaspoon dried)
- 1 tablespoon fresh thyme (or 1 teaspoon dried)
- 1 cup beef broth (don’t skimp on this flavor is key!)
- 1/2 cup red wine (optional, but highly recommended)
For the Mushroom Gravy:
- 1 tablespoon butter
- 1 tablespoon olive oil
- 2 cups mushrooms (button mushrooms are great, but I like to mix in some cremini for depth)
- 1 small onion, finely chopped
- 2 cloves garlic, minced
- 2 tablespoons all-purpose flour
- 1 1/2 cups beef broth
- 1/2 cup heavy cream
- 1 tablespoon Worcestershire sauce
- Salt and pepper, to taste
- Fresh parsley, for garnish
How to Make the Perfect Roast Beef
There are a few key steps I’ve learned over the years that really elevate a roast beef dinner. So let’s start with the roast itself:
- Prep the roast: The first thing I do is take the roast out of the fridge and let it sit at room temperature for about 30 minutes. This helps it cook more evenly. While it’s resting, I preheat the oven to 450°F (230°C). That initial blast of heat really sears the outside of the meat and locks in all those flavors.
- Season generously: I rub the roast with olive oil and season it with salt and pepper. Don’t hold back here this seasoning forms the crust, which is the key to that mouthwatering flavor. I also like to throw in some rosemary and thyme for a fragrant, herby touch.
- Sear the roast: I heat a cast-iron skillet over medium-high heat and sear the roast on all sides for about 3-4 minutes per side. I’m going for that golden-brown crust that’s going to lock in all the juicy goodness.
- Roast the beef: After searing, I move the roast to a roasting pan. I pour beef broth and red wine (if I’m using it) into the pan, and toss in garlic cloves and quarter onions. These aromatics add even more flavor and create the base for the gravy later. Then, I pop the pan in the oven and roast the beef for about 20 minutes per pound for a medium-rare roast. For a medium roast, I aim for an internal temperature of about 135°F.
- Rest the roast: Once the roast comes out of the oven, I let it rest for about 20 minutes. I know it’s tempting to slice it right away, but trust me, this step is crucial. It allows the juices to redistribute, ensuring a tender and juicy roast when you slice it.
Making the Mushroom Gravy
While the roast is resting, I get busy making the gravy. Honestly, the mushroom gravy is my favorite part it’s so rich and creamy, and it really brings the whole dish together. Here’s how I do it:
- Sauté the mushrooms: I heat butter and olive oil in a large skillet over medium heat. Once the pan is hot, I throw in the sliced mushrooms and cook them for about 5-7 minutes until they’re golden brown and releasing all their delicious juices. The smell of cooking mushrooms fills the kitchen and makes everything feel so cozy.
- Add onions and garlic: Once the mushrooms are browned, I toss in the onions and garlic, cooking them for another 2-3 minutes until soft and fragrant. The onions bring a bit of sweetness, and the garlic adds that punch of flavor I love.
- Make the roux: Next, I sprinkle flour over the mushroom mixture and stir it in. This forms a roux, which thickens the gravy. I let it cook for about 1-2 minutes to eliminate the raw flour taste.
- Add the broth: Slowly, I pour in the beef broth, stirring constantly to avoid lumps. Then I bring it to a simmer and cook for about 5 minutes until it thickens up. If you prefer a thinner gravy, just add a bit more broth.
- Finish the gravy: To make it extra creamy, I stir in the heavy cream and Worcestershire sauce. I always give it a taste at this point, adjusting with salt and pepper. If I’m feeling fancy, I might even add a splash more Worcestershire sauce for a richer flavor.
Serving the Roast Beef
Once everything’s ready, it’s time to slice up the roast and pour that amazing mushroom gravy all over it. I always slice the roast against the grain to ensure the meat is as tender as possible. Then, I generously ladle the mushroom gravy over the beef it’s the finishing touch that makes it absolutely irresistible.
Some Tips for the Best Roast Beef and Mushroom Gravy
- Rest the beef: Don’t skip this part! Letting the beef rest before slicing helps the juices stay inside, keeping the roast juicy and tender.
- Use quality beef broth: The flavor of the broth really shines through, so I always choose a good-quality one. It makes the gravy so much more flavorful.
- Make the gravy your own: If you want to add extra richness, try a splash of red wine or even a dollop of sour cream for something extra special.
- Pair with classic sides: I love serving this roast with creamy mashed potatoes, roasted vegetables, or even a fresh green salad for balance.
Why I Love This Dish
There’s something truly magical about a roast beef dinner. It’s timeless, comforting, and always a hit with everyone. But the mushroom gravy? That’s the star. It’s earthy, creamy, and just the right amount of savory. Every time I make this dish, it feels like I’m treating myself and anyone lucky enough to share it with something really special.
Recipe 4: Asian-inspired 7-Bottom Round Roast
My Asian-Inspired 7-Bottom Round Roast Recipe
I’m always on the lookout for new ways to spice up my classic roast dinners, and let me tell you this Asian-Inspired 7-Bottom Round Roast has quickly become my absolute favorite. If you’re anything like me and love the savory depth of Asian flavors, this roast is a game-changer. It takes the tender goodness of beef and elevates it with the punchy flavors of soy sauce, sesame oil, ginger, and just the right touch of spice. It’s truly a flavor explosion that’ll leave everyone at your dinner table coming back for seconds.
This roast is far from your typical “meat and potatoes” dinner. It’s a bold celebration of flavors, and I promise it’ll steal the spotlight at your next meal.
What Is a 7-Bottom Round Roast?
Now, if you’ve never come across a 7-bottom round roast, don’t sweat it it’s not one of those cuts you see on every menu. But trust me, it’s a hidden gem. This cut comes from the lower part of the cow’s back. It’s leaner than some pricier cuts like ribeye, and while it’s a bit tougher, it’s packed with flavor. With the right prep like marinating and slow roasting it becomes unbelievably tender. Plus, it’s easy on the wallet, so you can serve something amazing without breaking the bank.
Why I Love This Asian Twist
I’ve always been a fan of mixing things up in the kitchen, and this Asian-inspired twist on a roast is no exception. The Asian-inspired flavors think salty soy sauce, sweet hoisin sauce, and the nutty richness of sesame oil turn an ordinary roast into something extraordinary. I love the way the ginger, garlic, and honey come together, and the chili flakes add the perfect amount of heat. This isn’t just a roast; it’s a flavor-packed masterpiece.
Ingredients for the Roast
Here’s what you’ll need to make this delicious roast:
For the Marinade and Glaze:
- 1/4 cup soy sauce (I prefer low-sodium for balance)
- 1/4 cup hoisin sauce (adds a delightful sweetness)
- 1 tablespoon rice vinegar (for that perfect tang)
- 2 tablespoons sesame oil (my secret weapon for flavor!)
- 1 tablespoon fresh ginger, finely grated (the more ginger, the better)
- 4 cloves garlic, minced (garlic makes everything better)
- 2 tablespoons honey (just the right touch of sweetness)
- 1 teaspoon chili flakes (optional, but I love the heat)
- 1 tablespoon fish sauce (optional, but it really deepens the flavor)
- 1/4 cup water (just to thin out the glaze)
For the Roast:
- 1 (3-4 lb) 7-bottom round roast
- Salt and black pepper, to taste
- 2 tablespoons vegetable oil (for searing)
- Fresh herbs like rosemary or thyme for garnish (optional, but they add a nice touch)
My Step-by-Step Guide
Step 1: Make the Marinade
The first thing I do is make the marinade. In a bowl, I mix together the soy sauce, hoisin sauce, rice vinegar, sesame oil, ginger, garlic, honey, and chili flakes. I give it a taste and adjust the sweetness or spice depending on my mood sometimes I like it extra spicy, so I add a little more chili. After it’s just right, I set aside 1/4 cup of the marinade for glazing later.
I then pour the rest of the marinade over the roast, making sure to massage it into every nook and cranny. After that, I cover it and stick it in the fridge. I usually let it marinate for at least 2 hours, but if I have time, I let it sit overnight. The longer it marinates, the more the flavors sink in, and trust me, it’s worth the wait.
Step 2: Prepare the Roast
Once the roast has marinated, I take it out of the fridge about 30 minutes before I’m ready to cook. Letting it come to room temperature helps it cook more evenly. I pat it dry with paper towels to get rid of any excess moisture this step is key for a good sear.
Then, I generously season the roast with salt and pepper. Don’t be shy with the seasoning it creates a flavorful crust.
Step 3: Sear the Roast
Now, for the all-important searing step. I heat vegetable oil in a large oven-safe skillet over medium-high heat. Once it’s shimmering and hot, I carefully add the roast and sear it on all sides. I spend about 3-4 minutes per side to get that beautiful golden-brown crust. The smell as it sears? Absolutely divine.
Step 4: Roast It Low and Slow
After searing, it’s time to transfer the skillet to the oven. I set the oven to 350°F (175°C) and roast the meat for about 1.5 to 2 hours. I use a meat thermometer to keep track of the internal temperature. I like mine medium-rare, which is about 130°F (54°C), but feel free to cook it longer if you prefer your roast a bit more done.
While the roast is cooking, I bring the reserved marinade to a simmer in a small saucepan. I let it reduce and thicken for 5-10 minutes, and this becomes the glaze I’ll brush over the roast near the end.
Step 5: Glaze and Rest
Once the roast reaches the desired temperature, I pull it out of the oven and brush it generously with the thickened glaze. I then pop it back into the oven for another 10-15 minutes to let the glaze caramelize into a sticky, flavorful coating.
After that, I take the roast out of the oven and let it rest for about 15 minutes. Resting is crucial it lets the juices redistribute and ensures the roast stays juicy and tender.
Step 6: Slice and Serve
Now, for the best part slicing and serving! I slice the roast thinly against the grain for maximum tenderness. I drizzle any remaining glaze over the slices and sprinkle some fresh herbs, like rosemary or thyme, on top for a touch of color and extra flavor. I usually serve it with steamed rice and sautéed veggies, but this roast pairs well with just about anything.
My Tips for Success
- Marinate Longer: The longer the roast sits in the marinade, the more flavorful it becomes. If you have the time, let it marinate overnight for maximum flavor.
- Adjust the Spice: If you’re not into spicy food, just cut back on the chili flakes or skip them altogether. The roast will still be full of flavor.
- Make It a Feast: Serve this roast with some Asian-inspired sides like sesame noodles, miso soup, or a fresh cucumber salad. It’ll make the meal feel even more special.
Recipe 5: The Classic 7-Bottom Round Roast
My Go-To Recipe for a Perfect Roast Every Time
Let me tell you something: there’s nothing quite like the satisfaction of pulling a perfectly cooked roast out of the oven. The kind that’s so tender, juicy, and packed with flavor that it makes everyone at the table pause and sigh in appreciation. For me, that roast is the Classic 7-Bottom Round Roast. It’s my go-to recipe, one that always hits the mark. Simple, straightforward, and best of all delicious.
Let me walk you through the way I make it, step by step, and share some tips I’ve picked up along the way.
What’s a 7-Bottom Round Roast?
I remember the first time I heard the name “7-Bottom Round Roast” and thinking, “What on earth is that?” It sounded like some mysterious cut that I would never attempt to cook. But once I gave it a try, I realized what a gem it really is.
The 7-Bottom Round comes from the lower part of the cow’s rear leg. It’s a lean cut, which means there’s not a lot of fat running through it, but don’t let that fool you it’s bursting with flavor. When cooked the right way, it’s juicy, tender, and has that perfect beefy goodness. Think of it as the perfect balance between flavor and tenderness.
This roast is ideal for family meals, dinner parties, or any special occasion. And the best part? You don’t need any fancy cooking techniques to get it right. Just a little patience, attention to detail, and some basic ingredients.
The Ingredients You’ll Need
Now, let’s talk ingredients. One of the reasons I love this roast so much is because it’s so simple no complicated list of things to hunt down. Here’s what you’ll need:
- 1 (3-5 lb) 7-Bottom Round Roast – I usually go for a medium size, but you can adjust based on how many people you’re serving.
- 2 tablespoons olive oil – This is for searing the roast and locking in all the flavor.
- 4 garlic cloves, minced – You can’t have a roast without garlic. It’s the base of all that amazing aroma.
- 1 tablespoon fresh thyme – Fresh herbs make all the difference, but dried thyme works if you’re in a pinch.
- 2 teaspoons kosher salt – Don’t skimp on this. The salt brings out all the natural flavors of the beef.
- 1 teaspoon black pepper – Freshly cracked is always best for that perfect peppery kick.
- 1 cup beef broth – This keeps the roast moist while it’s cooking and creates a rich base for the sauce.
- 1 medium onion, sliced – Onions add a natural sweetness that balances out the richness of the meat.
- 1 cup red wine (optional, but highly recommended) – If I have it, I’ll throw in a bit of wine. It adds a touch of complexity and acidity to the dish.
- 2 tablespoons butter – This is for finishing the sauce and making it nice and silky.
Let’s Get Cooking: Step-by-Step
This roast has become one of my favorite go-to meals. I’m all about meals that require a bit of effort but don’t demand too much of my time. Here’s how I make it:
1. Prepare the Roast
First, I take the roast out of the fridge and let it come to room temperature for about 30 minutes. This helps it cook more evenly. While it’s warming up, I prep everything else mince the garlic, chop the onion, and measure out the herbs and spices. Once that’s done, I generously season the roast with kosher salt and black pepper, rubbing it in well to make sure every inch of the meat is covered. If I’ve got fresh thyme, I rub that in, too.
2. Searing the Roast
Now it’s time to sear the roast. I heat up the olive oil in a large roasting pan or Dutch oven over medium-high heat. When the oil shimmers, I add the roast and sear it on all sides until it’s a beautiful golden-brown. This part is important it locks in all the juices and adds that gorgeous flavor. I usually spend about 4-5 minutes per side, ensuring a nice crust.
3. Roasting the Beef
Once the roast is seared, I toss the sliced onions around it, then pour in the beef broth and red wine (if I’m using it). The liquid helps keep the roast moist and creates a flavorful sauce base. I cover the pan with a lid or aluminum foil, then pop it into a preheated oven at 325°F (165°C).
Now comes the magic: I let the roast cook slowly for about 1.5 to 2.5 hours, depending on the size of the roast and how done I want it. I like to check it every hour, and if the liquid is evaporating, I’ll add a bit more beef broth to keep things moist.
For the best results, I use a meat thermometer. For medium-rare, I pull the roast out at 130°F (54°C). For medium, I go for 140°F (60°C).
4. Resting the Roast
Once the roast is done, I pull it out of the oven and let it rest on a cutting board for about 15-20 minutes. Trust me, this step is key. If you slice the roast too soon, all those delicious juices will pour out, and you’ll be left with dry meat. Resting lets the juices redistribute, so the roast stays tender and juicy.
5. Making the Sauce
While the roast is resting, I make the pan sauce. I place the roasting pan on the stove over medium heat and let the liquid simmer. I use a spoon to scrape up all the flavorful bits stuck to the bottom of the pan this is called deglazing, and it adds tons of flavor to the sauce. I add the butter, let it melt in, and stir until the sauce is glossy and smooth. I taste it and adjust the seasoning with salt and pepper, if needed.
Serving the Roast
Once the roast has rested, it’s time to slice it up. I always cut against the grain to ensure the meat stays tender. I serve it with mashed potatoes, roasted vegetables, or whatever sides I have on hand. But the real showstopper? That rich, flavorful sauce. I drizzle it generously over each slice of beef. It makes all the difference.
My Pro Tips for Success
- Patience is key: Don’t rush this roast. Slow and steady wins the race. A low-and-slow cook always brings out the best flavors.
- Sear the roast: Don’t skip the searing! It seals in the juices and adds that perfect crust.
- Let it rest: This step is non-negotiable. Trust me, you’ll thank me later.
- Experiment with the sauce: Sometimes, I like to add a little Worcestershire sauce or Dijon mustard to the sauce for extra depth. Play around and find your perfect combo.
Why I Love This Roast
Every time I make the Classic 7-Bottom Round Roast, it feels like I’ve struck gold. It’s flavorful, surprisingly easy to make, and looks like something you’d find in a high-end restaurant. And let’s not forget the smell it makes the whole house smell like heaven. What’s not to love?
Recipe 6: Rosemary and Garlic Infused Roast
My Go-To Recipe for Comfort and Flavor
When I think of a meal that wraps me in warmth and satisfaction, the first thing that comes to mind is a rosemary and garlic infused roast. The moment it goes into the oven, the entire house is filled with that mouthwatering aroma, creating a cozy, inviting atmosphere. It’s like the kitchen is giving you a warm hug, making you feel right at home. Over the years, I’ve perfected this recipe, and let me tell you, it’s always a crowd-pleaser. So if you’re ready to take your roast game to the next level, let’s dive in.
Ingredients You’ll Need:
Before we start, here’s what you’ll need. Don’t stress; these are all ingredients that you likely already have on hand, and together, they create something truly special.
- 3-4 lbs of roast (I typically use beef, but lamb or pork works just as well)
- 2 tablespoons olive oil (or butter, depending on your mood)
- 6-8 garlic cloves, finely chopped or smashed
- 3-4 sprigs fresh rosemary, chopped (fresh is key here)
- 1 tablespoon fresh thyme leaves (optional, but it adds an extra depth of flavor)
- Salt and freshly cracked black pepper, to taste
- 1 large onion, cut into quarters (this adds flavor and serves as a natural rack for the roast)
- 1 cup vegetable broth (or wine, if you want to get fancy)
- 2 tablespoons Dijon mustard (optional, but it gives a nice tang to the roast)
Steps to Make the Perfect Roast:
1. Preheat the Oven:
First things first, preheat your oven to 400°F (200°C). This high heat helps get that crispy, golden exterior while keeping all the juicy goodness inside.
2. Prepare the Rosemary-Garlic Mixture:
In a small bowl, combine your chopped garlic and fresh rosemary. Then, drizzle in a good amount of olive oil (or butter, if you’re feeling indulgent). The scent of the rosemary and garlic together? Absolutely divine. If you’re in the mood for a little extra, toss in some fresh thyme. This mixture is going to be the flavor bomb that coats every inch of the roast.
3. Season the Roast:
Time to get hands-on! Pat the roast dry with a paper towel sounds a little odd, I know, but it helps the seasoning stick. Once it’s dry, season it generously with salt and pepper don’t be shy. Then, take that rosemary and garlic mixture and massage it all over the roast. Make sure every nook and cranny gets a good rub-down. This is where the magic happens.
4. Sear the Roast (Optional, But Totally Worth It):
If I’ve got the time, I’ll sear the roast before it goes in the oven. This step is optional, but it creates a beautiful caramelized crust that adds a layer of flavor. Heat some olive oil in a large skillet over medium-high heat, and sear the roast on all sides until it’s golden brown. The sizzling sound and that crispy crust? Pure satisfaction.
5. Set Up the Roasting Pan:
Grab a roasting pan and line the bottom with the quartered onions. Not only do they add great flavor, but they also help keep the roast elevated and cook it evenly. Throw in a couple of sprigs of rosemary around the onions for that extra herbal aroma. Pour in your vegetable broth (or wine if you’re feeling adventurous). The broth keeps the roast moist and infuses it with even more flavor.
6. Roast the Meat:
Place the roast on top of the onions in the pan and pop it into the preheated oven. Roast it for about 15-20 minutes per pound, depending on how you like your roast. For medium-rare, I aim for an internal temperature of 125-130°F (52-54°C), and for medium, around 140°F (60°C). Halfway through, I’ll baste the roast by spooning some of the pan juices over it to keep it moist and packed with flavor.
7. Let the Roast Rest:
Once the roast reaches your desired temperature, take it out of the oven and let it rest for about 10-15 minutes. I know, it’s hard to wait, but trust me, this step is key. Resting allows the juices to redistribute, making the roast incredibly tender and juicy. If you skip this step, the roast just won’t be the same.
8. Carve and Serve:
Now, the fun part slicing and serving. Cut the roast against the grain to ensure it stays tender with every bite. I like to serve it with the roasted onions on the side, and sometimes I’ll drizzle the pan juices over the slices for an extra burst of flavor. It’s the perfect finishing touch.
What to Serve It With:
Now that your roast is ready, here are a few of my favorite side dishes to round out the meal:
- Garlic mashed potatoes – You can never have too much garlic, right? They pair so well with the rosemary flavors.
- Roasted vegetables – I love roasting carrots, Brussels sprouts, and potatoes alongside the roast. They soak up all the delicious flavors and come out caramelized and tender.
- A simple green salad – A fresh, crisp salad helps balance the richness of the roast.
- Crispy roasted potatoes – Think golden, crispy edges with a fluffy interior. Pure perfection.
Recipe 7: Savory Mushroom Gravy Roast
My Ultimate Comfort Meal
Let me tell you, there’s something magical about a roast with mushroom gravy that just feels like home. It’s not just the rich, savory flavors or the way the smell fills the entire house it’s that feeling of warmth and comfort that wraps around you like a soft blanket. When I cook this dish, it’s like I’ve made something so special that it could bring a tear to your eye (in the best way possible). So, put on your apron, roll up your sleeves, and join me in making this savory mushroom gravy roast.
This is my go-to meal when I want to impress without being chained to the kitchen all day. It’s hearty, comforting, and always hits the spot. And let’s not forget the gravy oh, the gravy! It’s rich, velvety, and bursting with flavor. Trust me, the gravy is the star of the show. This roast will make your taste buds sing.
Why I Love This Recipe
What I love most about this dish is its versatility. Whether it’s beef, chicken, or pork, it’s the mushroom gravy that brings everything together. The gravy is earthy and rich, making it perfect with any roast you choose. Every time I make it, people are raving about it. The mushrooms add a depth that no store-bought sauce could ever match, and it’s all homemade.
But honestly, the best part? It’s the gravy. That sauce it’s thick, creamy, and savory, with that umami flavor that keeps you coming back for more. I find myself wanting to pour it over everything: potatoes, veggies, bread you name it. Heck, I’ve even caught myself dipping a spoon just to taste it one more time.
Now, let’s dive into what you’ll need to make this happen.
Ingredients: What You’ll Need for the Roast
For the Roast:
- 1 (4-5 lb) roast (beef is my go-to, but chicken or pork work just as well)
- 2 tablespoons olive oil (for searing)
- 1 tablespoon salt (for seasoning)
- 1 teaspoon black pepper
- 1 teaspoon garlic powder
- 1 teaspoon onion powder
- 1 teaspoon dried thyme (or rosemary if you’re feeling fancy)
- 1 teaspoon smoked paprika (trust me, it adds something special)
For the Mushroom Gravy:
- 2 tablespoons butter
- 2 tablespoons olive oil
- 1 lb mushrooms, sliced (cremini or button mushrooms are my favorites)
- 2 cloves garlic, minced (the more garlic, the better)
- 1 medium onion, finely chopped
- 2 tablespoons all-purpose flour (to thicken the gravy)
- 1 cup beef or chicken broth (depending on your roast choice)
- 1 cup heavy cream (for that rich, creamy texture)
- ½ cup dry white wine (optional, but adds some depth)
- 1 tablespoon soy sauce (it brings out the savory flavor)
- 1 teaspoon Dijon mustard (optional, but gives a nice tang)
- Fresh thyme sprigs (for extra flavor and garnish)
- Salt and pepper to taste (because you need it just right)
Step-by-Step: How I Make the Savory Mushroom Gravy Roast
Step 1: Season and Sear the Roast
The secret to a perfect roast starts with good seasoning. I make sure to rub the roast with all those amazing spices. First, I pat the roast dry with paper towels. It may seem simple, but it really helps the seasoning stick and gives the meat a better sear. Then, I drizzle it with olive oil and generously sprinkle it with salt, pepper, garlic powder, onion powder, thyme, and smoked paprika.
Next, I heat up a large, oven-safe pan over medium-high heat and add a bit of olive oil. Once the pan is nice and hot, I sear the roast on all sides for about 2-3 minutes per side until it’s beautifully golden-brown. This step is essential it locks in all the juices and gives the roast that irresistible flavor.
Step 2: Roast It Up
After the searing, it’s time to pop the roast into the oven. I set the oven to 350°F (175°C) and roast it for about 20 minutes per pound for beef, or 25 minutes per pound for pork and chicken. I use a meat thermometer to make sure it’s cooked just right: 125°F (52°C) for medium-rare beef or 145°F (63°C) for pork and chicken. The smell filling the house while it’s roasting? Absolutely amazing.
Once it’s done, I take it out of the oven, loosely cover it with foil, and let it rest. This step is a must! Resting allows the juices to redistribute, so the roast stays juicy and tender.
Step 3: Making the Mushroom Gravy
Now, the best part: the gravy. I start by heating butter and olive oil in the same pan I used to sear the meat (don’t wash it, all those brown bits are packed with flavor). I toss in the sliced mushrooms and let them cook down for 5-7 minutes. There’s something about hearing the sizzle as they brown and release their juices it’s music to my ears.
Once the mushrooms are browned, I add the minced garlic and chopped onion and cook them for another 3-4 minutes until they’re soft and fragrant. By now, the kitchen smells so good you’ll probably start getting hungry!
Next, I sprinkle in the flour and stir it around for a couple of minutes to make a roux, which helps thicken the gravy. Slowly, I add the beef or chicken broth, whisking constantly to avoid lumps. Then I pour in the white wine (if I’m using it), soy sauce, and Dijon mustard. The wine adds depth, and the soy sauce gives that extra savory punch.
Now, it’s time for the cream. I pour it in, and the gravy starts to come together. I let it simmer for a few minutes to thicken, tasting along the way and adding salt and pepper until it’s perfect. Finally, I toss in some fresh thyme leaves. They not only add flavor but also make the gravy look gorgeous.
Step 4: Serving the Roast
Once the roast has rested, I slice it into thick, juicy pieces. I pile those slices on a platter and generously pour that beautiful mushroom gravy over the top. You want it to be drenched in gravy trust me, that’s the best part.
For sides, I usually serve it with mashed potatoes (they soak up the gravy perfectly) and roasted vegetables. But really, you can pair it with whatever you like just make sure there’s enough gravy to go around!
My Tips for a Perfect Roast
- Don’t skip the searing! That golden crust adds so much flavor and texture.
- Rest the roast before slicing it. It keeps the juices locked in and ensures a tender, juicy roast.
- Use a meat thermometer to avoid overcooking. You’ll thank me later.
- Adjust the gravy to your taste. Want more tang? Add extra mustard. Craving richness? Throw in some cream cheese.
- Make the gravy ahead: You can make it in advance and just heat it up when you’re ready. It only gets better as it sits!
Conclusion
Cooking a 7-Bottom Round Roast in a slow cooker is an experience that blends the art of patience with the reward of flavorful meals. The classic recipe, infused with rosemary and garlic, and the savory mushroom gravy roast offer delightful variations that will satisfy a range of taste preferences.
As you embark on your culinary journey, remember that the anticipation, the sizzle of searing, and the rich aroma filling your kitchen are all part of what makes this dish special. Whether you opt for the classic version or venture into the world of savory enhancements, each recipe will provide you with a memorable, mouthwatering meal. It’s a testament to the joys of slow cooking, where time and ingredients combine to create culinary masterpieces.
So, gather your ingredients, set your slow cooker, and let time and flavors come together in harmonious delight. The 7-Bottom Round Roast in a slow cooker is more than just a meal; it’s a memorable culinary journey that tickles your taste buds and warms your heart. Happy cooking!
With these additional recipes, you’ve taken your culinary skills to the next level. From savory and spicy to rich and exotic, your slow cooker is now a gateway to a world of flavors. The beauty of slow cooking is that it allows you to experiment and create dishes that suit your taste.
So, as you embark on these new culinary adventures, remember that the magic of slow cooking is all about the anticipation, the aromas, and the joy of savoring the end result. And yes, even the humorous moments in the kitchen add a dash of fun to your cooking journey.
So, don your apron, gather your ingredients, and get ready to explore the endless possibilities of 7-Bottom Round Roast in your slow cooker.
And there you have it Spicy 7-Bottom Round Roast Tacos. Every time I make these, it’s like a little celebration in my kitchen. The flavors are bold, the meat is melt-in-your-mouth tender, and every bite is perfectly spiced. Whether you’re feeding a crowd or treating yourself to something special, these tacos never disappoint.
I can’t express enough how much I adore this Asian-Inspired 7-Bottom Round Roast. It strikes the perfect balance between savory, sweet, and spicy, and that glaze is absolutely irresistible. It looks and tastes like something that took all day to prepare, but it’s surprisingly simple to pull off. Whether you’re hosting a dinner party or just treating yourself to something amazing, this roast is sure to impress.
This rosemary and garlic infused roast has become my go-to recipe for so many reasons. It’s easy, yet packed with flavors that make every bite feel special. The garlic gives it that bold punch, while the rosemary adds an earthy, comforting aroma. If you’re looking to impress at your next family dinner or holiday gathering (or even if it’s just a Tuesday and you’re craving something delicious), this roast will never let you down.
This savory mushroom gravy roast has been the star of many dinner tables at my house. Whether I’m cooking for guests or just enjoying a family meal, it always feels like a special occasion. The rich, earthy mushroom gravy perfectly complements the roasted meat, and every bite just feels like a warm, comforting hug. Trust me, once you make this, it’ll become one of your favorite go-to recipes.
Calculate Recipe Calories
World Trade Center Footage | Webex Costs | Virtual Data Rooms | Structures Annuity Settlement | Sell Annuity Payment | Neuson | Online Classes | Nunavut Culture | Online College Course | Motor Replacements | Motor Insurance Quotes | Mortgage Adviser | Met Auto | Tax credit | Help desk software | Home refinancing | Urgent care | Marketing integration | Debt relief | Bitcoin | Fitness center software | Insurance | Gas | Electricity | Weight loss | Sell house for cash | Automotive repair | Loans | Internet marketing | Mortgage | Attorney | SEO specialist | Lawyer | Donate | Conference Call | Treatment | Degree | Software | Credit | Classes | Investing | Recovery | Trading | Rehab | Hosting | Cord Blood | Claim | Automotive warranty | Paintless dent repair | Mesothelioma Law Firm | Massage School Dallas Texas | Low Credit Line Credit Cards | Life Insurance Co Lincoln | Insurance Companies | Injury Lawyers | How to Donate A Car in California | Home Phone Internet Bundle | Holland Michigan College | Royalty-Free Images Stock | Register Free Domains | Psychic for Free | Ph.D. in Counseling Education | Personal Injury Lawyers | Personal Injury Law Firm | PaperPort Promotional Code | Online Stock Trading | Online Motor Insurance Quotes | Donate your Car for Money | Online Colleges | Health Records, Personal Health Record | Hard drive Data Recovery Services | Donate Old Cars to Charity | Forex Trading Platform | Forensics Online Course | Donate Car to Charity California | Donate Car for Tax Credit | Car Insurance Quotes PA | Email Bulk Service | Donating Used Cars to Charity | Donating a Car in Maryland | Donate Your Car Sacramento | Online Criminal Justice Degree | Donate Your Car for Kids | Futuristic Architecture | Donate Cars in MA | Data Recovery Raid | Mesothelioma | A car accident lawyer | Personal injury lawyer | AC repair | Lawsuit settlements | Car insurance | Flood recovery | Water damage restoration | Rehab doctors | Online degree | Online master’s degree | Doctoral programs | Hail car insurance