
7 Best Crockpot Recipes for Delicious Home Cooking
Slow cooking in a crockpot has become a lifesaver for many busy folks out there. It’s like having your personal chef, patiently simmering away while you go about your day. In this article, we’ll delve into the world of crockpot cooking and discover seven of the best crockpot recipes that will leave your taste buds dancing. Let’s get cooking!
When it comes to home cooking, there’s a magical device that can make your life in the kitchen much easier and your meals incredibly flavorful – the crockpot. Whether you’re a busy professional, a parent on the go, or simply someone who loves the convenience of slow-cooked dishes, crockpots are your culinary savior. In this article, we’ll embark on a journey to discover the seven best crockpot recipes that will make your home cooking not only delicious but also a breeze. Get ready to experience the wonder of slow-cooked delights.
Introduction
Home cooking is a joy, but it can be time-consuming. The crockpot, also known as a slow cooker, has revolutionized the way we prepare meals. It’s a device that allows you to toss ingredients in, set it, and forget it until your home is filled with the enticing aroma of a fully cooked meal. In this article, we’ll explore seven top crockpot recipes that will make your home cooking journey easier and more delightful. From hearty chili to savory stews, we’ve got you covered.Imagine coming home after a long day, opening your front door, and being greeted by the enticing aroma of a home-cooked meal. Thanks to the wonder of crockpot cooking, this dream can become a delicious reality. In this guide, we will embark on a culinary journey through seven delectable crockpot recipes that are perfect for creating mouthwatering dishes with minimal effort. From classic chili to vegetarian stew, these recipes are sure to make home cooking a delightful experience.
Recipe 1: Slow-Cooked Chili
My Go-To Comfort Food
I don’t know about you, but there’s something about slow-cooked chili that just feels right. It’s one of those dishes that I turn to whenever the weather gets cold or I need something that hits the spot without any hassle. I’ve made this chili more times than I can count, and each time, it gets better. The beauty of slow-cooked chili is that the flavors get richer the longer they simmer. It’s a magical process, really just set it and forget it.
Calculate Recipe Calories
Let me walk you through it this isn’t just any chili; this is my comfort food, my little piece of cozy heaven. So grab a cup of coffee (or maybe a glass of wine I’m not judging), and let’s get started.
Why I Love Slow-Cooked Chili
The thing I love most about slow-cooked chili is how hands-off it is. There’s no constant stirring or babysitting the pot. I just toss everything into the slow cooker, set it to cook, and let time work its magic. As it simmers away, the spices and ingredients meld together into a rich, hearty dish that’s perfect for chilly nights.
And the leftovers? Don’t even get me started. Chili is always better the next day, and it freezes so well. So, not only do I get a delicious dinner tonight, but I get to look forward to an amazing lunch tomorrow. It’s the gift that keeps on giving.
Ingredients: The Foundation of Flavor
Before we dive into the magic of cooking, let’s talk ingredients. I’m a firm believer that a simple list of quality ingredients makes all the difference. Here’s what you’ll need to make this comforting bowl of chili.
The Main Players:
- 1 pound of ground beef – I always go with 80/20 because it gives the perfect balance of richness without being greasy.
- 1 large onion – I dice it finely so it softens beautifully as it cooks.
- 2 cloves garlic – Minced. Honestly, garlic is a game-changer.
- 1 bell pepper – I like red, but any color works. It adds a touch of sweetness and a great texture.
Beans & Tomatoes:
- 1 can of kidney beans, drained and rinsed
- 1 can of black beans, drained and rinsed
- 1 can of pinto beans, drained and rinsed (optional, but I love the variety)
- 1 can of diced tomatoes (14 oz)
- 1 can of crushed tomatoes (14 oz)
- 1 small can of tomato paste (6 oz) – This thickens the chili and deepens the tomato flavor.
Seasonings & Spices:
- 2 tablespoons chili powder – This is the heart and soul of your chili’s flavor.
- 1 tablespoon cumin – Adds that smoky, earthy goodness.
- 1 teaspoon smoked paprika – Trust me, it makes all the difference.
- 1 teaspoon oregano – A pinch of herbal goodness.
- 1/2 teaspoon cayenne pepper – For a bit of heat (adjust to your spice preference).
- Salt and black pepper – To taste, of course.
Liquids & Extras:
- 1 ½ cups of beef broth – This adds richness and helps get the right chili consistency.
- 1 tablespoon Worcestershire sauce – My secret ingredient. It brings everything together and adds a little zing.
Optional Toppings (Because, let’s be honest, toppings are everything):
- Shredded cheddar cheese – Because chili and cheese are a match made in heaven.
- Sour cream – A cool, creamy contrast to the heat.
- Fresh cilantro – A pop of color and freshness.
- Tortilla chips or cornbread – For dipping, of course.
Let’s Get Cooking: Step-by-Step
Now that we’ve got everything we need, it’s time to cook. Here’s how I do it:
Step 1: Brown the Meat
First, I brown the ground beef in a large skillet over medium-high heat. I use a spatula to break it up as it cooks, making sure it’s nice and crumbly. Once it’s fully browned and there’s no pink left, I drain any excess fat. The goal here is to keep the chili rich, but not greasy.
Step 2: Sauté the Vegetables
While the beef is cooking, I chop up the onion, bell pepper, and garlic. Once the beef is done, I toss those veggies into the same skillet. Don’t you dare throw away that beefy fond at the bottom of the pan! I sauté them for about 5 minutes until the onion is soft and translucent. The smell? Heaven.
Step 3: Transfer Everything to the Slow Cooker
Now that the beef and veggies are ready, I transfer them to my slow cooker. I add the beans, tomatoes, and tomato paste, followed by the beef broth and Worcestershire sauce. I sprinkle in all the spices and give everything a good stir.
Step 4: Slow Cook for Hours of Flavor
This is the part where I just sit back and let the slow cooker do its thing. I set it on low and let it cook for about 6 to 8 hours. The house starts smelling incredible, and I can feel my stomach rumbling in anticipation. If I’m in a rush, I’ll set it on high for 3-4 hours, but honestly, low and slow is where the magic happens.
Step 5: Taste and Adjust
When the chili’s done, I take a spoon and give it a taste. It’s usually perfect, but sometimes I’ll add a little more salt, pepper, or cayenne depending on my mood. If it’s too thick, I’ll add a splash more broth. If it’s too thin, I’ll let it cook a bit longer with the lid off to thicken it up.
Step 6: Serve It Up!
Finally, I ladle the chili into bowls and top it with shredded cheddar, a dollop of sour cream, and a sprinkle of fresh cilantro. Maybe a few crushed tortilla chips for some crunch. It’s the perfect bowl of comfort, and it’s exactly what I need to warm up after a long day.
Pro Tips for the Best Chili
- Let It Sit: Chili always tastes better the next day. If you’ve got the time, make it the day before and let it sit in the fridge overnight. The flavors just get richer.
- Customize It: Chili is super versatile. If you’re not into beans, you can leave them out and add more meat or veggies. Want a vegetarian version? Skip the meat and add more beans and veggies.
- Toppings are Key: Don’t skip the toppings. A little cheese, sour cream, and cilantro will take your chili from good to great.
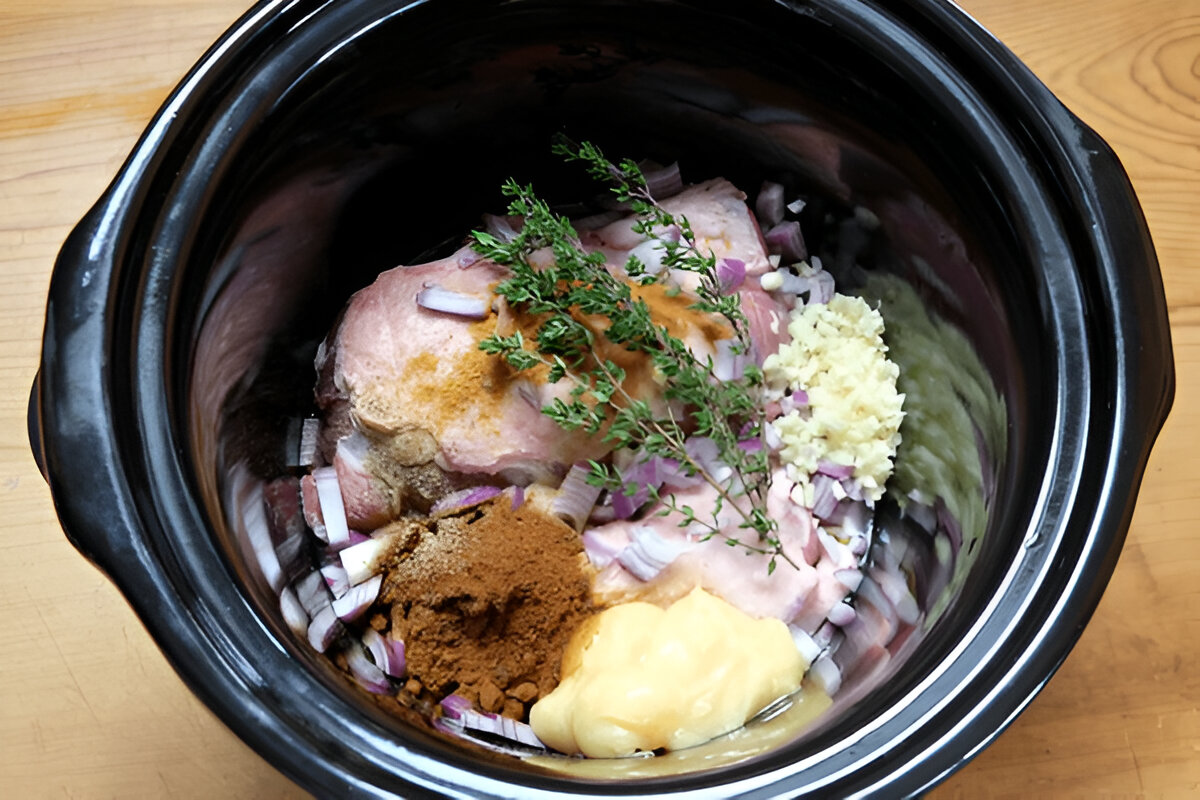
Recipe 2: Tender Pulled Pork
My Go-To Recipe for Perfection Every Time
There’s something so incredibly satisfying about a perfect pulled pork sandwich, don’t you think? The kind where the meat is so tender that it practically falls apart with just a gentle tug. Every bite is a mouthful of smoky, savory, and sweet goodness. I’ve made this recipe countless times, and honestly, it never disappoints. Whether I’m hosting a backyard BBQ, enjoying a cozy Sunday dinner, or prepping meals for the week, this tender pulled pork always steals the show. Let me walk you through how I make it – simple, fuss-free, and totally delicious.
What You’ll Need: Keeping It Simple
When it comes to pulled pork, I believe in keeping things as straightforward as possible. No need for fancy ingredients or complicated steps. Just a few quality items that really let the pork shine. Here’s what I use:
For the Pork:
- Pork Shoulder (Boston Butt) – This cut is the star. It’s marbled with fat, which makes the meat incredibly tender as it cooks. Trust me, you want this cut for pulled pork.
- Salt and Pepper – Basic but essential. Don’t skimp on the salt; it brings out the natural flavors of the pork.
- Olive Oil – For searing the pork before it goes into the slow cooker or oven.
- Apple Cider Vinegar – Helps tenderize the pork and gives it a nice tang.
- Garlic Powder and Onion Powder – These spices are the backbone of flavor. They make the pork taste like it’s been slow-cooked all day, even though it’s only a few hours.
- Paprika and Cumin – These two add a smoky, earthy depth to the pork.
- Brown Sugar – A touch of sweetness to balance all those savory flavors.
- Liquid Smoke (optional) – If you’re craving that smoky flavor but don’t have a smoker, a few drops of liquid smoke will do wonders.
For the BBQ Sauce:
- BBQ Sauce – I usually reach for a store-bought brand I love, but if you’re feeling adventurous, I’ll share a simple homemade BBQ sauce recipe too.
- Apple Cider Vinegar and Honey – A splash of these two adds a nice balance of tang and sweetness to the sauce.
Step-by-Step: Cooking the Pork
Alright, here’s where the magic happens. This is the part where things get a little messy – but in the best way possible. Let’s dive in.
Step 1: Seasoning the Pork
First thing’s first – season that pork shoulder! I sprinkle salt, pepper, garlic powder, onion powder, paprika, cumin, and brown sugar all over the pork. Be generous with it, coating the meat evenly on all sides. Then, give it a good rubdown to really work those spices in. This seasoning creates a flavorful crust while the pork cooks, making each bite even more amazing.
Step 2: Searing the Pork
While this step isn’t absolutely necessary, I love doing it because it adds so much depth to the flavor. Heat a little olive oil in a large pan over medium-high heat. Once the oil is hot, add the pork shoulder and sear it on all sides until it’s golden brown. This only takes a few minutes, but those caramelized bits add so much flavor. Once it’s done, take the pork out of the pan and set it aside. Don’t clean the pan – you’ll want to keep all that flavor in there for later.
Step 3: Slow-Cooking Magic
I’m all about that low and slow cooking when it comes to pulled pork. Here are a few options for how to cook it:
Slow Cooker
This is my preferred method because it’s pretty much foolproof. After searing the pork, I place it in the slow cooker, pour in about half a cup of apple cider vinegar (it helps tenderize the pork and adds tang), and usually a bit of water or broth to keep things moist. Then, I set the slow cooker to low and walk away. Eight hours later, I’m treated to melt-in-your-mouth pork that’s begging to be shredded.
Oven
If I don’t have time for the slow cooker, the oven works just as well. Preheat it to 300°F (150°C), place the seared pork in a roasting pan, and cover it with foil. After about 4-5 hours, the pork will be so tender that it falls apart easily with a fork. I always check around the four-hour mark, and if it’s shredding easily, I know it’s ready.
Pressure Cooker (Instant Pot)
In a rush? No problem. My Instant Pot is a lifesaver in these moments. I pop the seared pork in the pot with a cup of apple cider vinegar and a little water, then set it to high pressure for 90 minutes. In just over an hour, I’ve got super tender pulled pork, no fuss.
Step 4: Shredding the Pork
Once the pork is done and your kitchen smells like heaven, it’s time to shred. The pork should be so tender that it falls apart easily with just a fork. I use two forks to shred it into bite-sized pieces, and then I mix all the juices in the pot with the shredded pork. That’s where the magic happens – the pork soaks up all those flavorful juices, making every bite juicy and delicious.
Step 5: The Sauce
This step is all about personal preference. I usually pour my favorite BBQ sauce right over the shredded pork and mix it in, but if you’re in the mood to get a little more hands-on, here’s a quick BBQ sauce I love to whip up:
Quick BBQ Sauce:
- 1 cup BBQ sauce (use your favorite brand)
- 1 tablespoon apple cider vinegar
- 1 tablespoon honey
Mix those together in a bowl, then pour it over the shredded pork. Stir it in and let the pork absorb all that tasty sauce.
How to Serve Tender Pulled Pork
Now for the fun part – serving it! Pulled pork is so versatile, and there are so many ways to enjoy it. Here are some of my favorites:
- Pulled Pork Sandwiches – You can’t go wrong with this classic. Pile the tender pork on a soft bun, add some tangy coleslaw, and maybe a pickle or two. Perfect sandwich.
- Pulled Pork Tacos – Soft tortillas, pulled pork, a squeeze of lime, and fresh cilantro. Simple, fresh, and absolutely delicious.
- Pulled Pork Nachos – Layer tortilla chips with pulled pork, cheese, and jalapeños, then bake until everything is melty. Top with sour cream and guacamole – pure bliss.
- Pulled Pork Bowls – Serve the pork over rice, quinoa, or roasted veggies. Top with salsa, avocado, or shredded cheese for a satisfying meal.
- Pulled Pork and Veggies – Sometimes I keep it simple and serve the pulled pork with some roasted veggies for a hearty, filling dish.
Recipe 3: Hearty Beef Stew
A Recipe That Feels Like Home
There’s one dish in my kitchen that’s always been there for me a hearty beef stew. I can’t even count the times I’ve made it over the years. Each time, it’s a little different, but the heart of it remains the same. This stew is more than just a meal. It’s a warm hug in a bowl, and honestly, who doesn’t need a little comfort food like that?
The first time I made beef stew was on a rainy Sunday. It was one of those days where you just want to curl up with something hearty and delicious. I didn’t have a recipe in mind, but I had the ingredients beef, vegetables, broth and a gut feeling that this would be something I’d make again. And I was right. Since then, I’ve perfected it, making it my own, and now I’m excited to share it with you. Grab your pot, let’s make something great together.
Why This Beef Stew Works
This stew? It’s a total game-changer. It’s got everything a perfect balance of savory, comforting, and filling. I’ve made it for family, for friends, and every single time, they rave about it. And the best part? It’s ridiculously easy. No fancy ingredients or tricky steps. Just simple, hearty ingredients doing their thing.
The beef becomes so tender as it simmers, the veggies soak up all those delicious flavors, and the result is nothing short of magic. Plus, you can make this on the stovetop, in a slow cooker, or in a Dutch oven. Whatever tools you’ve got, this stew’s got you covered.
What You’ll Need
Before we get started, let’s make sure you’ve got everything on hand. Having all your ingredients ready to go makes everything so much smoother. Here’s the list:
- 2 lbs beef stew meat (I swear by chuck roast it’s tender and flavorful when slow-cooked)
- 4 cups beef broth (I prefer low-sodium so I can adjust the seasoning)
- 1 medium onion, chopped
- 3 cloves garlic, minced
- 4 large carrots, peeled and chopped into 1-inch pieces
- 3 large potatoes, peeled and diced
- 2 cups parsnips, peeled and cut (optional, but they add a nice, earthy sweetness)
- 1 cup celery, chopped
- 1 cup frozen peas (add these at the end for a pop of color and sweetness)
- 2 tablespoons tomato paste
- 2 teaspoons dried thyme
- 1 teaspoon dried rosemary
- 1 bay leaf
- Salt and pepper, to taste
- 2 tablespoons olive oil (for browning the beef)
- 2 tablespoons all-purpose flour (if you like your stew thicker)
- 1 cup red wine (optional, but trust me, it adds depth)
Got everything? Great, let’s dive in!
Step-by-Step: How to Make the Perfect Hearty Beef Stew
Step 1: Brown the Beef
This part is crucial. Don’t skip it! Heat up your large pot or Dutch oven over medium-high heat and pour in the olive oil. Once the oil is hot, add the beef in batches to ensure it gets that perfect sear. You want a deep brown crust on the meat. It might take about 5-7 minutes. Don’t rush it! Once browned, set the beef aside.
Step 2: Sauté the Aromatics
In the same pot, lower the heat a bit and toss in the chopped onion and garlic. You’ll smell it instantly. Sauté for about 3-4 minutes until the onion is soft and translucent. Then, add the tomato paste and cook for another 1-2 minutes to deepen the flavor. Trust me, it makes a big difference.
Step 3: Add the Wine (Optional)
If you’re using wine, pour it in now. I usually go for a nice red wine because it adds a richness that takes this stew to the next level. Use a wooden spoon to scrape up all those brown bits stuck at the bottom of the pot those bits are packed with flavor. Let the wine simmer for 2-3 minutes, just to cook off the alcohol and reduce a bit.
Step 4: Bring It All Together
Now, throw the browned beef back in and pour in the beef broth. Toss in the thyme, rosemary, and bay leaf, and season with salt and pepper. Stir it all together, bring it to a boil, then reduce the heat to low. Cover the pot and let it simmer for about 1 hour. The longer it cooks, the more flavorful it gets, so be patient.
Step 5: Add the Veggies
After an hour, it’s time to add the vegetables. In go the carrots, potatoes, parsnips, and celery. Stir everything together, cover the pot again, and let it simmer for another 30-40 minutes until the veggies are tender and the beef is falling apart.
Step 6: Thicken the Stew (Optional)
Want a thicker stew? Now’s the time to add flour. Mix the flour with a little water to make a paste, then stir it into the stew. Let it simmer for another 10 minutes to thicken up. It’ll give your stew that rich, hearty texture.
Step 7: Final Touches
Before serving, give it a taste and adjust the seasoning. Add a little salt or pepper if needed. Stir in the frozen peas and cook for a couple of minutes until they’re tender and bright green.
Step 8: Serve It Up
Ladle the stew into bowls and maybe sprinkle a little fresh parsley on top for color. Serve it with some crusty bread on the side perfect for dipping and soaking up that rich broth.
Tips for Perfecting Your Stew
- Brown the beef properly: Don’t rush this step. You want a deep, golden brown color because that’s where the flavor is.
- Use good broth: Since the broth is the base of the stew, make sure it’s something you love. Homemade is always best, but store-bought works just fine.
- Customize the veggies: Feel free to swap out veggies based on what you’ve got or what you love. Sweet potatoes, turnips, or parsnips all work great.
- Make it ahead: This stew gets even better the next day, so don’t hesitate to make a big batch.
Recipe 4: Creamy Chicken Alfredo
The Comfort Dish I Can’t Resist
There’s just something about those days when the world feels a little too much, and all I want to do is collapse on the couch, wrapped up in comfort food. When that craving hits, creamy chicken alfredo is always the answer. Rich, creamy, and downright comforting, it’s the kind of meal that feels like a warm hug in a bowl. Every time I make it, I’m reminded why it’s one of my all-time favorites. It’s honestly as much fun to prepare as it is to eat.
I think what I love most about this dish is the harmony of flavors – the juicy chicken, the luxurious alfredo sauce, and that fettuccine pasta perfectly drenched in creamy goodness. And then there’s the Parmesan. If I’m being real with you, it’s like the cherry on top. This dish feels so decadent, yet it’s surprisingly simple to whip up. It’s the kind of meal that gives you restaurant vibes without the hefty price tag.
So, let’s do this! Grab your apron, and let’s get cooking together.
Here’s What You’ll Need:
- 2 boneless, skinless chicken breasts (about 1 lb)
- 3 tablespoons olive oil
- Salt and black pepper (to taste)
- 3 cloves garlic, minced
- 1 cup heavy cream
- 1 cup whole milk
- 1 ½ cups freshly grated Parmesan cheese (seriously, don’t skimp on this)
- 8 oz fettuccine pasta
- 2 tablespoons unsalted butter
- 1 tablespoon flour (to thicken the sauce)
- Fresh parsley, chopped (optional, but adds a pop of color)
- Crushed red pepper flakes (for a little kick, optional)
Let’s Break It Down, Step-by-Step:
Step 1: Cook the Chicken
First things first, we’ve got to cook the chicken – the star of this dish. I season both sides of my chicken breasts generously with salt and pepper. Don’t be shy, this is where the flavor starts to build.
Next, heat up about 2 tablespoons of olive oil in a large skillet over medium heat. When it’s nice and hot (you’ll see it shimmering), add your chicken breasts. Let them sear for 6-7 minutes on each side, until they’re golden brown and cooked through. I always use a meat thermometer to make sure the internal temperature hits 165°F, but if you don’t have one, just cut into the center to check.
Once they’re cooked, remove them from the skillet and let them rest for a few minutes. Don’t slice them just yet – let the juices settle so the chicken stays nice and tender.
Step 2: Cook the Pasta
While the chicken is taking its break, let’s cook the pasta. Bring a big pot of salted water to a boil, then toss in your fettuccine. Cook it according to the package directions, usually 9-11 minutes, until it’s al dente. We don’t want it mushy!
Once the pasta is done, drain it, but save a cup of that pasta water. Trust me, we’ll need it later when making the sauce. Set the pasta aside for now.
Step 3: Make the Alfredo Sauce
Here comes the good part. In the same skillet where you cooked the chicken, melt the butter over medium heat. Once it’s melted and bubbling, throw in the garlic and cook it for about 30 seconds. The smell is amazing, right? Just be careful not to burn the garlic; we want it fragrant, not bitter.
Now, sprinkle the flour over the garlic-butter mix. Stir it constantly for 1-2 minutes to get rid of any lumps. This is the base that will thicken our sauce. Once it’s smooth, pour in the heavy cream and milk, whisking it all together. Watch as it transforms into a silky, velvety sauce.
Let it simmer for about 5 minutes, stirring occasionally. You’ll notice it thickening up. If it gets too thick, just add a bit of that pasta water until the sauce reaches the perfect consistency.
Once it’s smooth and creamy, stir in the Parmesan cheese. This is where it all comes together. The cheese melts in, making the sauce so luscious, you’ll almost want to dive right into the skillet.
Step 4: Put It All Together
Okay, it’s time to bring everything together. Add the cooked fettuccine pasta into the skillet with the sauce. Toss it all together, making sure every strand is coated in that glorious sauce. If you’re feeling extra fancy, add some sliced chicken on top for that perfect bite of both pasta and protein.
If you like a bit of heat, sprinkle in some crushed red pepper flakes. It’s totally optional, but it gives the dish a nice little kick.
To finish it off, I like to garnish with a sprinkle of fresh parsley. It adds color and a bit of freshness that cuts through the richness of the sauce. Plus, it just makes the dish look fancy – who doesn’t love that?
Step 5: Serve and Enjoy
Now, the moment we’ve been waiting for! Spoon the creamy chicken alfredo onto plates, making sure to get a little chicken and pasta in every bite. And if you’re anything like me, you’ll probably top it with even more grated Parmesan because, well, more cheese is always a good idea.
A Few Tips from Me:
- Freshly grated Parmesan is a game changer: Don’t even think about using the pre-grated stuff. Freshly grated Parmesan melts so much better and gives the sauce that smooth, luxurious texture you’re looking for.
- Don’t forget the pasta water: That starchy pasta water is key to making the sauce cling to the pasta. It’s liquid gold, so don’t throw it out!
- Don’t overcook the chicken: Dry, overcooked chicken is the worst. Use a thermometer or do a quick knife test to ensure it’s cooked but still juicy.
- Add your own twist: I love throwing in extra veggies like spinach or sun-dried tomatoes. Mushrooms also make a nice touch. You do you!
Why I Love This Dish:
Creamy chicken alfredo has this magical way of making everything feel better. It’s easy, indulgent, and guaranteed to put a smile on your face. Whether I’m cooking for a family dinner, a cozy night in, or just because I’m craving comfort food, this dish never disappoints. The best part? It’s a total crowd-pleaser and way easier than you’d think.
So, the next time you’re in the mood for something rich and comforting, give this creamy chicken alfredo a try. I promise, it’ll become one of your go-to meals too.
Savory Vegetable Soup
Recipe 5:
Savory Vegetable Soup: A Cozy Bowl of Comfort
There’s something about a big pot of savory vegetable soup simmering on the stove that feels downright magical. The aroma fills the entire house, making everything feel warm and inviting. It’s one of those dishes I’ve been making for years, especially when the weather gets chilly and I’m craving something hearty but healthy. I still remember the first time I made it it was one of those days when I wanted something easy, nutritious, and cozy. The result was a big win. Ever since then, it’s become my go-to comfort meal.
What I love most about this vegetable soup is how simple it is yet packed with flavor. There’s no need for fancy ingredients or complicated techniques. You just throw together fresh, seasonal veggies, a flavorful broth, and a few spices. It’s the kind of recipe I can make in big batches, store in the fridge, and enjoy all week long perfect for meal prep or those days when I want something quick and satisfying.
Gathering the Ingredients: Fresh and Simple
I usually start with a quick trip to the farmer’s market or my local grocery store to grab what I need. Here’s everything I toss into the soup:
- 1 medium onion – It’s what creates the savory base for the soup.
- 2 garlic cloves – Minced, of course. Garlic brings a bold punch of flavor.
- 2 carrots – Their sweetness balances the savory flavors.
- 2 celery stalks – For a fresh crunch, adding vibrancy to the soup.
- 1 medium potato – It makes the soup hearty and soaks up all the good stuff from the broth.
- 1 zucchini – It softens up nicely and adds a mild, tender flavor.
- 1 cup green beans – They give the soup a little snap and texture.
- 1 can diced tomatoes – Adds acidity and depth to the broth.
- 6 cups vegetable broth – This ties everything together into a comforting liquid.
- 1 teaspoon dried thyme – The earthy aroma of thyme is a must for flavor.
- 1 teaspoon dried basil – Adds a fresh, peppery bite that complements everything else.
- 1 bay leaf – A simple touch, but crucial for a richer flavor.
- Salt and pepper – Essential for bringing all the flavors to life.
- 2 tablespoons olive oil – For sautéing the onions and garlic.
- 1 cup frozen peas – I add these last to keep them bright and sweet.
- Fresh parsley – A sprinkle on top finishes the soup with a pop of color and freshness.
The Cooking Process: Simple Steps for Maximum Flavor
- Chop Everything Up
I start by chopping all the veggies onion, garlic, carrots, celery, zucchini, and potatoes. It takes a little time, but the more evenly chopped everything is, the better the soup will turn out. Plus, there’s something so satisfying about chopping fresh vegetables. The colors pop, and it feels like everything’s falling into place for a great meal. - Sauté the Aromatics
I heat some olive oil in a large pot over medium heat. Once the oil is hot, I toss in the onions. I let them cook for about 5 minutes, stirring occasionally, until they’re soft and translucent. Then, I add the minced garlic and cook for another minute. That’s when the kitchen starts to smell amazing, and I know the soup is going to be delicious. - Add the Vegetables
Next, I add the carrots, celery, zucchini, and potatoes to the pot. I give everything a good stir, letting the veggies mix with the onions and garlic. The colors are beautiful orange carrots, green zucchini, and the earthy brown of the potatoes. I can already smell the savory flavors coming together. - Pour in the Broth and Tomatoes
I pour in the 6 cups of vegetable broth, making sure all the veggies are covered. Then I add the can of diced tomatoes, juices and all, for a little acidity and depth. To really bring out the flavor, I toss in the dried thyme, basil, and bay leaf. A quick stir, and the soup is on its way to being magical. - Simmer the Soup
I bring the soup to a boil, then reduce the heat to low and let it simmer uncovered for 25–30 minutes, stirring occasionally. During this time, the vegetables become tender, and the broth turns into a rich, flavorful base. I know the soup is ready when the potatoes are soft and everything is perfectly tender. - Add the Peas and Final Seasoning
With about 5 minutes left in the cooking time, I add the frozen peas. I like to add them last so they stay bright and sweet. Then I taste the soup and adjust the seasoning with salt and pepper. Sometimes, I toss in a little more thyme if I want it extra flavorful. - Garnish and Serve
When the soup is ready, I ladle it into bowls and top each one with a sprinkle of fresh parsley. The parsley gives the soup a burst of color and a fresh finish. Now, it’s time to dig in. There’s nothing like enjoying a bowl of homemade soup on a cool evening.
Why This Soup is So Special
For me, this savory vegetable soup isn’t just about filling my stomach it’s about creating something from scratch that’s healthy, comforting, and full of flavor. Every ingredient adds its own personality to the dish, from the sweetness of the carrots to the earthiness of the thyme and the tender potatoes. It’s one of those meals where the whole is definitely greater than the sum of its parts.
It’s also incredibly versatile. You can throw in whatever veggies you have lying around. Got some spinach, kale, or corn? Throw it in! The soup will still taste fantastic. And I love how well it keeps if I make a big batch, it lasts for several days, and the flavors just get better. Sometimes I even freeze individual servings for those nights when I don’t feel like cooking.
Recipe 6: Sweet and Tangy Barbecue Ribs
My Ultimate Go-To Recipe
There’s something about barbecue ribs that hits differently, don’t you think? Whether it’s the smoky flavor, the sweet-and-tangy sauce, or that fall-off-the-bone goodness, nothing says comfort food quite like a plate of perfectly cooked ribs. Over the years, I’ve perfected my Sweet and Tangy Barbecue Ribs recipe, and trust me, they’ve become a staple at every summer cookout and family dinner. I’m not kidding when I say these ribs are something special.
I’ve learned a lot along the way especially when it comes to balancing sweetness, tanginess, and smokiness. So let’s dive in this recipe isn’t just about cooking ribs; it’s about crafting an experience, one that’ll have everyone coming back for more.
Picking the Right Ribs
Before we even start talking about the sauce or seasoning, let’s talk about the most important thing: the ribs. You’ve got two main options here: baby back ribs and spare ribs.
- Baby back ribs are smaller, leaner, and a little more tender. They cook faster and tend to have a sweeter flavor.
- Spare ribs are larger, meatier, and a bit fattier, which makes them juicier and heartier.
For this recipe, I’m all about baby back ribs. They’re just so tender and cook beautifully, whether in the oven or on the grill. But honestly, you can’t go wrong with either type both will be delicious with this recipe.
Ingredients You’ll Need
For this dish, I always make my own sweet and tangy barbecue sauce, and trust me, it’s worth it. Homemade sauce just has that extra something that store-bought versions can’t match.
For the Ribs:
- 2 racks of baby back ribs (about 2-3 pounds)
- Salt (to taste)
- Black pepper (to taste)
- Garlic powder (because garlic makes everything better)
- Paprika (adds that subtle smokiness)
- Brown sugar (for that caramelized, sticky sweetness)
For the Sweet and Tangy Barbecue Sauce:
- 1 cup ketchup (basic but essential)
- 1/2 cup apple cider vinegar (adds that zing)
- 1/4 cup honey (for that touch of sweetness)
- 1/4 cup brown sugar (again, sweetness is key)
- 1 tablespoon Worcestershire sauce (adds richness)
- 1 tablespoon Dijon mustard (for a little kick)
- 1/2 teaspoon smoked paprika (smokiness, obviously)
- 1 teaspoon chili powder (for a bit of heat)
- 1/2 teaspoon garlic powder
- 1/2 teaspoon onion powder
- 1/2 teaspoon black pepper
- Salt, to taste
Feel free to tweak the ingredients as you go add more honey for sweetness or more vinegar for tang. I’ve made this sauce so many times, and it always feels just right.
The Rib Prep
Now comes the fun part. If you’ve never cooked ribs before, don’t worry I’ve got your back.
1. Remove the Membrane
Ribs can be intimidating, but this step is key. There’s a membrane on the back of the ribs that can be tough and chewy, so we’re going to remove it.
Here’s how:
- Flip the ribs so the bone side is facing up.
- Use a butter knife to gently lift one end of the membrane.
- Once you have a good grip, pull it off with your fingers or a paper towel (it helps with grip). It should come off in one solid piece.
Removing the membrane ensures the seasoning and sauce actually get into the meat, making it tender instead of tough.
2. Season the Ribs
Once the membrane is gone, it’s time to season. Generously sprinkle salt and black pepper all over the ribs. Then, add garlic powder, paprika, and brown sugar. I like to rub the seasoning in with my hands, really massaging it into the meat. Let the ribs sit for about 30 minutes so all those flavors can sink in.
Pro tip: If you want to take it to the next level, prep the ribs the night before and let them marinate in the fridge overnight. It really boosts the flavor and tenderness.
3. Preheat Your Oven or Grill
Now, you’ve got a couple of options for cooking these ribs. I love the oven method because it’s hands-off and nearly foolproof.
- Oven Method: Preheat to 275°F (135°C). This low-and-slow approach ensures the ribs cook perfectly without drying out.
- Grill Method: If you prefer grilling, set your grill to medium heat (around 350°F or 175°C) and cook the ribs on the cooler side of the grill for indirect cooking.
Cooking the Ribs
Oven Method:
Once the oven’s preheated, place the ribs on a baking sheet lined with foil. I like to cover them with another layer of foil, making a little pouch. This keeps the ribs moist as they cook, and trust me, moisture is key.
- Pop the ribs in the oven for 2.5 to 3 hours. You want them tender and juicy but not falling apart. Halfway through, check the ribs to make sure they’re not drying out. If needed, add a little water.
- After they’re tender, take them out and brush on a generous layer of your homemade barbecue sauce. Put them back in the oven (uncovered) for another 15-20 minutes to let the sauce caramelize and get all sticky and delicious.
Grill Method:
If you’re grilling, place the ribs on the cool side of the grill (indirect heat) and cover. Grill them for 1.5 to 2 hours, flipping once. About 15 minutes before they’re done, brush on the barbecue sauce. You don’t want the sauce to burn, but you do want it to get that perfect glaze.
Making the Sweet and Tangy Barbecue Sauce
While the ribs are cooking, let’s whip up that sauce. It’s the secret that’ll take your ribs to the next level.
- Combine all the ingredients in a saucepan and heat them over medium heat.
- Stir it all together and bring it to a simmer. Let it cook for 15-20 minutes, stirring occasionally. The sauce should thicken and darken as it simmers.
- Taste it. If it’s too tangy, add a little more honey. If you want it richer, add a splash more Worcestershire sauce. Adjust it to your taste.
Serving the Ribs
Once the ribs are done, take them out of the oven or off the grill and let them rest for about 5 minutes. This step helps the juices redistribute, making the ribs even more flavorful.
Slice them up, drizzle with extra sauce, and serve. These ribs go perfectly with classic sides like corn on the cob, coleslaw, or potato salad but honestly, you can’t go wrong.
Recipe 7: Mouthwatering Dessert – Chocolate Lava Cake
A Personal Guide
You know that moment when you make a dessert, and it feels like you’ve just unlocked some secret level in the world of gourmet baking? For me, that moment always happens when I whip up Chocolate Lava Cake. The kind where the cake looks totally innocent on the outside, but when you break it open, a warm, molten river of chocolate pours out. It’s like magic, but it’s totally real. Every time I make it, I get that feeling of being a total kitchen wizard, and I’m sure you’ll feel the same way too once you try it.
Making this dessert is easier than you might think. I’m going to walk you through my version of it trust me, once you’ve done it a couple of times, you’ll feel like you’ve been baking lava cakes your whole life.
Why I Can’t Get Enough of Chocolate Lava Cake
Alright, let’s talk about why this dessert is so irresistible. The texture, my friends, is the star of the show. The outside of the cake is slightly firm, but as soon as you cut into it, the inside is like soft, warm chocolate lava. It’s a delightful contrast the outer cake and the gooey center that flows out when you break in. There’s no other dessert I can think of that’s as indulgent or as satisfying as this one. The best part? It’s not complicated. You don’t need a ton of fancy ingredients or advanced skills to make this at home.
Let me show you how I nail that perfect gooey center while keeping the cake’s exterior just right.
Ingredients You’ll Need:
I keep it simple, and you probably have most of these ingredients already. But if not, no worries everything’s easy to grab. This recipe makes 4 individual lava cakes:
- 1/2 cup (115g) unsalted butter – This gives the cake richness and moisture.
- 6 oz (170g) high-quality semi-sweet or bittersweet chocolate – I always use good chocolate here; it really makes the difference. Semi-sweet is usually my go-to for a perfect balance of sweetness.
- 1 cup (120g) powdered sugar – Gotta keep it sweet, right?
- 2 large eggs
- 2 large egg yolks – Yes, you’ll have extra egg whites, but I promise you won’t have to throw them away! There’s always something you can do with them.
- 1 teaspoon vanilla extract – For that touch of flavor.
- 1/4 cup (32g) all-purpose flour – Just enough to help bind it all together.
- A pinch of salt – Chocolate and salt? A winning combo.
- Butter or non-stick spray – For greasing the ramekins.
- Cocoa powder – A light dusting ensures the cakes don’t stick to the ramekins.
Tools You’ll Need:
- 4 ramekins (6-ounce size) – These are essential for baking individual cakes.
- Microwave-safe bowl – For melting the chocolate and butter.
- Hand whisk or electric mixer – An electric mixer makes the job easier, but a whisk works just fine if you want to get a little more hands-on.
- Oven – Yep, the oven is part of this magic.
Making the Lava Cake:
Ready to dive in? It’s not as intimidating as it sounds. Here’s how I make it:
Step 1: Preheat the Oven
First thing’s first preheat your oven to 425°F (220°C). The high temperature is what helps create that perfect outer shell while keeping the center molten. I like to get the oven going early so it’s nice and hot when my batter’s ready.
Step 2: Grease the Ramekins
This is one of the most important steps. I always grease the ramekins with butter (why not?), or sometimes I use non-stick spray. Then I dust them with cocoa powder to make sure the cakes come out easily.
Step 3: Melt the Chocolate and Butter
In a microwave-safe bowl, combine the butter and chocolate. Heat it in the microwave in 20-second intervals, stirring each time until it’s fully melted and smooth. You can also use a double boiler if you’re feeling fancy, but the microwave works perfectly fine.
Step 4: Whisk the Eggs and Sugar
In a separate bowl, I whisk the whole eggs, egg yolks, and powdered sugar together. This takes about 2-3 minutes of whisking. The result should be light, fluffy, and a pale yellow color. This is what gives the cake its structure, so don’t skip this step.
Step 5: Combine the Chocolate and Egg Mixture
Now, slowly pour the melted chocolate and butter into the egg mixture while stirring. I usually let the chocolate cool a bit so it doesn’t cook the eggs. Stir in the vanilla extract and a pinch of salt. This is where all the magic happens, trust me.
Step 6: Add the Flour
Next, sift the flour into the batter and fold it gently. You want the batter to be thick and smooth, so no lumps here!
Step 7: Fill the Ramekins
Now for the fun part! I divide the batter evenly between the ramekins, filling them about 3/4 of the way full. Don’t overfill them, because you need room for the molten center. For an extra indulgent touch, you can place a small piece of chocolate right in the middle of the batter.
Step 8: Bake the Lava Cakes
I pop the ramekins in the oven and bake for about 12-14 minutes. Keep an eye on them this step is crucial. The edges should be set, but the center should still look a little wobbly. If it looks too firm, you’ve overbaked them.
Step 9: Let the Cakes Rest
Once they’re out of the oven, I let the cakes sit for about 1 minute to firm up just enough to avoid falling apart when I invert them.
Step 10: Serve and Enjoy
Now, for the best part: I run a knife around the edges of the cakes to loosen them, then flip them over onto a plate. When I lift the ramekin, I’m always thrilled to see that gooey chocolate center oozing out. If I’m feeling fancy, I’ll top it with a dollop of whipped cream or a scoop of vanilla ice cream.
A Few Tips From Me to You:
- Don’t overbake: This is so important. The key to the perfect lava cake is that molten center, so watch the baking time closely.
- Use high-quality chocolate: It makes a huge difference in the final taste of the cake.
- Make ahead: You can prep the batter in advance, store it in the fridge, and bake it when you’re ready. Just give it a few extra minutes in the oven.
Why You Need to Try This:
Trust me when I say that this is one indulgent dessert you won’t forget. The warm, gooey center is like chocolate heaven, and when it oozes out, it’s like your chocolate dreams come true. Whether you’re making it for a special occasion or just because you need a little chocolate therapy, this lava cake is sure to impress. So grab your ingredients, preheat that oven, and get ready to treat yourself (and anyone else lucky enough to try it).
Conclusion
Crockpot cooking isn’t just a convenient way to prepare meals; it’s a delicious journey into the world of slow-cooked flavors. These seven recipes cover a range of tastes, from savory stews to sweet desserts. Slow cooking allows the ingredients to meld and infuse, resulting in dishes that are bursting with flavor.As you experiment with these recipes, don’t hesitate to add your own personal touch. Maybe a bit of extra spice or a unique twist that makes the dish truly yours. The best part is that crockpot cooking is forgiving, so even if you’re not a seasoned chef, you’re bound to create culinary magic.So, whether you’re a working parent looking to simplify dinner or just someone who enjoys the art of cooking, these crockpot recipes will surely become your favorites. The convenience and incredible taste make them a win-win in any kitchen.Now, go ahead, pick a recipe, and let your crockpot do the work. Your taste buds will thank you later. Enjoy your culinary adventure!
The crockpot is a game-changer for home cooking. It allows you to create delicious, flavorful meals with minimal effort. From classic slow-cooked chili to savory chicken and vegetables, mouthwatering pulled pork, delectable beef stew, creamy mac and cheese, vegetarian chili, and spaghetti Bolognese, there’s a crockpot recipe for every taste and dietary preference.So, why wait? Choose your favorite recipe, gather the ingredients, and let your crockpot do the work. Your home will be filled with enticing aromas, and your taste buds will be treated to a delicious home-cooked meal. Say goodbye to the stress of meal preparation and hello to the convenience and flavor of crockpot cooking!
crockpots are not just time-savers; they are also culinary tools that bring home-cooked meals to a new level of convenience and flavor. Whether you choose the classic chili, the pulled pork, the chicken and dumplings, or any of the other delightful recipes, you’re in for a treat that will make home cooking a joy.So, pick your favorite recipe, set up your crockpot, and embark on a culinary journey that combines convenience and flavor. Your taste buds and your loved ones will thank you for introducing them to the world of crockpot cooking. It’s a delightful experience that makes coming home to a home-cooked meal a reality. Enjoy the delicious home cooking!
This slow-cooked chili is my go-to whenever I need something simple, hearty, and full of flavor. It’s comforting, satisfying, and perfect for those days when I just want to relax and enjoy a warm bowl of deliciousness.
So, next time you’re craving a cozy, flavorful meal that practically cooks itself, give this chili a try. Trust me you won’t regret it. It’s easy, delicious, and guaranteed to warm you up on even the coldest of days.
There’s truly nothing like a plate of tender pulled pork. It’s comforting, flavorful, and filling – the kind of dish that brings people together. What I love most about this recipe is how simple it is. No need for a ton of fancy ingredients or hours of prep. Just a good cut of pork, a few spices, and a little patience.
Once you’ve tried this pulled pork, you’ll never go back to the pre-cooked stuff. It’s easy, it’s flavorful, and it’s perfect for any occasion. So, grab that pork shoulder, fire up the slow cooker, and get ready to enjoy the best pulled pork you’ve ever tasted!
Making this hearty beef stew is a simple joy. It’s one of those recipes where you throw a bunch of ingredients in a pot, let them work their magic, and end up with something amazing. The flavors are deep, the textures are perfect, and the whole process is so satisfying.
So, go ahead make this stew. Enjoy the slow simmering, the mouthwatering smells, and that first warm bite. It’s a dish that brings people together, and I know you’ll love it just as much as I do.
There’s something about a warm bowl of homemade savory vegetable soup that makes everything feel right. Whether it’s the simple act of chopping fresh veggies or the way the broth fills the house with its comforting aroma, I can always count on this soup to bring me a sense of calm and satisfaction. It’s the kind of meal that nourishes both the body and the soul, and I’ve come to rely on it as a staple in my kitchen. If you haven’t made it yet, I highly recommend giving it a try. You’ll be amazed at how much joy a simple vegetable soup can bring.
These Sweet and Tangy Barbecue Ribs have become a go-to for me. There’s just something magical about that tender, smoky meat paired with a finger-licking good sauce that makes them a hit every time. Whether I’m hosting a backyard barbecue or cooking for my family, these ribs always steal the show.
So, if you’re looking to impress your guests or treat yourself to a seriously delicious meal, I highly recommend these ribs. Don’t rush the process let the flavors meld together, and enjoy the satisfaction of a meal well made. And hey, if you’re feeling adventurous, slather on some extra sauce and enjoy the messiness. That’s the best part, right?
Calculate Recipe Calories
World Trade Center Footage | Webex Costs | Virtual Data Rooms | Structures Annuity Settlement | Sell Annuity Payment | Neuson | Online Classes | Nunavut Culture | Online College Course | Motor Replacements | Motor Insurance Quotes | Mortgage Adviser | Met Auto | Tax credit | Help desk software | Home refinancing | Urgent care | Marketing integration | Debt relief | Bitcoin | Fitness center software | Insurance | Gas | Electricity | Weight loss | Sell house for cash | Automotive repair | Loans | Internet marketing | Mortgage | Attorney | SEO specialist | Lawyer | Donate | Conference Call | Treatment | Degree | Software | Credit | Classes | Investing | Recovery | Trading | Rehab | Hosting | Cord Blood | Claim | Automotive warranty | Paintless dent repair | Mesothelioma Law Firm | Massage School Dallas Texas | Low Credit Line Credit Cards | Life Insurance Co Lincoln | Insurance Companies | Injury Lawyers | How to Donate A Car in California | Home Phone Internet Bundle | Holland Michigan College | Royalty-Free Images Stock | Register Free Domains | Psychic for Free | Ph.D. in Counseling Education | Personal Injury Lawyers | Personal Injury Law Firm | PaperPort Promotional Code | Online Stock Trading | Online Motor Insurance Quotes | Donate your Car for Money | Online Colleges | Health Records, Personal Health Record | Hard drive Data Recovery Services | Donate Old Cars to Charity | Forex Trading Platform | Forensics Online Course | Donate Car to Charity California | Donate Car for Tax Credit | Car Insurance Quotes PA | Email Bulk Service | Donating Used Cars to Charity | Donating a Car in Maryland | Donate Your Car Sacramento | Online Criminal Justice Degree | Donate Your Car for Kids | Futuristic Architecture | Donate Cars in MA | Data Recovery Raid | Mesothelioma | A car accident lawyer | Personal injury lawyer | AC repair | Lawsuit settlements | Car insurance | Flood recovery | Water damage restoration | Rehab doctors | Online degree | Online master’s degree | Doctoral programs | Hail car insurance