
7 Spooktacular Halloween Bakes Recipes
Halloween, the time of the year when pumpkins light up, and spooky costumes come out to play. It’s the season for ghostly tales and haunted houses, but most importantly, it’s the perfect excuse to get creative in the kitchen. In this article, we’ll take you on a culinary journey filled with delightfully eerie treats. These 7 Halloween bakes recipes will make your taste buds scream with joy!
The Ultimate Homemade Pumpkin Pie Recipe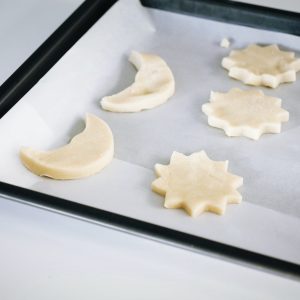
Introduction:Ah, pumpkin pie – the quintessential fall dessert that warms the heart and tickles the taste buds. While I can’t provide you with a specific copyrighted recipe, I can guide you through the process of creating your very own mouthwatering pumpkin pie. This isn’t just any pie; it’s a pumpkin pie so good it’s almost scary!
Ingredients
Here’s what you’ll need:1 1/2 cups of pumpkin puree
1 can (14 ounces) of sweetened condensed milk
2 large eggs
1 teaspoon ground cinnamon
1/2 teaspoon ground nutmeg
1/2 teaspoon ground ginger
1/2 teaspoon salt
1 pie crust (store-bought or homemade)
Directions
Preheat your oven to 425°F (220°C).
In a large bowl, combine the pumpkin puree, sweetened condensed milk, eggs, cinnamon, nutmeg, ginger, and salt. Mix it all together until it’s as smooth as a witch’s brew.
Take your pie crust (either store-bought or homemade) and place it in a 9-inch pie dish. You can crimp the edges for that classic homemade look.
Pour your pumpkin pie mixture into the crust. It should be as silky as a ghost’s whisper.
Pop it into the preheated oven and bake for 15 minutes.
Reduce the oven temperature to 350°F (175°C) and continue baking for another 40-50 minutes. The pie should be firm around the edges but slightly jiggly in the center.
Remove your masterpiece from the oven and let it cool. It’s like waiting for Halloween candy—torturous but worth it!
Once it’s cooled, you can refrigerate it for a few hours or overnight to let the flavors meld together.
Serve your hauntingly delicious pumpkin pie with a dollop of whipped cream or a scoop of vanilla ice cream. It’s so good it’ll make your taste buds do the monster mash!
Let’s kick things off with a Halloween classic: the Pumpkin Pie. But this isn’t your ordinary pie; it’s been spookified for the occasion! Imagine a golden, flaky crust with a creamy, pumpkin-spiced filling. It’s the kind of dessert that gives you cozy autumn vibes with a dash of spookiness.
Personal Experience:I remember the first time I sunk my teeth into this Halloween treat. The aroma of cinnamon and nutmeg filled the air as I took a bite. It was like a warm hug from the inside out. I couldn’t help but savor every mouthful.
Instructions
Preheat & Prep:Start by preheating your oven to 425°F (220°C). Place your unbaked pie crust in a pie dish and set it aside.
Click Here To Buy Our Healthy Cookbook For Only $27 Today!Mix & Pour:In a mixing bowl, combine the pumpkin puree, granulated sugar, brown sugar, eggs, spices (cinnamon, ginger, cloves), and salt. Mix until it’s as smooth as a silk sheet.
Fill the Crust:Pour this delicious mixture into your waiting pie crust. It’s like a golden bath for your pumpkin filling.
Bake & Reduce:Bake your pie in the preheated oven for 15 minutes. Then, reduce the oven temperature to 350°F (175°C) and continue baking for another 45 minutes.
Cool & Serve:Once it’s done, let your pumpkin pie cool on a wire rack. Once it’s at room temperature, slice, serve, and enjoy!
Bewitchingly Delicious Witch’s Brew Cupcakes Recipe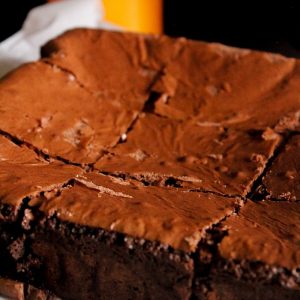
Introduction:Get ready to cast a spell on your taste buds with these enchanting Witch’s Brew Cupcakes. These delightful treats are perfect for Halloween parties or any time you want to add a touch of magic to your dessert table. In this recipe, we’ll conjure up cupcakes that are not only delicious but also a feast for the eyes.
Ingredients
Gather your ingredients for the cupcakes and frosting:For the Cupcakes:1 1/2 cups all-purpose flour
1 1/2 teaspoons baking powder
1/2 teaspoon baking soda
1/4 teaspoon salt
1/2 cup unsalted butter, softened
1 cup granulated sugar
2 large eggs
1 teaspoon vanilla extract
1/2 cup buttermilk
1/2 cup strong brewed coffee, cooled
Green food coloring
For the Witch’s Brew Frosting:1 cup unsalted butter, softened
4 cups powdered sugar
1/4 cup milk
1 teaspoon vanilla extract
Purple and green food coloring
Witch hat and broomstick decorations (optional)
Directions
For the Cupcakes:Preheat your oven to 350°F (175°C) and line a cupcake tin with paper liners.
In a medium-sized bowl, whisk together the flour, baking powder, baking soda, and salt. Set this mixture aside.
In a separate bowl, beat the softened butter and granulated sugar until it’s as light and fluffy as a cloud on a broomstick.
Add the eggs one at a time, mixing well after each addition. Stir in the vanilla extract.
Gradually alternate adding the dry ingredients mixture and the buttermilk to the butter and sugar mixture. Begin and end with the dry ingredients.
Mix in the cooled brewed coffee until the batter is as dark as a witch’s cauldron. Add green food coloring until you achieve the desired spooky shade.
Divide the batter evenly among the cupcake liners, filling each about two-thirds full.
Bake for 18-20 minutes or until a toothpick inserted into the center comes out clean. Let them cool completely.
For the Witch’s Brew Frosting:Beat the softened butter until it’s as smooth as a witch’s spell.
Gradually add the powdered sugar, mixing until it’s as creamy as a potion.
Stir in the milk and vanilla extract until the frosting is as smooth as a moonlit night.
Divide the frosting into two bowls. Add purple food coloring to one and green to the other. Mix until the colors are as vibrant as a witch’s wardrobe.
Assembling Your Witch’s Brew Cupcakes:Once the cupcakes are completely cooled, frost them with the two-colored frosting. You can use a piping bag for a swirled effect.
Top each cupcake with a witch hat and broomstick decoration if desired, making them as spooky as a haunted forest.
Serve these bewitching cupcakes at your Halloween party or any time you want to delight your taste buds with a taste of witchcraft!
Next up, we have the Witch’s Brew Cupcakes. These little green and black wonders are a sight to behold. They look like something straight out of a witch’s cauldron, and they taste even better than they look!
Picture this:a rich, dark chocolate cupcake topped with eerie green frosting and adorned with bubbling cauldron decorations. It’s a treat that’s wickedly delicious.
Humor Alert:These cupcakes may not grant you magical powers, but they sure make you feel like a culinary wizard in the kitchen!
Instructions
Preheat & Mix:Preheat your oven to 350°F (175°C). In a large bowl, mix the chocolate cake mix, buttermilk, vegetable oil, eggs, and vanilla extract until it’s devilishly smooth.
Color the Brew:Divide the batter into two equal parts. Add a few drops of purple food coloring to one and green to the other. Mix until the colors are as vibrant as a witch’s robe.
Layer & Bake:Line your cupcake tins with baking cups. Starting with the purple batter, fill each cup halfway, and then add a layer of green batter. It’s like a potion in the making.
Swirl the Magic:Take a toothpick and swirl the two colors together, creating a bewitching marbled effect.
Bake & Decorate:Bake for about 18-20 minutes or until a toothpick comes out clean. Once cooled, top with witch hat cupcake toppers if you want to add a touch of spellbinding charm.
Mummy Brownies Recipe: Unwrapping Deliciousness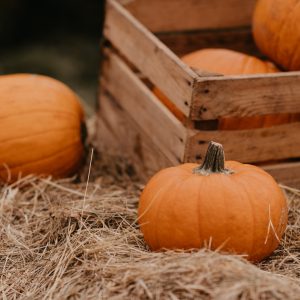
What’s Halloween without a few mummies? No, not the spooky kind you find in ancient tombs, but the sweet and chocolatey Mummy Brownies. These adorable treats are wrapped in white icing bandages, giving them that unmistakable mummy look.
They’re incredibly easy to make, and I can assure you, they’ll disappear faster than you can say, “Trick or treat!”
Funny Story:Be warned, though, after indulging in these mummy brownies, you might find yourself mummified under a cozy blanket on the couch. They’re that comforting!
Introduction:Get ready to embark on a spooktacular baking adventure with our Mummy Brownies! These delightful treats are perfect for Halloween parties, and they’re so delicious that they’ll vanish as quickly as a ghost in the night. In this recipe, we’ll show you how to create brownies that are both scary-good and easy to make.
Ingredients
For the Brownies:1 cup unsalted butter
2 cups granulated sugar
4 large eggs
1 teaspoon vanilla extract
1/2 cup cocoa powder
1/2 teaspoon salt
1 teaspoon baking powder
1 1/2 cups all-purpose flour
For the Mummy Decoration:1 cup white chocolate chips or white chocolate candy melts
Candy eyes
Optional: black decorating gel
Directions
Making the Brownies:Preheat your oven to 350°F (175°C). Grease and line a 9×13-inch baking pan with parchment paper, leaving some overhang for easy removal.
Click Here To Buy Our Healthy Cookbook For Only $27 Today!In a microwave-safe bowl or using a saucepan, melt the butter until it’s as smooth as silk. Let it cool slightly.
In a separate bowl, whisk together the granulated sugar, eggs, and vanilla extract until it’s as smooth as a witch’s broomstick.
Add the melted butter to the sugar and egg mixture, stirring until they’re as well combined as potion ingredients.
Sift in the cocoa powder, salt, baking powder, and all-purpose flour. Stir until the batter is as dark and mysterious as a moonless night.
Pour the brownie batter into the prepared pan, spreading it evenly.
Bake for 25-30 minutes or until a toothpick inserted into the center comes out with a few moist crumbs. Let the brownies cool completely in the pan.
Decorating Your Mummy Brownies:Once the brownies are cool, carefully lift them out of the pan using the parchment paper overhang and place them on a cutting board.
Cut the brownies into rectangular pieces, resembling mummy shapes. You can vary the sizes for some mummies to add character.
Melt the white chocolate chips or candy melts in the microwave in 20-second intervals, stirring in between until it’s as smooth as a ghost’s sheet.
Drizzle the melted white chocolate over each brownie, creating a mummy’s wrapping effect. Leave a small space for the “eyes.”
Place two candy eyes on each brownie mummy, pressing them gently into the white chocolate. These eyes should be as expressive as a Halloween jack-o’-lantern.
For added spookiness, you can use black decorating gel to draw “mouths” on some of your mummy brownies, giving them a playful, eerie touch.
Allow the white chocolate to set, which won’t take long at all.
Instructions
Prepare the Brownies:Begin by baking a batch of your favorite brownies in a square baking dish. Let them cool completely.
Melt the Chocolate:Melt the white chocolate chips, either in a microwave or on a stovetop using a double boiler.
Create the Mummies:Use the melted white chocolate to drizzle “bandages” over the brownies. Place candy eyes on the brownies to give your mummies character. They’re like little chocolate-covered pharaohs.
Chill & Serve:Allow the white chocolate to set, then cut your brownies into squares. Serve and enjoy the eerie deliciousness.
Spiderweb Donuts Recipe: A Web of Sweet Delight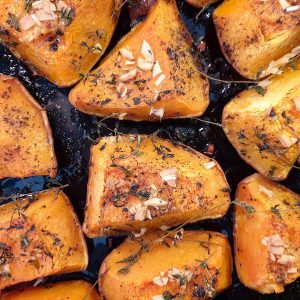
Our next Halloween bake is the Spiderweb Donuts. These delectable delights are as pleasing to the eyes as they are to the taste buds. Imagine sinking your teeth into a soft, fluffy donut with a delicate spiderweb design drizzled on top.
When I made these for the first time, I felt like a skilled pastry artist weaving sweet magic in the kitchen. And the best part? They are surprisingly easy to create!
Introduction:Prepare to spin a web of sweet magic with our Spiderweb Donuts! These delightful treats are perfect for Halloween breakfasts or as a tasty snack during your spooky celebrations. In this recipe, we’ll guide you through the steps to create donuts that are both visually captivating and scrumptiously tempting.
Ingredients
For the Donuts:2 cups all-purpose flour
1/2 cup granulated sugar
2 teaspoons baking powder
1/2 teaspoon salt
2/3 cup buttermilk
2 large eggs
2 tablespoons unsalted butter, melted
1 teaspoon vanilla extract
Cooking oil for frying
For the Spiderweb Glaze:1 cup powdered sugar
2 tablespoons milk
1/2 teaspoon vanilla extract
Black gel food coloring
Directions
Making the Donuts:In a large mixing bowl, whisk together the all-purpose flour, granulated sugar, baking powder, and salt until they’re as well mixed as a witch’s potion.
In a separate bowl, combine the buttermilk, eggs, melted butter, and vanilla extract. Stir until the mixture is as smooth as silk.
Pour the wet ingredients into the dry ingredients and mix until you have a smooth, slightly sticky dough.
Flour a clean surface and roll out the dough to about 1/2 inch thickness.
Use a donut cutter or a round cutter to create donut shapes. You can use a smaller cutter or a bottle cap to make the donut holes.
Heat cooking oil in a deep skillet or pot to 350°F (175°C).
Carefully place the donuts into the hot oil, a few at a time, and fry until they’re golden brown on each side. This should take about 2-3 minutes per side.
Use a slotted spoon to remove the donuts from the oil and place them on a paper towel-lined plate to drain.
Creating the Spiderweb Glaze:In a mixing bowl, combine the powdered sugar, milk, and vanilla extract until the glaze is as smooth as a spider’s silk thread.
Add black gel food coloring to the glaze and stir until it reaches a spooky, dark black color. You can adjust the color to your liking.
Decorating Your Spiderweb Donuts:Once the donuts are completely cooled, drizzle the black glaze over each donut in a spiral pattern, starting from the center and working your way out. This will create the spiderweb effect.
For added spookiness, you can place a plastic spider ring or a small plastic spider in the center of each web.
Allow the glaze to set, which should take about 15-20 minutes.
Instructions
Bake the Donuts:First, prepare and bake a batch of your favorite donuts. Let them cool on a wire rack.
Melt the Chocolate:Melt the white chocolate chips using your preferred method.
Create Spiderwebs:With a steady hand, drizzle the melted white chocolate over the donuts to create intricate spiderweb patterns.
Add the Spider:For the finishing touch, use black food coloring to draw a cute little spider in the center of each web.
Let Them Set & Serve:Allow the white chocolate to set, then present your spiderweb donuts for all to enjoy. They’re sure to be a hit at any gathering.
Creepy Crawly Cookies Recipe: A Taste of Halloween Thrills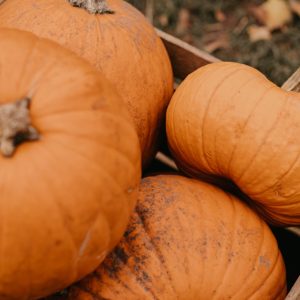
If you’re in the mood for something a bit more creepy, our Creepy Crawly Cookies should do the trick. These cookies are not your ordinary chocolate chip or oatmeal cookies. Oh no, they are crawling with eerie, edible insects!
But don’t be scared; these bugs are made of chocolate, and they add a playful twist to your usual cookie experience. These cookies are the perfect conversation starter at your Halloween party.
Spooky Tale:I remember one Halloween party where these cookies were the star attraction. They had everyone talking, and some guests even dared each other to eat the biggest “bug.” It was a night filled with laughter and memorable moments.
Introduction:Get ready to creep out your taste buds with our Creepy Crawly Cookies! These ghoulishly delightful treats are perfect for Halloween parties or whenever you want to add a dash of spine-tingling fun to your dessert table. In this recipe, we’ll guide you through creating cookies that are both eerie to look at and scrumptious to eat.
Ingredients
For the Cookies:2 1/4 cups all-purpose flour
1/2 teaspoon baking powder
1/4 teaspoon salt
3/4 cup unsalted butter, softened
1 cup granulated sugar
1 large egg
1 teaspoon vanilla extract
For the Royal Icing:2 cups powdered sugar
2 tablespoons meringue powder
3-4 tablespoons water
Black and red gel food coloring
For the Creepy Crawly Decorations:Gummy worms, gummy spiders, or any other creepy gummy creatures
Directions
Making the Cookies:In a medium-sized bowl, whisk together the all-purpose flour, baking powder, and salt. Set this mixture aside.
In a separate large bowl, beat the softened butter and granulated sugar together until it’s as creamy as a ghost’s whisper.
Add the egg and vanilla extract to the butter and sugar mixture, beating until it’s as smooth as a cauldron of potion.
Gradually add the dry ingredients mixture to the wet ingredients, mixing until you have a cookie dough as mysterious as a moonlit night.
Divide the cookie dough in half, shape each half into a disc, wrap them in plastic wrap, and refrigerate for at least 30 minutes. This will make the dough easier to work with.
Preheat your oven to 350°F (175°C) and line a baking sheet with parchment paper.
Roll out one of the chilled dough discs on a floured surface to about 1/4 inch thickness.
Use your favorite Halloween-themed cookie cutters to cut out spooky shapes.
Place the cookies on the prepared baking sheet, leaving some space between them.
Bake for 10-12 minutes or until the edges are as golden as a harvest moon.
Let the cookies cool on a wire rack.
Creating the Royal Icing:In a mixing bowl, combine the powdered sugar, meringue powder, and water. Beat until it’s as smooth as a witch’s spell. You can adjust the consistency by adding more water if needed.
Divide the royal icing into two bowls. Use black gel food coloring to create black icing and red gel food coloring to create red icing. Mix until you achieve your desired spooky colors.
Decorating Your Creepy Crawly Cookies:Once the cookies are completely cool, use the black royal icing to outline the shapes and create spiderweb or creepy designs. Allow the black icing to set for a few minutes.
Fill in the outlines with the colored royal icing, creating a striking contrast.
While the icing is still wet, place gummy worms, spiders, or other creepy creatures on top of the cookies, making them as eerie as a haunted house.
Let the icing fully set, which will take about an hour.
Ghostly Cupcake Cones Recipe: A Hauntingly Sweet Treat
Up next, we have the Ghostly Cupcake Cones. These treats are a delightful fusion of cupcakes and ice cream cones, shaped like friendly little ghosts. They are so cute you won’t want to eat them, but trust me, you won’t be able to resist.
The cupcakes are moist and flavorful, while the ice cream cones give them a playful twist. It’s like having a sweet, ghostly friend by your side.
Instructions
Prep the Dough:Begin with your sugar cookie dough. Roll it into small balls.
Insert the Worms:Gently press gummy worms into the cookie dough balls. It’s like they’re crawling through edible soil.
Bake & Enjoy:Bake your cookie creations according to the dough instructions. Once they’re out of the oven, you’ve got creepy, crawly cookies ready to thrill your taste buds.
A Delightful Fright:These cupcakes can give your taste buds a delightful fright. They’re sweet, soft, and utterly irresistible!
Introduction:Prepare to delight your taste buds with our Ghostly Cupcake Cones! These charmingly eerie treats are perfect for Halloween parties or any time you want to enjoy a spooky yet delicious dessert. In this recipe, we’ll guide you through creating cupcake cones that are both ghostly in appearance and hauntingly sweet in taste.
Ingredients
For the Cupcake Cones:12 flat-bottomed ice cream cones
1 box of your favorite cake mix (plus the ingredients mentioned on the box)
1 cup mini chocolate chips (for the “ghostly” effect)
For the Ghostly Whipped Cream Frosting:
2 cups heavy whipping cream
1/2 cup powdered sugar
1 teaspoon vanilla extract
Mini chocolate chips or chocolate sprinkles (for the ghost’s eyes and mouth)
Directions
Making the Cupcake Cones:Preheat your oven according to the cake mix instructions.
Prepare the cake batter as instructed on the box. You can use a cake mix of your choice or make the batter from scratch.
Fill each flat-bottomed ice cream cone with a small amount of mini chocolate chips, creating a “ghostly” surprise in the center.
Stand the filled cones upright in a muffin tin or on a baking sheet.
Carefully pour the cake batter into each cone, filling them about two-thirds full. Be sure not to overfill.
Bake the cupcake cones in the preheated oven according to the cake mix instructions, usually around 15-20 minutes. They’re ready when a toothpick inserted into the center comes out clean.
Let the cupcake cones cool completely before moving on to the frosting.
Creating the Ghostly Whipped Cream Frosting:In a mixing bowl, combine the heavy whipping cream, powdered sugar, and vanilla extract.
Whip the mixture until it reaches stiff peaks. This frosting should be as fluffy as a friendly ghost.
Decorating Your Ghostly Cupcake Cones:Once the cupcake cones are cool, pipe the whipped cream frosting on top of each cone, creating a “ghostly” swirl that resembles a ghost’s body.
Use mini chocolate chips or chocolate sprinkles to add eyes and a mouth to each “ghost.” Get creative with different facial expressions for a fun touch.
For an extra eerie effect, you can use a kitchen torch to lightly brown the whipped cream frosting, giving it a ghostly toasted appearance.
Let your ghostly creations set for a few minutes before serving.
Instructions
Fill the Cones:Preheat your oven as directed by your cake batter recipe. Fill the ice cream cones with cake batter about halfway.
Bake & Cool:Bake the cone-filled batter as directed. Once they’re baked and cooled, you have cake-filled “ghost” cones.
Frost & Decorate:Use white icing to cover the cone-shaped cakes. Place mini chocolate chips for the ghostly eyes and mouth. They’re like sweet apparitions.
Serve & Spook:Present your Ghostly Cupcake Cones to your guests, and watch them be delighted by these hauntingly delicious treats.
Pumpkin Patch Cake Recipe: A Slice of Fall’s Delight
Last but certainly not least, we have the Pumpkin Patch Cake. This cake is a slice of pure fall goodness. It’s adorned with charming pumpkin-shaped decorations, making it the perfect centerpiece for your Halloween dessert table.
Personal Love:I have a personal fondness for this cake. It brings back memories of childhood pumpkin picking adventures. It’s like capturing the essence of autumn in every bite.
Introduction:Get ready to savor the flavors of fall with our Pumpkin Patch Cake! This delectable dessert is the perfect way to celebrate the season and delight your taste buds with a taste of autumn. In this recipe, we’ll guide you through creating a cake that not only looks like a pumpkin patch but also tastes like a slice of fall’s finest.
Ingredients
For the Cake:2 cups all-purpose flour
2 teaspoons baking powder
1 teaspoon baking soda
1/2 teaspoon salt
2 teaspoons ground cinnamon
1/2 teaspoon ground nutmeg
1/2 teaspoon ground cloves
1/2 cup unsalted butter, softened
1 1/2 cups granulated sugar
3 large eggs
1 can (15 ounces) pumpkin puree
1 teaspoon vanilla extract
1/2 cup whole milk
For the Cream Cheese Frosting:8 ounces cream cheese, softened
1/2 cup unsalted butter, softened
4 cups powdered sugar
1 teaspoon vanilla extract
For the Decorations:Green gel food coloring
Orange gel food coloring
Chocolate sandwich cookies (crushed for “dirt”)
Gummy pumpkins
Pumpkin-shaped candies or decorations
Directions
Making the Cake:Preheat your oven to 350°F (175°C). Grease and flour two 9-inch round cake pans.
In a medium-sized bowl, whisk together the flour, baking powder, baking soda, salt, cinnamon, nutmeg, and cloves. Set this mixture aside.
In a large bowl, beat the softened butter and granulated sugar until it’s as light and fluffy as fallen leaves.
Add the eggs one at a time, mixing well after each addition.
Stir in the pumpkin puree and vanilla extract, creating a batter as smooth as a calm autumn day.
Gradually add the dry ingredients mixture to the wet ingredients, alternating with the milk, beginning and ending with the dry mixture. Mix until everything is well combined, and the batter is as golden as a harvest moon.
Divide the batter evenly between the prepared cake pans.
Bake for 25-30 minutes or until a toothpick inserted into the center of the cakes comes out clean.
Let the cakes cool in the pans for a few minutes before transferring them to a wire rack to cool completely.
Creating the Cream Cheese Frosting:In a mixing bowl, beat together the softened cream cheese and butter until it’s as smooth as a serene autumn lake.
Gradually add the powdered sugar and vanilla extract, beating until the frosting is as creamy as a pumpkin pie.
Assembling Your Pumpkin Patch Cake:Level the tops of the cooled cakes if necessary to create an even surface.
Place one cake layer on your serving plate. Spread a layer of cream cheese frosting on top.
Carefully place the second cake layer on top, creating a pumpkin-shaped cake.
Use green and orange gel food coloring to tint some of the remaining frosting. Create green “vines” on top of the cake and orange “pumpkins” by piping small circles with stems.
Sprinkle crushed chocolate sandwich cookies around the cake to create a “dirt” effect.
Decorate the cake with gummy pumpkins and pumpkin-shaped candies or decorations to mimic a charming pumpkin patch.
Instructions
Prepare & Preheat:Preheat your oven to 350°F (175°C). Grease and flour two round cake pans.
Mix the Dry Ingredients:In a bowl, whisk together the flour, baking powder, baking soda, salt, and spices (cinnamon, nutmeg, cloves).
Cream the Butter & Sugar:In a separate bowl, beat the softened butter, granulated sugar, and brown sugar until it’s light and fluffy.
Add Eggs & Pumpkin:Beat in the eggs one at a time, then add the pumpkin puree, sour cream, and vanilla extract. Mix until it’s as smooth as a pumpkin patch.
Incorporate Dry Ingredients:Gradually add the dry ingredients to the wet mixture. Mix until just combined, no overmixing.
Divide & Color:Divide the batter into two equal parts. Color one part with orange food coloring and the other with green.
Layer & Bake:Pour the orange batter into one cake pan and the green into the other. Bake for about 25-30 minutes or until a toothpick comes out clean.
Create Pumpkin Patch:Once cooled, frost one cake layer with cream cheese frosting and place the second cake on top. Use chocolate wafer cookies to create pumpkin shapes on the cake. You’ve got a pumpkin patch masterpiece!
Serve & Enjoy:Slice your Pumpkin Patch Cake and savor a taste of fall’s delight.
Conclusion
These 7 Halloween bakes recipes are sure to add a spooktacular touch to your Halloween celebrations. Whether you’re baking for a party or just enjoying some homemade treats with your family, these recipes are easy to follow and full of flavor.
Don’t forget to add your own creative twists and decorations to make them even more unique. And remember, the kitchen can become a haunted house of delicious surprises when you embark on these baking adventures.
So, gather your ingredients, put on your favorite Halloween costume, and let the baking begin! These recipes will not only satisfy your sweet tooth but also fill your home with the spirit of Halloween. Happy baking and have a spooky, scrumptious Halloween!
Creating a mouthwatering pumpkin pie doesn’t have to be a spooky endeavor. With the right ingredients and a dash of love, you can whip up a homemade pie that’s so delicious it’s almost eerie. Whether it’s for a holiday feast or just a cozy fall evening, this pumpkin pie recipe is sure to delight and satisfy. Happy baking, and may your pumpkin pie be spooktacularly good!
These Witch’s Brew Cupcakes are a bewitchingly delicious addition to any Halloween celebration. With a dash of magic in each bite, they’re sure to enchant your guests. So, whip up a batch of these delightful treats, and watch as everyone is spellbound by their flavor and appearance. Happy baking, you culinary sorcerer!
These Mummy Brownies are a wrap of flavor that’s perfect for Halloween or any time you want a fun and delicious treat. With their adorable mummy decorations and rich, chocolatey taste, they’re sure to disappear from your dessert table in no time. Share these with friends and family and watch as they unwrap smiles of delight! Enjoy your baking adventure, and remember, the spookier, the better!
These Spiderweb Donuts are a web of sweet delight that will enchant your taste buds and add a touch of Halloween magic to your breakfast or snack time. With their intricate spiderweb design and irresistible flavor, they’re sure to be a hit at any spooky gathering. Share these treats with friends and family, and watch as they get caught in the web of deliciousness. Enjoy crafting these delightful donuts and weaving your own sweet magic!
These Creepy Crawly Cookies are a taste of Halloween thrills that will make your spooky celebrations even more memorable. With their eerie decorations and delicious flavor, they’re sure to cast a spell on anyone who tries them. Share these cookies with your friends and family, and watch as they get caught in the web of Halloween excitement. Enjoy creating these spine-tingling treats!
These Ghostly Cupcake Cones are a hauntingly sweet treat that will enchant your taste buds and add a touch of whimsy to your Halloween celebrations. With their ghostly appearances and delightful flavor, they’re sure to be a hit with kids and adults alike. Share these spooktacular treats with your friends and family, and watch as they disappear as mysteriously as a ghost in the night. Enjoy creating these charming and delicious delights!
This Pumpkin Patch Cake is a slice of fall’s delight that captures the essence of autumn in every bite. With its pumpkin flavor, cream cheese frosting, and adorable pumpkin patch decorations, it’s the perfect dessert to celebrate the season. Share this cake with friends and family, and watch as they fall in love with the flavors of fall. Enjoy creating this delicious and visually stunning masterpiece!
World Trade Center Footage | Webex Costs | Virtual Data Rooms | Structures Annuity Settlement | Sell Annuity Payment | Neuson | Online Classes | Nunavut Culture | Online College Course | Motor Replacements | Motor Insurance Quotes | Mortgage Adviser | Met Auto | Tax credit | Help desk software | Home refinancing | Urgent care | Marketing integration | Debt relief | Bitcoin | Fitness center software | Insurance | Gas | Electricity | Weight loss | Sell house for cash | Automotive repair | Loans | Internet marketing | Mortgage | Attorney | SEO specialist | Lawyer | Donate | Conference Call | Treatment | Degree | Software | Credit | Classes | Investing | Recovery | Trading | Rehab | Hosting | Cord Blood | Claim | Automotive warranty | Paintless dent repair | Mesothelioma Law Firm | Massage School Dallas Texas | Low Credit Line Credit Cards | Life Insurance Co Lincoln | Insurance Companies | Injury Lawyers | How to Donate A Car in California | Home Phone Internet Bundle | Holland Michigan College | Royalty-Free Images Stock | Register Free Domains | Psychic for Free | Ph.D. in Counseling Education | Personal Injury Lawyers | Personal Injury Law Firm | PaperPort Promotional Code | Online Stock Trading | Online Motor Insurance Quotes | Donate your Car for Money | Online Colleges | Health Records, Personal Health Record | Hard drive Data Recovery Services | Donate Old Cars to Charity | Forex Trading Platform | Forensics Online Course | Donate Car to Charity California | Donate Car for Tax Credit | Car Insurance Quotes PA | Email Bulk Service | Donating Used Cars to Charity | Donating a Car in Maryland | Donate Your Car Sacramento | Online Criminal Justice Degree | Donate Your Car for Kids | Futuristic Architecture | Donate Cars in MA | Data Recovery Raid | Mesothelioma | A car accident lawyer | Personal injury lawyer | AC repair | Lawsuit settlements | Car insurance | Flood recovery | Water damage restoration | Rehab doctors | Online degree | Online master’s degree | Doctoral programs | Hail car insurance