
7 Christmas Dessert Recipes: Sweet Treats for the Festive Season
‘Tis the season to be jolly, and what better way to spread the holiday cheer than with mouthwatering Christmas desserts? From classic Christmas pudding to delightful gingerbread cookies, these 7 Christmas dessert recipes are sure to make your festive celebrations sweeter than ever.
Classic Christmas Pudding Recipe
Ingredients
1 cup of raisins
1 cup of currants
1 cup of sultanas
1/2 cup of chopped candied peel
1/2 cup of chopped dried apricots
1/2 cup of chopped prunes
1/4 cup of brandy
Zest and juice of 1 orange
Zest and juice of 1 lemon
1/2 cup of dark brown sugar
1/2 cup of unsalted butter, softened
3 large eggs
1 1/2 cups of all-purpose flour
1 teaspoon of ground cinnamon
1/2 teaspoon of ground nutmeg
1/4 teaspoon of ground cloves
1/4 teaspoon of salt
Directions
Start by soaking the raisins, currants, sultanas, candied peel, apricots, and prunes in the brandy, orange juice, and lemon juice. Leave them to soak for at least an hour. You can even let them soak overnight for extra flavor.
In a large mixing bowl, cream together the softened butter and dark brown sugar. It should be as smooth as Santa’s sleigh ride.
Beat in the eggs, one at a time, adding a little flour with each to prevent curdling. This is where the magic happens.
Stir in the orange and lemon zest, making your mixture smell like a citrusy winter wonderland.
Sift in the flour, ground cinnamon, ground nutmeg, ground cloves, and salt. Mix it all together until you have a batter as smooth as freshly fallen snow.
Now, fold in the soaked fruits and brandy mixture. Your pudding mix should be as rich and exciting as unwrapping presents on Christmas morning.
Grease a 2-quart pudding basin and line the bottom with parchment paper.
Spoon your pudding mixture into the basin, packing it down gently. Smooth the top like you’re smoothing out a warm, cozy blanket.
Cover the basin with a double layer of parchment paper and a layer of foil, securing it with kitchen twine. It’s like tucking your pudding in for a long winter’s nap.
Steam the pudding for 6 hours. Yes, you read that right, 6 hours. It’s worth the wait, I promise.
Once steamed, let the pudding cool. Store it in a cool, dark place until Christmas day.
On the big day, reheat the pudding by steaming it for another 2 hours.
Serve your classic Christmas pudding with a dollop of brandy butter or a scoop of vanilla ice cream. It’s the grand finale of your festive feast.
Click Here To Buy Our Healthy Cookbook For Only $27 Today!The Tradition That Never Gets Old:Let’s kick things off with a holiday classic – Christmas pudding. This rich, fruity dessert has been gracing Christmas tables for generations. It’s a symbol of tradition, and making it is a cherished ritual in many families.
Method:Combine all ingredients in a bowl and mix well.
Pour the mixture into a greased pudding basin.
Cover with parchment paper and foil, securing with a string.
Steam for 2-3 hours.
Pro Tips:The longer you age it, the better it gets.
Serve with a flaming brandy for a dramatic touch.
Serving Suggestion:Slice it up and serve with a dollop of whipped cream. This pudding is so rich; it’s like a taste of Christmas history. Just remember, it’s so good that even Santa might sneak a bite!
Instructions
Grease a pudding basin with butter and sprinkle the inside with brown sugar.
In a large mixing bowl, combine suet, flour, breadcrumbs, brown sugar, mixed dried fruit, chopped almonds, chopped candied peel, mixed spice, and ground cinnamon.
In another bowl, whisk together the eggs, milk, and brandy.
Pour the wet mixture into the dry mixture and stir well to combine.
Spoon the pudding mixture into the prepared basin.
Cover with a layer of parchment paper and a layer of foil, secured with string.
Steam the pudding for about 4-5 hours.
Allow it to cool, then re-cover with fresh parchment and foil.
Store in a cool, dark place until Christmas Day.
On Christmas Day, re-steam the pudding for 2 hours before serving.
Unmold and serve with your choice of sauce.
Yule Log Cake Recipe
Ingredients
For the Cake:4 large eggs
3/4 cup granulated sugar
2/3 cup all-purpose flour
1/3 cup unsweetened cocoa powder
1 teaspoon baking powder
1/4 teaspoon salt
1 teaspoon vanilla extract
For the Filling:1 1/2 cups heavy cream
1/4 cup powdered sugar
1 teaspoon vanilla extract
For the Ganache:6 ounces semi-sweet chocolate, finely chopped
2/3 cup heavy cream
A pinch of salt
For Decoration:Confectioners’ sugar for dusting
Fresh rosemary sprigs (to mimic pine branches)
Cranberries (for a festive touch)
Directions
Preheat your oven to 350°F (175°C). Grease and line a 10×15-inch jelly roll pan with parchment paper, ensuring it overhangs the edges.
In a bowl, sift together the cocoa powder, flour, baking powder, and salt. This ensures your dry ingredients are as smooth as a freshly fallen snow.
Separate the egg yolks from the whites. In a large bowl, beat the egg yolks with 1/2 cup of granulated sugar until the mixture turns pale and creamy. Add vanilla extract and mix in.
In another clean bowl, whip the egg whites with the remaining 1/4 cup of granulated sugar until stiff peaks form. This is where your cake gets its airy magic.
Gently fold the dry ingredient mixture into the egg yolk mixture until just combined. Then, fold in the whipped egg whites. Be gentle, like you’re handling fragile ornaments.
Pour this velvety batter into the prepared pan, spreading it evenly. Bake for 12-15 minutes until it springs back when gently touched.
While the cake bakes, lay out a clean kitchen towel and dust it with confectioners’ sugar. This will be your cake’s cozy blanket later.
When the cake is done, immediately invert it onto the sugared towel. Carefully peel off the parchment paper. Roll the cake, starting at one of the short ends, along with the towel. Let it cool completely, seam-side down.
While the cake cools, whip the heavy cream, powdered sugar, and vanilla extract until it’s as thick as snowdrifts.
Carefully unroll the cooled cake, removing the towel. Spread the whipped cream evenly over the cake, leaving a small border at the edges.
Roll the cake back up without the towel, starting from the same short end. Place it seam-side down on your serving platter, like a Yule log hidden in the forest.
Now, let’s make the ganache. Heat the heavy cream in a saucepan until it just begins to simmer. Pour it over the chopped chocolate and add a pinch of salt. Let it sit for a minute, then whisk until smooth and glossy.
Pour the ganache over your Yule log cake, allowing it to gently drip down the sides, like melting icicles.
Decorate your Yule log with fresh rosemary sprigs and cranberries for that extra festive touch.
Dust the log with confectioners’ sugar to resemble a dusting of snow.
Slice and serve your masterpiece to your holiday guests. Watch their faces light up like twinkling Christmas lights!
Rolling in the Sweetness:The Yule Log cake, also known as “Bûche de Noël,” is a showstopper on any Christmas dessert table. It’s a delightful treat that looks like a real log, and its taste matches its appearance.
Method:Roll out the sponge cake.
Spread the ganache and whipped cream.
Roll it up and shape it like a log.
Dust with powdered sugar to resemble snow.
Pro Tips:Get creative with decorations like meringue mushrooms.
Make it look like a real log with some bark-like patterns on the ganache.
A Funny Anecdote:Ever tried making a Yule Log that ended up looking more like a Yule Lump? Don’t worry; we’ve all been there. Just cover it in more ganache and call it a “rustic” log. It’ll taste amazing, no matter its shape!
Instructions
Preheat your oven to 375°F (190°C).
Line a 15×10-inch (40×25 cm) jelly-roll pan with parchment paper.
In a mixing bowl, beat the eggs and granulated sugar until thick and pale.
In a separate bowl, whisk together flour, cocoa, baking powder, and salt.
Gradually fold the dry mixture into the egg mixture.
Spread the batter evenly in the prepared pan.
Bake for about 12-15 minutes or until the cake springs back when lightly touched.
While the cake is baking, prepare a clean kitchen towel by sprinkling it with 1/4 cup confectioners’ sugar.
Once the cake is done, immediately turn it out onto the sugared towel.
Carefully peel off the parchment paper.
Roll up the cake and towel together, starting from a short side.
Allow the rolled cake to cool completely.
In a chilled mixing bowl, whip the cream with 2 tablespoons of confectioners’ sugar and vanilla extract until it’s stiff.
Carefully unroll the cooled cake.
Spread the whipped cream over the cake.
Roll the cake back up, without the towel.
Place it seam side down on a serving platter.
Decorate with chocolate shavings and a dusting of powdered sugar.
Slice and serve your Yule log cake.
Peppermint Bark Recipe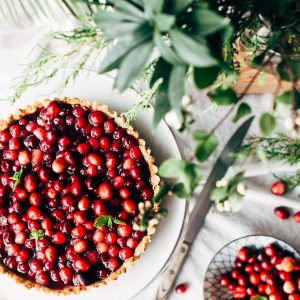
Ingredients
12 ounces of high-quality white chocolate, chopped
12 ounces of high-quality semi-sweet chocolate, chopped
1 teaspoon of peppermint extract
1/2 cup of crushed candy canes or peppermint candies
Directions
Line a baking sheet with parchment paper. This will make your cleanup as easy as Santa’s sleigh ride.
In a microwave-safe bowl, melt the semi-sweet chocolate in 20-30 second intervals, stirring in between until it’s smooth and shiny. This will make your base layer.
Pour the melted semi-sweet chocolate onto the prepared baking sheet and spread it out evenly. It should be as smooth as a frozen pond.
Place the baking sheet in the refrigerator to let the semi-sweet chocolate set for about 20 minutes. This is the stage where you can sneak in a few Christmas carols.
While the semi-sweet chocolate is setting, melt the white chocolate using the same microwave method. Once melted, stir in the peppermint extract, making it as minty as a winter breeze.
Let the white chocolate cool slightly before pouring it over the semi-sweet chocolate layer. Spread it evenly with a spatula.
Click Here To Buy Our Healthy Cookbook For Only $27 Today!Sprinkle the crushed candy canes or peppermint candies over the white chocolate while it’s still soft. Gently press them in to make sure they stick.
Place the baking sheet back in the refrigerator and let it chill for at least 30 minutes, or until both layers are completely set.
Once set, break your peppermint bark into deliciously irregular pieces. Think of it as edible modern art.
Package your peppermint bark in festive tins or gift bags for a sweet holiday treat.
Share your peppermint bark with friends and family, or keep it all to yourself (we won’t tell!).
A Minty Delight:Peppermint bark is a sweet and refreshing Christmas treat. Its combination of creamy white chocolate and crunchy peppermint candy canes is a match made in dessert heaven.
Method:Melt white chocolate chips.
Spread it on a parchment-lined tray.
Sprinkle crushed candy canes on top.
Let it cool and harden, then break into pieces.
Pro Tips:Use high-quality white chocolate for the best flavor.
Don’t skimp on the candy canes; that’s where the magic happens.
Why It’s a Holiday Favorite:Peppermint bark has a way of transporting us back to our childhood. The combination of sweet and minty freshness is like a winter wonderland in your mouth. It’s also a great stress reliever—crushing those candy canes can be quite therapeutic!
Instructions
Line a baking sheet with parchment paper.
Melt the semi-sweet chocolate chips in a microwave-safe bowl, stirring every 30 seconds until smooth.
Pour the melted chocolate onto the prepared baking sheet and spread it evenly.
Place it in the refrigerator for about 20 minutes or until set.
Melt the white chocolate chips in the same manner, stirring in the peppermint extract.
Pour the white chocolate over the set semi-sweet chocolate layer and spread it evenly.
Sprinkle the crushed peppermint candies on top.
Return it to the refrigerator for about 20 minutes or until fully set.
Break into pieces and serve your delightful peppermint bark.
Gingerbread Cookies Recipe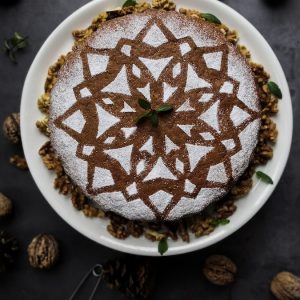
Ingredients
For the Cookies:3 cups all-purpose flour
1 teaspoon baking powder
1/2 teaspoon baking soda
1/4 teaspoon salt
1 tablespoon ground ginger
1 1/2 teaspoons ground cinnamon
1/4 teaspoon ground cloves
1/4 teaspoon ground nutmeg
3/4 cup unsalted butter, softened
3/4 cup dark brown sugar, packed
1 large egg
1/2 cup molasses
1 teaspoon pure vanilla extract
For the Icing:2 cups powdered sugar
2 tablespoons milk
2 tablespoons light corn syrup
Food coloring (optional)
Directions
Preheat your oven to 350°F (175°C). Line baking sheets with parchment paper. No sticking allowed!
In a large bowl, whisk together flour, baking powder, baking soda, salt, ginger, cinnamon, cloves, and nutmeg. This will be the spice blend that’ll make your cookies sing with flavor.
In another bowl, beat the softened butter and brown sugar until it’s light and fluffy. This is where the magic begins.
Add the egg, molasses, and vanilla extract to the butter-sugar mix. Beat until it’s as smooth as a freshly Zamboni’d ice rink.
Gradually add the dry ingredients to the wet mixture, mixing until you have a dough as cozy as a winter sweater.
Divide your gingerbread dough into two equal portions. Flatten each portion into a disk, wrap them in plastic wrap, and chill in the refrigerator for about an hour. This is your cookie dough hibernating until it’s ready to shine.
Roll out one portion of the dough on a lightly floured surface to about 1/4 inch thickness. Use your favorite cookie cutters to create your festive shapes. Place them on the prepared baking sheets.
Bake in the preheated oven for 8-10 minutes. They should be lightly golden around the edges.
While your cookies cool on wire racks, prepare the icing. Mix powdered sugar, milk, and corn syrup until it’s smooth and glossy. Add food coloring if you want to get creative with your cookie decorations.
Once your cookies are completely cool, it’s time to get artsy with the icing. Decorate your gingerbread cookies with swirls, dots, and smiles. It’s like giving your cookies their own holiday attire!
Let the icing set, and your gingerbread cookies are ready to be devoured or shared. Don’t forget to leave some for Santa!
Baking Up Memories:Gingerbread cookies are a beloved Christmas tradition. The spicy aroma that fills the kitchen while baking these delightful treats is enough to put anyone in a festive mood.
Method:Cream the butter and sugar.
Add molasses and egg.
Mix in the dry ingredients.
Roll out the dough, cut into shapes, and bake.
Pro Tips:Let the kids decorate the cookies with icing and sprinkles.
Don’t overbake; slightly soft gingerbread is the best.
The Story Behind the Gingerbread Tradition:
Gingerbread has been a part of Christmas since the Middle Ages. It was used to make decorative shapes and even served as a form of currency at fairs. Now, it’s a sweet reminder of the past and a delightful treat for the present.
Personal Experience:
Ever tried decorating gingerbread cookies with kids? It’s like an art project gone wild, but the smiles on their faces are worth every sprinkle that ends up on the floor.
Instructions
In a bowl, whisk together flour, baking powder, baking soda, salt, ginger, cinnamon, and cloves.
In another bowl, beat the butter and dark brown sugar until fluffy.
Beat in the egg, then molasses, and vanilla extract.
Gradually add the dry mixture to the wet mixture, stirring to combine.
Divide the dough into two equal parts and flatten each into a disk.
Wrap them in plastic wrap and refrigerate for at least 1 hour.
Preheat your oven to 375°F (190°C).
On a lightly floured surface, roll out each disk to about 1/8-inch thickness.
Cut out gingerbread shapes with cookie cutters and place them on a parchment-lined baking sheet.
Bake for about 8-10 minutes or until the edges are just beginning to brown.
Let the cookies cool on the baking sheet for a few minutes, then transfer to a wire rack to cool completely.
Decorate with royal icing once they’re cooled.
Eggnog Cheesecake Recipe
Ingredients
For the Crust:1 1/2 cups graham cracker crumbs
1/4 cup granulated sugar
1/2 cup unsalted butter, melted
For the Filling:3 (8-ounce) packages cream cheese, softened
1 cup granulated sugar
1 cup eggnog
3 large eggs
1 tablespoon all-purpose flour
1 teaspoon vanilla extract
1/2 teaspoon ground nutmeg
1/4 teaspoon salt
For the Topping:1 cup whipped cream
Ground nutmeg for garnish
Directions
Preheat your oven to 325°F (160°C). Grease a 9-inch springform pan with a touch of butter. This will ensure your cheesecake slides out as smoothly as a sled on fresh snow.
In a bowl, combine the graham cracker crumbs, sugar, and melted butter. Press this mixture firmly into the bottom of your prepared pan, creating a sturdy crust.
In a large mixing bowl, beat the softened cream cheese until it’s smooth and creamy. You want it as velvety as Santa’s suit.
Gradually add in the granulated sugar, eggnog, eggs, flour, vanilla extract, ground nutmeg, and salt. Beat until everything is well combined and your batter is as merry as a holiday jingle.
Pour this delightful mixture over the crust in the pan. Smooth the top to make it as even as freshly fallen snow.
Place your cheesecake in the preheated oven and bake for about 55-60 minutes, or until the edges are set but the center still jiggles slightly.
Turn off the oven and crack the oven door open. Let your cheesecake cool in the warm oven for an hour. This gradual cooling will help prevent cracks.
After cooling in the oven, move your cheesecake to the refrigerator and chill for at least 4 hours or, even better, overnight. This will let the flavors meld together like old friends reuniting for the holidays.
When it’s time to serve, carefully remove the cheesecake from the springform pan. It should come out with ease.
Spread a generous layer of whipped cream over the top of your eggnog cheesecake, and sprinkle a touch of ground nutmeg for that extra festive touch.
Slice, serve, and enjoy! Your cheesecake will be as delightful as opening presents on Christmas morning.
Instructions
Preheat your oven to 325°F (160°C).
In a mixing bowl, combine graham cracker crumbs, 1/4 cup sugar, and melted butter.
Press the mixture into the bottom of a 9-inch springform pan.
In another bowl, beat the cream cheese until it’s smooth.
Gradually add 1 cup sugar, eggs, and eggnog, beating until it’s well blended.
Stir in the flour, nutmeg, cinnamon, and vanilla extract.
Pour the cream cheese mixture over the crust in the pan.
Bake for about 45 minutes or until the center is set.
Let it cool, then refrigerate for at least 3 hours before serving.
Recipe: A Creamy Dream
Ingredients
Cream cheese
Eggnog
Graham cracker crumbs
Nutmeg
Directions
Prepare Your Base:In a saucepan, combine the heavy cream and whole milk. Heat the mixture over medium heat until it’s warm but not boiling. Stir occasionally to prevent scorching.
Whisk the Yolks:In a separate bowl, whisk together the egg yolks, granulated sugar, vanilla extract, and a pinch of salt. This will form the luscious base of your creamy dream.
Temper the Eggs:Carefully, and in a slow, steady stream, pour a portion of the warm cream mixture into the egg yolk mixture, whisking continuously. This tempers the eggs and prevents them from curdling.
Combine and Heat:Pour the egg and cream mixture back into the saucepan with the remaining warm cream. Heat the mixture over medium-low heat, stirring constantly, until it thickens and coats the back of a spoon. This will take about 5-7 minutes.
Chill:Remove the saucepan from the heat and let the mixture cool to room temperature. Then, cover it and refrigerate for at least 2 hours, or until it’s thoroughly chilled. The creaminess is coming to life.
Add the Dreamy Ingredients:Once the base is chilled, stir in the chocolate chips, toasted almonds, and fresh raspberries. These additions will elevate your dream into reality.
Churn to Perfection:Pour the mixture into your ice cream maker and churn according to the manufacturer’s instructions. This will transform your dreamy concoction into creamy, frozen bliss.
Serve and Savor:Scoop the creamy dream into bowls or cones and savor the heavenly combination of flavors. The creaminess will melt in your mouth, and the dream will linger on your taste buds.
Method:Mix cream cheese, eggnog, and nutmeg.
Pour over a graham cracker crust.
Bake until set, then chill.
Pro Tips:Freshly grated nutmeg makes a world of difference.
Don’t skip the chilling step; it enhances the flavor.
A Humorous Take:Eggnog cheesecake is so creamy; it’s like a snowbank in your mouth! Just be careful not to mistake it for actual eggnog; one sip, and you might find yourself wondering why it doesn’t have that cheesecake richness.
Instructions
Chill Out:First things first, make sure your ice cream maker’s freezer bowl is properly frozen. It’s gotta be as cold as your ex’s heart, ideally chilled for at least 12 hours.
Mix It Up:In a saucepan, combine the heavy cream and milk over medium heat. Stir gently until it’s hotter than a summer day, but don’t let it boil. Just when you start seeing steam, remove it from the heat.
Whisk It Good:In a separate bowl, whisk the egg yolks and sugar until it’s as smooth as a silk scarf.
Temper, Don’t Temper:Gradually, temper the egg yolk mixture by pouring the hot milk-cream combo into it, all the while whisking like your life depends on it. This prevents scrambled eggs in your ice cream.
Back on the Heat:Pour the mixture back into the saucepan and cook over low heat, stirring continuously, until it thickens. It’s ready when it coats the back of a spoon like a velvety coat in winter.
Vanilla Magic:Remove from the heat, add that teaspoon of vanilla extract, and a tiny pinch of salt. Let it cool down to room temperature.
Chill Again:Pop this mixture into the fridge for a few hours. You want it cold, like your heart after a breakup.
Freeze Time:Time to break out the ice cream maker. Pour your chilled mixture in there and churn according to the manufacturer’s instructions.
Mix-Ins:If you want to get fancy, add some chocolate shavings, caramel drizzle, or chopped nuts during the last few minutes of churning.
Solidify:Once it’s reached a creamy consistency, transfer it to an airtight container. Cover it like you’re hiding a secret, and freeze for at least 4 hours or until firm.
Scoop and Savor:When it’s time to indulge, scoop out that Creamy Dream and enjoy! It’s richer and smoother than a smooth-talking charmer.
Share the Love:Don’t forget to share with your friends. You wouldn’t want to keep all this creamy goodness to yourself, would you?
So there you have it, a Creamy Dream that’ll melt hearts faster than an unexpected compliment. Enjoy, and remember, ice cream can mend broken hearts!
Cranberry Bliss Bars Recipe
Ingredients
For the Bars:1 cup (2 sticks) unsalted butter, melted
1 1/2 cups granulated sugar
2 large eggs
1 teaspoon vanilla extract
1 teaspoon orange extract (optional, but delightful)
2 cups all-purpose flour
1/2 teaspoon salt
1/2 cup dried cranberries
1/2 cup white chocolate chips
For the Frosting:8 ounces cream cheese, softened
1 1/2 cups powdered sugar
1 teaspoon orange zest
2 tablespoons fresh orange juice
1/2 cup dried cranberries, chopped
1/2 cup white chocolate chips, melted
For the Drizzle:1/4 cup white chocolate chips, melted
Directions
Preheat your oven to 350°F (175°C). Grease a 9×13-inch baking pan or line it with parchment paper for easy removal.
In a large bowl, mix the melted butter and granulated sugar until it’s as smooth as freshly fallen snow.
Beat in the eggs, one at a time, until your batter is as creamy as a winter’s dream.
Stir in the vanilla extract and orange extract if you’re using it. The aroma should be as cheerful as a holiday carol.
In a separate bowl, whisk together the flour and salt. Gradually add this dry mixture to your wet ingredients, stirring until just combined. Don’t overmix; you want your batter as tender as a snowflake.
Gently fold in the dried cranberries and white chocolate chips. This is where your bars get their blissful texture.
Spread this delightful batter evenly into your prepared baking pan. It should be as smooth as freshly fallen snow.
Bake in the preheated oven for 25-30 minutes, or until the edges are golden and a toothpick inserted in the center comes out clean. Your kitchen will smell heavenly.
While your bars are baking, prepare the frosting. In a mixing bowl, beat the softened cream cheese until it’s as creamy as Santa’s beard.
Gradually add the powdered sugar, orange zest, and fresh orange juice, beating until it’s as smooth as a winter’s pond.
Stir in the chopped dried cranberries and melted white chocolate chips. Your frosting should be as decadent as holiday indulgence.
Once your bars are out of the oven and have cooled slightly, spread the cream cheese frosting evenly over them.
Drizzle the melted white chocolate over the frosting for that extra touch of bliss.
Allow your Cranberry Bliss Bars to cool completely in the pan. Then, refrigerate them for a few hours or overnight to set.
When they’re thoroughly chilled and set, use a sharp knife to cut them into squares or bars. They should be as delightful as unwrapping presents on Christmas morning.
Serve and enjoy your Cranberry Bliss Bars with a cup of hot cocoa or your favorite holiday drink. Bliss is just a bite away!
Blissful Bites:Cranberries are a staple of the holiday season, and these Cranberry Bliss Bars take their tartness and turn it into a delightful dessert.
Instructions
Preheat your oven to 350°F (175°C).
In a bowl, whisk together flour, baking powder, and salt.
In another bowl, beat the softened butter and brown sugar until it’s fluffy.
Beat in the egg and vanilla extract.
Gradually add the dry mixture to the wet mixture, stirring to combine.
Stir in 1/2 cup white chocolate chips, 1/2 cup dried cranberries, and chopped macadamia nuts.
Spread the mixture in a greased 9×9-inch (23×23 cm) baking pan.
Bake for about 20-25 minutes or until a toothpick comes out clean.
Let it cool in the pan.
In a microwave-safe bowl, melt 1/2 cup white chocolate chips.
Drizzle the melted chocolate over the cooled bars.
Sprinkle with 1/2 cup dried cranberries.
Allow the chocolate to set before cutting into bars.
Recipe: A Surprising Twist
Ingredients
White chocolate chips
Dried cranberries
Cream cheese frosting
Ginger and orange zest
Directions
Preheat and Prepare:Start by preheating your oven to 350°F (175°C). Grease and flour a 9×9-inch (23×23 cm) square baking pan. This ensures your surprising twist will come out perfectly.
Mix the Dry Ingredients:In a bowl, whisk together the flour, cocoa powder, baking powder, baking soda, and salt. These dry ingredients will form the base of your unique creation.
Cream the Butter and Sugar:In a separate mixing bowl, cream together the softened butter and granulated sugar until the mixture becomes light and fluffy. This step is crucial for the texture of your surprise.
Add Eggs and Vanilla:Beat in the eggs one at a time, ensuring they are fully incorporated. Then, stir in the vanilla extract. The aroma is already getting exciting.
Alternate Dry and Wet Ingredients:Add the dry ingredients to the wet mixture in batches, starting and ending with the dry mixture. This step ensures that your twist will have the right consistency.
Incorporate Coffee:Stir in the cooled brewed coffee until the batter is smooth. The coffee is the secret ingredient that will take your dish to a whole new level.
Fold in the Surprise:Now, for the surprising twist! Gently fold in the chocolate chips. This hidden gem will make every bite a delightful discovery.
Bake to Perfection:Pour the batter into the prepared pan, spreading it evenly. Bake for about 30-35 minutes, or until a toothpick inserted into the center comes out clean. The anticipation is building.
Cool and Enjoy:Allow your creation to cool in the pan for 10 minutes. Then, transfer it to a wire rack to cool completely. As it cools, the flavors will meld, and your unique twist will become even more apparent.
Method:Mix cranberries and white chocolate into a batter.
Bake and cool, then frost with cream cheese frosting.
Sprinkle with ginger and orange zest.
Pro Tips:The ginger and orange zest give it a zingy kick.
Use a sharp knife for clean, beautiful bars.
A Humorous Twist:Cranberry Bliss Bars – the name says it all. They’re so good that they make you feel blissfully unaware of any calories you might be consuming during the holidays. It’s like a little piece of heaven in each bite!
Instructions
Preheat your oven to 350°F (175°C). Grease and flour a 9×9-inch (23×23 cm) square baking pan.
In a bowl, whisk together the flour, cocoa powder, baking powder, baking soda, and salt.
In a separate mixing bowl, cream together the softened butter and granulated sugar until it’s light and fluffy.
Beat in the eggs one at a time, then stir in the vanilla extract.
Add the dry ingredients alternately with buttermilk, beginning and ending with the dry mixture.
Stir in the cooled brewed coffee until the batter is smooth.
Fold in the surprise ingredient: chocolate chips.
Pour the batter into the prepared pan.
Bake for about 30-35 minutes, or until a toothpick inserted into the center comes out clean.
Allow the cake to cool in the pan for 10 minutes before transferring it to a wire rack to cool completely.
Fruitcake – Love It or Hate It Recipe
Ingredients
For the Fruit Mix:3 cups mixed dried fruits (raisins, currants, candied peel, cherries, apricots, etc.)
1 cup chopped nuts (walnuts, almonds, or your choice)
1/2 cup rum or brandy
For the Cake:1 cup unsalted butter, softened
1 cup granulated sugar
4 large eggs
2 cups all-purpose flour
1 teaspoon baking powder
1/2 teaspoon salt
1/2 teaspoon ground cinnamon
1/4 teaspoon ground nutmeg
1/4 teaspoon ground allspice
For the Glaze:1/4 cup apricot preserves
1 tablespoon rum or brandy
Directions
In a large bowl, combine the mixed dried fruits and chopped nuts. Pour the rum or brandy over them, giving your fruits a boozy bath. Cover and let them soak for at least a few hours, or even overnight. This is where the magic of flavor begins.
Preheat your oven to 325°F (160°C). Grease and flour a 9-inch round cake pan or a loaf pan. Your fruitcake will come out as easily as Santa down a chimney.
In a separate bowl, whisk together the flour, baking powder, salt, cinnamon, nutmeg, and allspice. This is your aromatic mix that will infuse your cake with warm spices.
In another bowl, cream together the softened butter and granulated sugar until it’s light and fluffy. This is where the sweetness meets the richness.
Beat in the eggs, one at a time, until your batter is as smooth as a winter’s pond.
Gradually add the dry ingredients to the wet mixture, mixing until just combined. Don’t overmix; you want your batter to be tender and loving.
Now, fold in your beautifully soaked dried fruits and nuts. Your batter should be as colorful as a Christmas ornament.
Pour this delightful mixture into your prepared pan and smooth the top like you’re tucking it in for a long winter’s nap.
Bake in the preheated oven for about 60-70 minutes, or until a toothpick inserted into the center comes out clean. Your kitchen will be filled with the heavenly aroma of fruit and spice.
While your fruitcake is baking, prepare the glaze. In a small saucepan, warm the apricot preserves and rum or brandy over low heat until they’re nicely combined. This is your finishing touch.
When your fruitcake is done, remove it from the oven and let it cool in the pan for a bit. Then, transfer it to a wire rack.
While the cake is still warm, brush the glaze over the top, letting it soak in and give your fruitcake that beautiful sheen.
Allow your Fruitcake to cool completely before slicing and serving. It’s as comforting as a hug from a loved one.
Share your Fruitcake with friends and family, and you might just make some converts out of the skeptics. Fruitcake – love it or hate it, it’s a holiday tradition!
The Fruitcake Debate:Now, let’s address the elephant in the room – fruitcake. This dense, fruit-laden cake has a reputation, and opinions about it are as varied as the ingredients inside.
A Discussion:Fruitcake is like that quirky relative at family gatherings. Some people love its dense, fruity goodness, while others wonder how it keeps getting invited. The truth is, a well-made fruitcake can be a delightful surprise, and it’s worth giving it a chance.
A Surprising Twist:Here’s a secret – the key to a good fruitcake is soaking the dried fruits in brandy for weeks. It transforms them into plump, flavorful bursts of joy. So, the next time you encounter a fruitcake, remember that it’s like a boozy treasure chest of flavors waiting to be discovered.
A Humorous Take:Fruitcake – it’s the gift that keeps on giving, even if you’re not quite sure what you’re getting. Whether you love it or hate it, it’s a Christmas tradition that adds a touch of mystery to the season.
Instructions
In a large bowl, combine mixed dried fruit, chopped candied peel, candied cherries, and chopped nuts.
Pour the dark rum over the fruit and nut mixture.
Cover and let it sit for at least 24 hours, stirring occasionally.
Preheat your oven to 275°F (135°C).
Grease and flour a 10-inch tube pan.
In a bowl, whisk together flour, baking powder, salt, and spices.
In another bowl, beat the softened butter and sugar until it’s fluffy.
Beat in the eggs one at a time, then stir in the vanilla extract.
Gradually add the dry mixture to the wet mixture, stirring to combine.
Stir in the fruit and nut mixture.
Pour the batter into the prepared pan.
Bake for about 2 1/2 to 3 hours, or until a toothpick comes out clean.
Let the cake cool in the pan for 10 minutes before transferring to a wire rack to cool completely.
Conclusion
The holiday season is all about togetherness, joy, and, of course, delicious food. These 7 Christmas dessert recipes are more than just sweet treats; they’re a way to create lasting memories with loved ones.
So, this Christmas, don your apron, gather your ingredients, and let the magic of these desserts fill your home with warmth and laughter. Whether you’re baking a classic Christmas pudding or trying your hand at a Yule Log cake, remember that the best part of the holiday season is sharing these delectable delights with those you hold dear.
Wishing you a sweet and memorable holiday season filled with laughter, love, and, of course, plenty of Christmas desserts!
World Trade Center Footage | Webex Costs | Virtual Data Rooms | Structures Annuity Settlement | Sell Annuity Payment | Neuson | Online Classes | Nunavut Culture | Online College Course | Motor Replacements | Motor Insurance Quotes | Mortgage Adviser | Met Auto | Tax credit | Help desk software | Home refinancing | Urgent care | Marketing integration | Debt relief | Bitcoin | Fitness center software | Insurance | Gas | Electricity | Weight loss | Sell house for cash | Automotive repair | Loans | Internet marketing | Mortgage | Attorney | SEO specialist | Lawyer | Donate | Conference Call | Treatment | Degree | Software | Credit | Classes | Investing | Recovery | Trading | Rehab | Hosting | Cord Blood | Claim | Automotive warranty | Paintless dent repair | Mesothelioma Law Firm | Massage School Dallas Texas | Low Credit Line Credit Cards | Life Insurance Co Lincoln | Insurance Companies | Injury Lawyers | How to Donate A Car in California | Home Phone Internet Bundle | Holland Michigan College | Royalty-Free Images Stock | Register Free Domains | Psychic for Free | Ph.D. in Counseling Education | Personal Injury Lawyers | Personal Injury Law Firm | PaperPort Promotional Code | Online Stock Trading | Online Motor Insurance Quotes | Donate your Car for Money | Online Colleges | Health Records, Personal Health Record | Hard drive Data Recovery Services | Donate Old Cars to Charity | Forex Trading Platform | Forensics Online Course | Donate Car to Charity California | Donate Car for Tax Credit | Car Insurance Quotes PA | Email Bulk Service | Donating Used Cars to Charity | Donating a Car in Maryland | Donate Your Car Sacramento | Online Criminal Justice Degree | Donate Your Car for Kids | Futuristic Architecture | Donate Cars in MA | Data Recovery Raid | Mesothelioma | A car accident lawyer | Personal injury lawyer | AC repair | Lawsuit settlements | Car insurance | Flood recovery | Water damage restoration | Rehab doctors | Online degree | Online master’s degree | Doctoral programs | Hail car insurance