
7 Oven-Fried Chicken Recipes: Crispy, Juicy, and Guilt-Free!
Ah, the temptation of fried chicken! That crispy exterior, juicy meat on the inside, and a taste that’s oh so comforting. But what if we told you that you can indulge in this delightful treat without the deep frying and extra calories? Welcome to the world of oven-fried chicken! In this article, we’ll explore seven delectable oven-fried chicken recipes that are not only easy to make but also healthier alternatives to traditional fried chicken. So, get your apron on and your taste buds ready, because we’re diving into a world of flavor and guilt-free indulgence.
Classic Crispy Oven-Fried Chicken
Ingredients
4 bone-in, skin-on chicken thighs
1 cup all-purpose flour
1 teaspoon salt
1 teaspoon black pepper
1 teaspoon paprika
1 teaspoon garlic powder
2 eggs
2 tablespoons milk
Cooking spray
Directions
Preheat your oven to 425°F (220°C).
In a bowl, mix together the flour, salt, pepper, paprika, and garlic powder. This is your seasoned coating.
In another bowl, whisk the eggs and milk to create an egg wash.
Dredge each chicken thigh in the seasoned coating, then dip it into the egg wash, and back into the coating. Make sure it’s well coated.
Place the coated chicken thighs on a baking sheet lined with parchment paper.
Lightly spray the chicken with cooking spray. This will help them get that crispy texture without deep frying.
Bake in the preheated oven for 35-40 minutes or until the chicken is golden brown and crispy.
Instructions
Preheat your oven to 400°F (200°C) and line a baking sheet with parchment paper.
In a bowl, mix flour, salt, paprika, garlic powder, onion powder, and black pepper.
In another bowl, whisk eggs and milk.
Dip each chicken thigh in the flour mixture, then the egg mixture, and finally, coat it with breadcrumbs.
Place the coated chicken thighs on the prepared baking sheet.
Lightly spray the chicken with cooking spray.
Bake for 45-50 minutes, or until the chicken is golden brown and crispy.
Let’s dive into the process of making this classic favorite with a healthy twist.
Marinate the Chicken –In a large bowl, place the chicken pieces and pour buttermilk over them. Let them soak for at least 30 minutes, or if you have time, refrigerate them for a few hours or overnight. This buttermilk bath is the secret to tender and juicy chicken.
Prepare the Coating –In a separate bowl, combine the all-purpose flour, paprika, garlic powder, onion powder, cayenne pepper, salt, and pepper. Mix them well to create the flavorful coating.
Coat the Chicken –Preheat your oven to 400°F (200°C) and line a baking sheet with foil. Spray it with cooking spray. Take each chicken piece, let the excess buttermilk drip off, and coat it thoroughly with the seasoned flour mixture. Place the coated chicken on the prepared baking sheet.
Bake to Crispy Perfection –Place the baking sheet in the preheated oven and bake for about 45-50 minutes, or until the chicken is golden brown and crispy. You’ll be amazed at how oven-baking can achieve that classic fried chicken texture.
Click Here To Buy Our Healthy Cookbook For Only $27 Today!Serve and Enjoy –Once the chicken is done, remove it from the oven and let it cool for a few minutes. Then, serve your Classic Crispy Oven-Fried Chicken while it’s still hot and crunchy.
Spicy Oven-Fried Chicken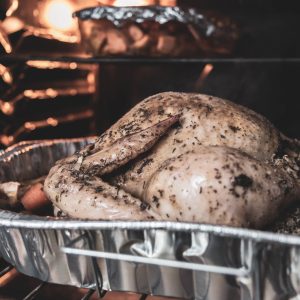
Ingredients
4 bone-in, skin-on chicken drumsticks
1 cup panko breadcrumbs
2 teaspoons cayenne pepper
1 teaspoon paprika
1 teaspoon garlic powder
Salt and pepper to taste
2 eggs
Directions
Preheat your oven to 400°F (200°C).
In a bowl, mix the panko breadcrumbs, cayenne pepper, paprika, garlic powder, salt, and pepper.
In another bowl, whisk the eggs.
Dredge each chicken drumstick in the egg wash, then roll it in the spicy breadcrumb mixture.
Place the drumsticks on a baking sheet lined with parchment paper.
Bake for 35-40 minutes or until the chicken is crispy and cooked through.
Instructions
Preheat your oven to 400°F (200°C) and line a baking sheet with parchment paper.
In a bowl, mix buttermilk and hot sauce.
In another bowl, combine breadcrumbs, chili powder, cayenne pepper, garlic powder, salt, and pepper.
Dip each chicken drumstick in the buttermilk mixture, then coat it with the breadcrumb mixture.
Place the coated drumsticks on the baking sheet.
Lightly spray with cooking spray.
Bake for 30-35 minutes until the chicken is crispy and cooked through.
Let’s roll up our sleeves and get cooking with these fiery steps.
Marinate the Chicken –Take your chicken pieces and place them in a large bowl. Pour the buttermilk over them, ensuring they’re well-coated. Let them soak for at least 30 minutes, or if you can, refrigerate them for a few hours or overnight. This buttermilk bath is the secret to tender, juicy chicken.
Prepare the Fiery Coating –In a separate bowl, combine the all-purpose flour, paprika, cayenne pepper, garlic powder, onion powder, and a pinch of salt and pepper. Mix everything well; this is where the heat and flavor come to life.
Coat the Chicken –Preheat your oven to 400°F (200°C) and line a baking sheet with foil. Give it a light spray with cooking oil. Take each chicken piece, let the excess buttermilk drip off, and coat it thoroughly with the spicy flour mixture. Place the coated chicken on the prepared baking sheet.
Spice it Up –Drizzle hot sauce over the top of the coated chicken pieces for an extra fiery kick. It’s all about that sizzle!
Bake to Crispy Perfection –Pop the baking sheet into the preheated oven and bake for about 45-50 minutes, or until the chicken is gloriously golden brown and crispy. You won’t believe it’s baked, not fried!
Serve and Savor –Once your Spicy Oven-Fried Chicken is done, remove it from the oven and let it cool for a few minutes. Then, get ready to dive into fiery, crispy goodness.
Buttermilk Ranch Oven-Fried Chicken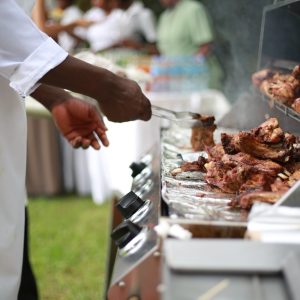
Ingredients
4 bone-in, skin-on chicken breasts
1 cup buttermilk
1 packet ranch dressing mix
1 cup crushed cornflakes
Salt and pepper to taste
Directions
In a bowl, mix the buttermilk and ranch dressing mix to create a flavorful marinade.
Place the chicken breasts in the buttermilk mixture and let them marinate for at least 30 minutes, or overnight for maximum flavor.
Preheat your oven to 375°F (190°C).
In a separate bowl, combine the crushed cornflakes, salt, and pepper.
Take each marinated chicken breast and coat it with the cornflake mixture.
Place the coated chicken on a baking sheet and bake for 30-35 minutes, or until they’re crispy and cooked through.
Instructions
Preheat your oven to 375°F (190°C) and line a baking sheet with parchment paper.
In a bowl, mix buttermilk and ranch seasoning.
In another bowl, combine panko breadcrumbs, Parmesan cheese, salt, and pepper.
Dip each chicken breast in the buttermilk mixture, then coat it with the breadcrumb mixture.
Place the coated chicken breasts on the baking sheet.
Lightly spray with cooking spray.
Bake for 35-40 minutes until the chicken is golden and the internal temperature reaches 165°F (74°C).
Let’s get to work and transform these simple ingredients into a mouthwatering meal.
Marinate the Chicken –Begin by placing the chicken pieces in a large bowl and pouring the buttermilk over them. Make sure they are well-coated. Let them soak for at least 30 minutes, or refrigerate them for a few hours or overnight for maximum tenderness. This buttermilk bath is the key to juicy chicken.
Prepare the Ranch Coating –In a separate bowl, mix the all-purpose flour, ranch seasoning mix, garlic powder, onion powder, and a pinch of salt and pepper. Blend these ingredients well to create a tangy ranch coating that will elevate your chicken.
Coat the Chicken –Preheat your oven to 400°F (200°C) and line a baking sheet with foil. Give it a light spray with cooking oil. Take each chicken piece, let the excess buttermilk drip off, and coat it thoroughly with the ranch-flavored flour mixture. Place the coated chicken on the prepared baking sheet.
Bake to Golden Perfection –Slide the baking sheet into the preheated oven and bake for approximately 45-50 minutes, or until your Buttermilk Ranch Oven-Fried Chicken is beautifully golden brown and irresistibly crispy. You’ll be amazed that it’s oven-baked, not fried.
Serve and Savor –Once your Buttermilk Ranch Oven-Fried Chicken is done, take it out of the oven and let it cool for a few minutes. Then, get ready to savor the tangy, crispy goodness.
Garlic Parmesan Oven-Fried Chicken
Ingredients
4 bone-in, skin-on chicken wings
1 cup grated Parmesan cheese
2 teaspoons garlic powder
1 teaspoon paprika
Salt and pepper to taste
2 eggs
Directions
Preheat your oven to 400°F (200°C).
In a bowl, mix the grated Parmesan cheese, garlic powder, paprika, salt, and pepper.
In another bowl, whisk the eggs.
Dredge each chicken wing in the egg wash, then roll it in the garlic Parmesan mixture.
Place the wings on a baking sheet lined with parchment paper.
Bake for 30-35 minutes or until the chicken is golden brown and the cheese is crispy.
Click Here To Buy Our Healthy Cookbook For Only $27 Today!Instructions
Preheat your oven to 425°F (220°C) and line a baking sheet with parchment paper.
In a bowl, combine Parmesan cheese, breadcrumbs, minced garlic, dried oregano, dried basil, salt, and pepper.
Dip each chicken wing in the breadcrumb mixture, ensuring an even coating.
Place the coated chicken wings on the baking sheet.
Lightly spray with cooking spray.
Bake for 30-35 minutes until the chicken is crispy and the internal temperature reaches 165°F (74°C).
Let’s roll up our sleeves and get to work, transforming these simple ingredients into a flavor-packed masterpiece.
Marinate the Chicken –Start by placing the chicken pieces in a large bowl and pouring the buttermilk over them. Ensure they are well-coated. Let them soak for at least 30 minutes, or refrigerate for a few hours or overnight for maximum tenderness. This buttermilk bath is the secret to juicy chicken.
Prepare the Garlic Parmesan Coating –In a separate bowl, combine the all-purpose flour, garlic powder, grated Parmesan cheese, and a pinch of salt and pepper. Mix these ingredients thoroughly to create a cheesy, garlicky coating that will elevate your chicken.
Coat the Chicken –Preheat your oven to 400°F (200°C) and line a baking sheet with foil. Give it a light spray with cooking oil. Take each chicken piece, let the excess buttermilk drip off, and coat it thoroughly with the garlic Parmesan-flavored flour mixture. Place the coated chicken on the prepared baking sheet.
Bake to Golden Perfection –Slide the baking sheet into the preheated oven and bake for approximately 45-50 minutes, or until your Garlic Parmesan Oven-Fried Chicken is gloriously golden brown and irresistibly crispy. You won’t believe it’s oven-baked, not fried.
Serve and Savor –Once your Garlic Parmesan Oven-Fried Chicken is done, remove it from the oven and let it cool for a few minutes. Then, get ready to savor the garlicky, cheesy goodness.
Honey Mustard Glazed Oven-Fried Chicken
Ingredients
4 bone-in, skin-on chicken legs
1 cup breadcrumbs
1/2 cup honey mustard sauce
1/4 cup honey
1/4 cup Dijon mustard
Salt and pepper to taste
Directions
Preheat your oven to 375°F (190°C).
In a bowl, mix the honey mustard sauce, honey, Dijon mustard, salt, and pepper. This is your sweet and tangy glaze.
Coat each chicken leg with the glaze and let it sit for a few minutes.
Roll the glazed chicken legs in breadcrumbs.
Place the legs on a baking sheet and bake for 35-40 minutes, or until they’re crispy and the glaze is caramelized.
Instructions
Preheat your oven to 375°F (190°C) and line a baking sheet with parchment paper.
In a bowl, whisk together honey, Dijon mustard, garlic powder, onion powder, salt, and pepper.
Dip each chicken thigh in the honey mustard glaze, ensuring an even coating.
Place the coated chicken thighs on the baking sheet.
Lightly spray with cooking spray.
Bake for 40-45 minutes, basting with additional glaze halfway through, until the chicken is cooked through.
Let’s roll up our sleeves and get cooking, turning these simple ingredients into a sweet and savory masterpiece.
Marinate the Chicken –Begin by placing the chicken pieces in a large bowl and pouring the buttermilk over them. Ensure they are well-coated. Let them soak for at least 30 minutes, or refrigerate for a few hours or overnight for maximum tenderness. This buttermilk bath is the secret to juicy chicken.
Prepare the Honey Mustard Glaze –In a separate bowl, combine the honey mustard sauce, paprika, garlic powder, onion powder, and a pinch of salt and pepper. Mix these ingredients thoroughly to create a sweet and savory glaze that will elevate your chicken.
Coat the Chicken –Preheat your oven to 400°F (200°C) and line a baking sheet with foil. Give it a light spray with cooking oil. Take each chicken piece, let the excess buttermilk drip off, and coat it thoroughly with the honey mustard-flavored flour mixture. Place the coated chicken on the prepared baking sheet.
Bake to Golden Perfection –Slide the baking sheet into the preheated oven and bake for approximately 45-50 minutes, or until your Honey Mustard Glazed Oven-Fried Chicken is gloriously golden brown and irresistibly crispy. You won’t believe it’s oven-baked, not fried.
Serve and Savor –Once your Honey Mustard Glazed Oven-Fried Chicken is done, remove it from the oven and let it cool for a few minutes. Then, get ready to savor the sweet and savory delight.
Lemon Pepper Oven-Fried Chicken
Ingredients
4 bone-in, skin-on chicken thighs
1 cup cornmeal
Zest of 1 lemon
1 teaspoon black pepper
Salt to taste
2 eggs
Directions
Preheat your oven to 400°F (200°C).
In a bowl, mix the cornmeal, lemon zest, black pepper, and salt.
In another bowl, whisk the eggs.
Dredge each chicken thigh in the egg wash, then roll it in the lemon pepper cornmeal mixture.
Place the thighs on a baking sheet lined with parchment paper.
Bake for 35-40 minutes or until the chicken is crispy and cooked through, with a zesty lemon kick.
Instructions
Preheat your oven to 400°F (200°C) and line a baking sheet with parchment paper.
In a bowl, mix lemon zest, lemon juice, black pepper, garlic powder, and onion powder.
Dip each chicken leg in the lemon pepper mixture, then coat it with breadcrumbs.
Place the coated chicken legs on the baking sheet.
Lightly spray with cooking spray.
Bake for 35-40 minutes until the chicken is golden and the internal temperature reaches 165°F (74°C).
Let’s dive into the kitchen and transform these simple ingredients into a citrusy masterpiece.
Marinate the Chicken –Begin by placing the chicken pieces in a large bowl and pouring the buttermilk over them. Ensure they are well-coated. Let them soak for at least 30 minutes, or refrigerate for a few hours or overnight for maximum tenderness. This buttermilk bath is the secret to juicy chicken.
Prepare the Lemon Pepper Coating –In a separate bowl, combine the all-purpose flour, lemon zest, lemon pepper seasoning, garlic powder, and a pinch of salt and pepper. Mix these ingredients thoroughly to create a zesty coating that will elevate your chicken.
Coat the Chicken –Preheat your oven to 400°F (200°C) and line a baking sheet with foil. Give it a light spray with cooking oil. Take each chicken piece, let the excess buttermilk drip off, and coat it thoroughly with the lemon pepper-flavored flour mixture. Place the coated chicken on the prepared baking sheet.
Bake to Citrusy Perfection –Slide the baking sheet into the preheated oven and bake for approximately 45-50 minutes, or until your Lemon Pepper Oven-Fried Chicken is beautifully golden brown and bursting with citrusy flavor. You’ll be amazed that it’s oven-baked, not fried.
Serve and Savor –Once your Lemon Pepper Oven-Fried Chicken is done, remove it from the oven and let it cool for a few minutes. Then, get ready to savor the zesty delight.
BBQ Oven-Fried Chicken
Ingredients
4 bone-in, skin-on chicken wings
1 cup BBQ sauce
1 cup crushed potato chips
Salt and pepper to taste
Directions
Preheat your oven to 375°F (190°C).
In a bowl, mix the BBQ sauce, salt, and pepper.
Coat each chicken wing with the BBQ sauce.
Roll the sauced wings in the crushed potato chips. Yes, potato chips make for a deliciously crispy coating!
Place the wings on a baking sheet and bake for 30-35 minutes or until they’re crispy and smothered in BBQ goodness.
There you have it, a scrumptious lineup of oven-fried chicken recipes to satisfy all your cravings. Each of these recipes is crispy, flavorful, and guaranteed to make your taste buds dance. Now, it’s time to put on your apron, get cooking, and enjoy a feast of mouthwatering, oven-fried chicken. Bon appétit!
Instructions
Preheat your oven to 375°F (190°C) and line a baking sheet with parchment paper.
In a bowl, mix barbecue sauce, smoked paprika, garlic powder, onion powder, salt, and pepper.
Dip each chicken quarter in the barbecue sauce mixture, ensuring an even coating.
Place the coated chicken quarters on the baking sheet.
Lightly spray with cooking spray.
Bake for 40-45 minutes, basting with additional sauce halfway through, until the chicken is cooked through.
There you have it, a finger-licking, crispy, oven-fried chicken feast! Enjoy these delightful recipes and don’t be afraid to add your personal touch to each one. And remember, it’s not just about the taste; it’s about the joy of cooking and sharing a hearty meal with loved ones. Bon appétit!
Let’s roll up our sleeves and get to work, turning these simple ingredients into a smoky barbecue masterpiece.
Marinate the Chicken –Start by placing the chicken pieces in a large bowl and pouring the buttermilk over them. Ensure they are well-coated. Let them soak for at least 30 minutes, or refrigerate for a few hours or overnight for maximum tenderness. This buttermilk bath is the secret to juicy chicken.
Prepare the BBQ Coating –In a separate bowl, combine the all-purpose flour, paprika, garlic powder, onion powder, and a pinch of salt and pepper. Mix these ingredients thoroughly to create a smoky, savory coating that will elevate your chicken.
Coat the Chicken –Preheat your oven to 400°F (200°C) and line a baking sheet with foil. Give it a light spray with cooking oil. Take each chicken piece, let the excess buttermilk drip off, and coat it thoroughly with the BBQ-flavored flour mixture. Place the coated chicken on the prepared baking sheet.
Bake to BBQ Perfection –Slide the baking sheet into the preheated oven and bake for approximately 45-50 minutes, or until your BBQ Oven-Fried Chicken is gloriously golden brown and bursting with smoky flavor. You’ll be amazed that it’s oven-baked, not grilled.
Serve and Savor –Once your BBQ Oven-Fried Chicken is done, remove it from the oven and let it cool for a few minutes. Then, get ready to savor the smoky, tangy goodness.
Conclusion
There you have it, seven mouthwatering oven-fried chicken recipes that are easy to make and won’t make you feel guilty. Whether you’re into classic crispy, spicy, buttermilk ranch, garlic Parmesan, honey mustard, lemon pepper, or BBQ, these recipes are sure to satisfy your cravings. Say goodbye to the deep fryer and embrace the healthier, oven-fried goodness. So, roll up your sleeves, get cooking, and enjoy these flavorful, crispy delights!
In the world of cooking, experimenting and trying out new recipes is half the fun. So, go ahead and make these recipes your own by adding your personal touch. Remember, cooking is an art, and you are the artist. Enjoy your culinary journey!
World Trade Center Footage | Webex Costs | Virtual Data Rooms | Structures Annuity Settlement | Sell Annuity Payment | Neuson | Online Classes | Nunavut Culture | Online College Course | Motor Replacements | Motor Insurance Quotes | Mortgage Adviser | Met Auto | Tax credit | Help desk software | Home refinancing | Urgent care | Marketing integration | Debt relief | Bitcoin | Fitness center software | Insurance | Gas | Electricity | Weight loss | Sell house for cash | Automotive repair | Loans | Internet marketing | Mortgage | Attorney | SEO specialist | Lawyer | Donate | Conference Call | Treatment | Degree | Software | Credit | Classes | Investing | Recovery | Trading | Rehab | Hosting | Cord Blood | Claim | Automotive warranty | Paintless dent repair | Mesothelioma Law Firm | Massage School Dallas Texas | Low Credit Line Credit Cards | Life Insurance Co Lincoln | Insurance Companies | Injury Lawyers | How to Donate A Car in California | Home Phone Internet Bundle | Holland Michigan College | Royalty-Free Images Stock | Register Free Domains | Psychic for Free | Ph.D. in Counseling Education | Personal Injury Lawyers | Personal Injury Law Firm | PaperPort Promotional Code | Online Stock Trading | Online Motor Insurance Quotes | Donate your Car for Money | Online Colleges | Health Records, Personal Health Record | Hard drive Data Recovery Services | Donate Old Cars to Charity | Forex Trading Platform | Forensics Online Course | Donate Car to Charity California | Donate Car for Tax Credit | Car Insurance Quotes PA | Email Bulk Service | Donating Used Cars to Charity | Donating a Car in Maryland | Donate Your Car Sacramento | Online Criminal Justice Degree | Donate Your Car for Kids | Futuristic Architecture | Donate Cars in MA | Data Recovery Raid | Mesothelioma | A car accident lawyer | Personal injury lawyer | AC repair | Lawsuit settlements | Car insurance | Flood recovery | Water damage restoration | Rehab doctors | Online degree | Online master’s degree | Doctoral programs | Hail car insurance