
7 Fall Recipes Appetizers
 Are you looking for delicious fall appetizers to impress your guests? Look no further! In this article, I will share with you 7 mouthwatering fall appetizer recipes that are easy to make and packed with seasonal flavors. From savory to sweet, these bites capture the essence of autumn in every bite.
Key Takeaways: These fall appetizer recipes are perfect for impressing your guests
They are easy to make and packed with seasonal flavors
From savory to sweet, there’s something for everyone
These bites capture the essence of autumn in every bite
Spiced Butternut Squash Crostini Recipe
If you’re looking for a fall-inspired twist on the classic crostini, try this spiced butternut squash crostini recipe. It’s an easy and delicious appetizer that’s perfect for any fall gathering!
To make this tasty crostini, start by roasting some butternut squash with cinnamon, nutmeg, and a pinch of salt. While the squash is roasting, slice a baguette into thin rounds and toast them until crispy.
Once the squash is done, mash it up with a fork and spread it onto each crostini round. Top with a sprinkle of chopped pecans or goat cheese for extra flavor and crunch.
These butternut squash crostini bites are a great way to incorporate seasonal flavors into your appetizer spread. They’re perfect for serving at a fall dinner party or for snacking on during a cozy night in.
Ingredients
- 1 medium-sized butternut squash
- 1 baguette
- 2 tablespoons olive oil
- 1 teaspoon ground cinnamon
- 1/2 teaspoon ground nutmeg
- Salt and pepper to taste
- 1 cup ricotta cheese
- 1/4 cup honey
- Fresh rosemary leaves for garnish
Directions
Preheat the Oven: Preheat your oven to 400°F (200°C).
Prepare the Squash: Peel and dice the butternut squash into small cubes.
Season the Squash: In a mixing bowl, toss the butternut squash cubes with 2 tablespoons of olive oil, 1 teaspoon of ground cinnamon, 1/2 teaspoon of ground nutmeg, salt, and pepper to taste. Make sure the squash is evenly coated with the spices.
Roast the Squash: Spread the seasoned squash cubes on a baking sheet lined with parchment paper. Roast them in the preheated oven for about 25-30 minutes or until they are tender and slightly caramelized.
Prepare the Baguette: While the squash is roasting, slice the baguette into 1/2 inch thick rounds. You can lightly toast them in the oven for a few minutes if you prefer a crunchier texture.
Assemble the Crostini: Once the butternut squash is roasted to perfection, take it out of the oven and let it cool for a few minutes.Spread a generous spoonful of ricotta cheese on each baguette round.Top the ricotta with the roasted butternut squash cubes.
Click Here To Buy Our Healthy Cookbook For Only $27 Today!Drizzle with Honey: Drizzle honey over the crostini for a touch of sweetness. Be as generous as you like!
Garnish and Serve: Finish off your Spiced Butternut Squash Crostini with a sprinkle of fresh rosemary leaves for that extra burst of flavor and a touch of elegance.
Enjoy: Your Spiced Butternut Squash Crostini is now ready to be devoured! Serve it as an appetizer at your next gathering or savor it as a delightful snack.
Pro Tip: You can add a bit of humor to your culinary adventure by telling your guests that these crostini are so good, they’ll “squash” the competition!
Feel free to make this recipe your own by adjusting the seasoning or experimenting with different types of cheese. Happy cooking! ️
Instructions
Preheat your oven to 400°F (200°C).
Brush baguette slices with olive oil and toast until golden.
Mix honey, cinnamon, salt, and pepper with roasted butternut squash cubes.
Place a spoonful of the spiced squash on each baguette slice.
Garnish with fresh sage leaves.
Serve your delightful butternut squash crostini!
Caramelized Onion and Brie Tartlets Recipe

One of my favorite fall appetizers is definitely these caramelized onion and brie tartlets. The combination of sweet caramelized onions and creamy brie cheese is irresistible, and the buttery pastry adds the perfect crunch to every bite.
To make the caramelized onions, I sauté sliced onions in butter and a bit of oil until they turn a beautiful golden brown color. This process takes a bit of time, but it’s definitely worth the effort for the amazing flavor it adds to the tartlets.
The brie cheese is cut into small cubes and placed on top of the caramelized onions in the pastry shells. I like to sprinkle a bit of salt and pepper over each tartlet before baking them in the oven until the cheese is perfectly melted and gooey.
These tartlets are perfect for any fall gathering, and they always disappear quickly. They’re easy to make in advance and reheat just before serving, making them a stress-free appetizer option. Give this caramelized onion and brie tartlets recipe a try for your next fall event, and I promise your guests will be impressed.
Ingredients
- 1 package of frozen puff pastry sheets
- 2 large onions, thinly sliced
- 2 tablespoons olive oil
- 1 tablespoon butter
- 1 tablespoon brown sugar
- Salt and pepper to taste
- 6 ounces Brie cheese, cut into small pieces
- Fresh thyme leaves for garnish
Directions
Preheat the Oven: Preheat your oven to 375°F (190°C).
Thaw the Puff Pastry: Take the frozen puff pastry sheets out of the freezer and let them thaw at room temperature for about 20-30 minutes.
Prepare the Onions: In a large skillet, heat 2 tablespoons of olive oil and 1 tablespoon of butter over medium-low heat.
Add the thinly sliced onions and sauté them until they become soft and translucent, which should take about 15-20 minutes.
Caramelize the Onions: Sprinkle 1 tablespoon of brown sugar over the onions and continue to cook, stirring occasionally, until the onions turn a beautiful golden brown color. This caramelization process should take an additional 10-15 minutes.
Season the onions with salt and pepper to taste.
Prepare the Pastry: Roll out the thawed puff pastry sheets on a lightly floured surface. Cut them into squares or rectangles of your desired size.
Assemble the Tartlets: Place the pastry squares on a baking sheet lined with parchment paper.
Add a spoonful of the caramelized onions onto each pastry square.
Top the onions with pieces of Brie cheese.
Bake to Perfection: Place the baking sheet in the preheated oven and bake for approximately 15-20 minutes, or until the puff pastry is golden brown, and the Brie cheese is oozy and delicious.
Garnish and Serve: Once out of the oven, garnish your Caramelized Onion and Brie Tartlets with fresh thyme leaves for a burst of flavor and a touch of elegance.
Enjoy: These savory tartlets are ready to be savored as a delightful appetizer or a tasty snack. Serve them warm and watch them disappear in no time!
Pro Tip: For a touch of humor, you can tell your guests that these tartlets are so irresistible, they’ll be fighting over the last one like it’s the last piece of treasure in a pirate’s chest!
Feel free to customize this recipe by adding a sprinkle of crushed walnuts or a drizzle of honey for an extra layer of flavor. Enjoy your culinary adventure!
Instructions
Heat olive oil in a pan, add onions, and cook until caramelized.
Sprinkle with brown sugar and balsamic vinegar; cook until syrupy.
Fill tartlet shells with caramelized onions and top with brie pieces.
Bake until cheese melts and tartlets are golden.
Serve your savory caramelized onion and brie tartlets.
Maple Glazed Bacon-Wrapped Brussels Sprouts Recipe
One of my favorite fall appetizers is this delicious maple glazed bacon-wrapped Brussels sprouts. The combination of sweet and salty flavors is simply irresistible, and the texture of the roasted sprouts is crispy on the outside and tender on the inside.
Ingredients
- 1 pound fresh Brussels sprouts
- 8 slices of bacon
- 1/4 cup maple syrup
- 1 tablespoon olive oil
- Salt and pepper to taste
- Toothpicks for securing
Directions
Preheat the Oven: Begin by preheating your oven to 400°F (200°C).
Prepare the Brussels Sprouts: Wash the Brussels sprouts thoroughly and trim the stem ends. If they are large, consider cutting them in half for even cooking.
Wrap with Bacon: Take a slice of bacon and wrap it around each Brussels sprout. Secure it in place with a toothpick. Repeat until all Brussels sprouts are wrapped in bacon blankets.
Maple Glaze Preparation: In a small bowl, mix 1/4 cup of maple syrup with 1 tablespoon of olive oil. Add a pinch of salt and pepper to taste. Stir well to create a flavorful glaze.
Glaze the Bacon-Wrapped Sprouts: Place the bacon-wrapped Brussels sprouts on a baking sheet lined with parchment paper.
Brush the maple glaze generously over each sprout.
Bake to Perfection: Pop the baking sheet into the preheated oven and bake for approximately 25-30 minutes. Keep an eye on them, and when the bacon is crispy and the Brussels sprouts are tender, they’re ready.
Serve and Enjoy: Transfer your Maple Glazed Bacon-Wrapped Brussels Sprouts to a serving platter. Remove the toothpicks carefully.
These savory bites are ready to be enjoyed as an appetizer or a delicious side dish.
Pro Tip: Tell your guests that these little delights are so good, they’ll have them wrapped around their fingers!
Click Here To Buy Our Healthy Cookbook For Only $27 Today!Feel free to add some humor to your culinary journey. Experiment with the glaze by adding a pinch of cayenne pepper for a hint of heat, or sprinkle with a touch of grated Parmesan cheese for an extra layer of flavor. Enjoy!
To prepare the maple glaze, whisk together the maple syrup, Dijon mustard, garlic powder, salt, and pepper in a small bowl. Set aside.
Wrap each Brussels sprout half with a slice of bacon, securing it with a toothpick. Place the bacon-wrapped sprouts on a baking sheet lined with parchment paper. Brush the maple glaze over the bacon-wrapped sprouts, making sure they are evenly coated.
Bake in a preheated oven at 400°F for 20-25 minutes, or until the bacon is crispy and the Brussels sprouts are tender. Serve immediately and enjoy!
This maple glazed bacon-wrapped Brussels sprouts appetizer is sure to be a crowd-pleaser at any fall gathering. The combination of savory bacon and sweet maple syrup is perfect for the season, and the Brussels sprouts add a healthy twist to this indulgent appetizer.
If you’re looking for a delicious and easy-to-make Brussels sprouts appetizer recipe, look no further than this maple glazed bacon-wrapped version. Your guests will thank you!
Instructions
Wrap each Brussels sprout with a bacon strip and secure with a toothpick.
Brush with maple syrup.
Bake until bacon is crispy and sprouts are tender.
Serve your irresistible maple glazed bacon-wrapped Brussels sprouts.
Pumpkin Hummus with Pita Chips Recipe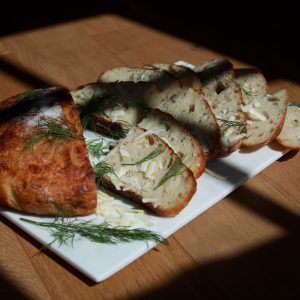
Ingredients
- For the Pumpkin Hummus: 1 can (15 ounces) of pumpkin puree
- 1 can (15 ounces) of chickpeas, drained and rinsed
- 2 cloves garlic, minced
- 2 tablespoons tahini
- 2 tablespoons lemon juice
- 1 teaspoon ground cumin
- 1/2 teaspoon ground paprika
- Salt and pepper to taste
- 2 tablespoons olive oil, plus extra for garnish
- Fresh parsley leaves for garnish
For the Pita Chips: 4 whole wheat pita bread rounds
- 2 tablespoons olive oil
- 1/2 teaspoon garlic powder
- 1/2 teaspoon dried oregano
- Salt to taste
Directions
Making the Pumpkin Hummus
Prepare the Ingredients: Gather your ingredients for the pumpkin hummus.
Blend It All: In a food processor, combine the pumpkin puree, chickpeas, minced garlic, tahini, lemon juice, ground cumin, ground paprika, salt, and pepper.
Blend to Smoothness: Blend everything until you achieve a smooth and creamy consistency.
Add Olive Oil: With the food processor running, drizzle in 2 tablespoons of olive oil to make the hummus even creamier.
Taste and Adjust: Taste your pumpkin hummus and adjust the seasoning if needed. You can add more lemon juice, salt, or any other spices to your liking.
Chill and Garnish: Transfer the hummus to a serving bowl and drizzle a bit of olive oil over the top.
Garnish with fresh parsley leaves for a pop of color.
Making the Pita Chips: Preheat the Oven: Preheat your oven to 375°F (190°C).
Cut the Pita: Take the whole wheat pita bread rounds and cut them into wedges or triangles.
Season the Chips: In a bowl, combine olive oil, garlic powder, dried oregano, and a pinch of salt.
Brush this mixture over both sides of each pita wedge.
Bake to Crispy Perfection: Arrange the seasoned pita wedges on a baking sheet in a single layer.
Bake in the preheated oven for about 8-10 minutes, or until the pita chips are golden and crispy.
Serve and Enjoy: Presentation: Arrange your freshly baked pita chips around the bowl of pumpkin hummus for a beautiful display.
Dip and Delight: Your Pumpkin Hummus with Pita Chips is ready to be savored. Dive in and enjoy the delightful combination of creamy pumpkin goodness and crispy pita chips.
Pro Tip: You can add a bit of humor by telling your guests that this hummus is so good, it’ll have them “fall”ing in love with pumpkin all over again!
Feel free to customize your hummus with extra spices, such as a pinch of cinnamon or nutmeg, to enhance the pumpkin flavor. Enjoy your tasty adventure!
If you’re looking for a delicious and healthy fall appetizer, look no further than this pumpkin hummus with pita chips! Made with roasted pumpkin, garlic, and spices, this creamy and flavorful hummus is perfect for any occasion.
To make the hummus, all you need is a food processor and a few simple ingredients like chickpeas, tahini, olive oil, and of course, pumpkin puree. Simply blend everything together until smooth and creamy, and you’re done!
For the pita chips, I like to use whole wheat pita bread cut into triangles and baked until crispy. It’s an easy and healthy alternative to store-bought chips that pairs perfectly with the pumpkin hummus.
With its beautiful orange color and delicious fall flavors, this pumpkin hummus is sure to impress your guests and become a new seasonal favorite. Give it a try and see for yourself!
Instructions
Mix canned pumpkin puree with hummus.
Drizzle with olive oil and sprinkle pumpkin pie spice.
Serve with pita chips for a delightful pumpkin hummus dip.
Cranberry and Goat Cheese Stuffed Mushrooms Recipe
These stuffed mushrooms are a fall favorite! The combination of creamy goat cheese and sweet cranberries creates a burst of flavor in every bite. Plus, they’re super easy to make and look impressive on any appetizer platter.
Ingredients
- For the Stuffed Mushrooms: 12 large white button mushrooms
- 4 ounces goat cheese
- 1/4 cup dried cranberries, finely chopped
- 2 cloves garlic, minced
- 2 tablespoons fresh parsley, finely chopped
- 2 tablespoons olive oil
- Salt and pepper to taste
For Garnish: Fresh parsley leaves
- Additional dried cranberries
Directions
Preparing the Mushrooms: Preheat the Oven: Begin by preheating your oven to 375°F (190°C).
Clean and Prep Mushrooms: Gently clean the mushrooms with a damp cloth to remove any dirt.
Carefully remove the stems from the mushrooms and set them aside. You’ll use them in the filling.
Prepare Mushroom Caps: Using a small spoon or your fingers, create a hollow space in each mushroom cap. This will be the perfect cavity for your tasty filling.
Making the Filling: Chop the Mushroom Stems: Finely chop the reserved mushroom stems. They’ll add a rich, earthy flavor to the filling.
Saute the Mushrooms and Garlic: In a pan, heat 2 tablespoons of olive oil over medium heat.
Add the minced garlic and chopped mushroom stems. Saute them until they become soft and fragrant.
Mix the Filling: In a mixing bowl, combine the sauteed mushroom and garlic mixture with goat cheese, finely chopped dried cranberries, fresh parsley, salt, and pepper. Mix well until all ingredients are fully incorporated.
Stuffing the Mushrooms: Fill the Mushroom Caps: Using a small spoon or your fingers, stuff each mushroom cap with the delightful goat cheese mixture. Be generous!
Baking and Garnishing: Bake to Perfection: Place the stuffed mushrooms on a baking sheet lined with parchment paper.
Bake in the preheated oven for about 15-20 minutes, or until the mushrooms are tender and the filling is slightly golden.
Garnish with Elegance: Remove the stuffed mushrooms from the oven and let them cool for a minute or two.
Garnish with fresh parsley leaves and a sprinkle of additional dried cranberries for a festive touch.
Serve and Enjoy: Presentation: Arrange your Cranberry and Goat Cheese Stuffed Mushrooms on a serving platter.
Delight Your Guests: These savory bites are ready to be enjoyed as a mouthwatering appetizer at your next gathering. Your guests will savor the delightful combination of creamy goat cheese and sweet cranberries.
Pro Tip: Share a chuckle with your guests and tell them these stuffed mushrooms are so irresistible, they’ll “mushroom” their way to the front of the appetizer table!
Feel free to experiment with the filling by adding a pinch of thyme or a dash of balsamic glaze for extra flavor. Enjoy your culinary adventure!
These stuffed mushrooms are the perfect appetizer for any fall gathering. They’re delicious and easy to make, and they’ll impress your guests with their beautiful presentation. Try them out for your next party!
Instructions
Remove stems from mushrooms and stuff with goat cheese and dried cranberries.
Drizzle with olive oil and bake until mushrooms are tender.
Sprinkle with chopped parsley and balsamic glaze.
Serve your exquisite cranberry and goat cheese stuffed mushrooms.
Apple and Bacon Quesadillas Recipe
These apple and bacon quesadillas are a unique twist on the classic dish, perfect for any fall gathering. The combination of the sweetness of apples and the salty taste of bacon creates a mouthwatering flavor. Plus, the melted cheese adds an extra layer of gooey goodness to each bite.
To make this delicious fall appetizer, start by cooking bacon until crispy and set aside. Sauté thinly sliced apples with a pinch of cinnamon until they are tender. Then assemble the quesadillas by layering the apples, bacon, and shredded cheese between two tortillas. Cook in a pan until the cheese is melted and the tortillas are crispy.
These apple and bacon quesadillas are perfect for any fall occasion, from a cozy night in to a festive party. Plus, they are easy to make and are sure to impress your guests.
-
Ingredients
- 4 medium flour tortillas
2 cups shredded cheddar cheese
2 apples, thinly sliced (use your favorite variety)
8 slices of bacon, cooked until crispy
2 tablespoons maple syrup
2 tablespoons butter
1/2 teaspoon cinnamon
Pinch of salt
Directions
Preparing the Apple and Bacon Mixture: Cook the Bacon: Start by cooking the bacon until it’s crispy. Once cooked, place it on paper towels to remove excess grease, and then crumble it into small pieces.
Caramelized Apples: In the same pan, add 2 tablespoons of butter and thinly sliced apples. Drizzle with 2 tablespoons of maple syrup and sprinkle with a pinch of salt and 1/2 teaspoon of cinnamon.
Sauté the apples until they become tender and slightly caramelized, which should take about 5-7 minutes.
Assembling the Quesadillas: Preheat a Skillet:Preheat a large skillet over medium heat.
Build the Quesadillas:Take one flour tortilla and place it in the skillet.
Sprinkle a generous amount of shredded cheddar cheese evenly over the tortilla.
Add a portion of the caramelized apple mixture on top of the cheese.
Sprinkle with crumbled bacon.
Place another tortilla on top to form a sandwich.
Cook to Perfection:Cook the quesadilla for about 2-3 minutes on each side, or until the tortilla becomes golden brown and the cheese is melted.
Repeat for the Other Quesadillas:Repeat the assembly and cooking process for the remaining tortillas and filling.
Serve and Enjoy: Presentation: Carefully remove the quesadillas from the skillet and place them on a cutting board.
Slice and Share:Slice each quesadilla into wedges, just like you would with a pizza.
Serve these delectable Apple and Bacon Quesadillas while they’re still warm.
Pro Tip: For a touch of humor, tell your family or guests that these quesadillas are so good, they’ll make you want to “bacon” for more!
Feel free to customize your quesadillas by adding a drizzle of honey or a sprinkle of red pepper flakes for a hint of heat. Enjoy your delicious culinary adventure!
Instructions
Cook bacon in a pan until crispy. Set aside and chop into small pieces.
In the same pan, sauté thinly sliced apples with a pinch of cinnamon until tender. Set aside.
Layer the apples, bacon, and shredded cheese between two tortillas.
Cook the quesadillas in a pan until the cheese is melted and the tortillas are crispy.
Serve warm and enjoy!
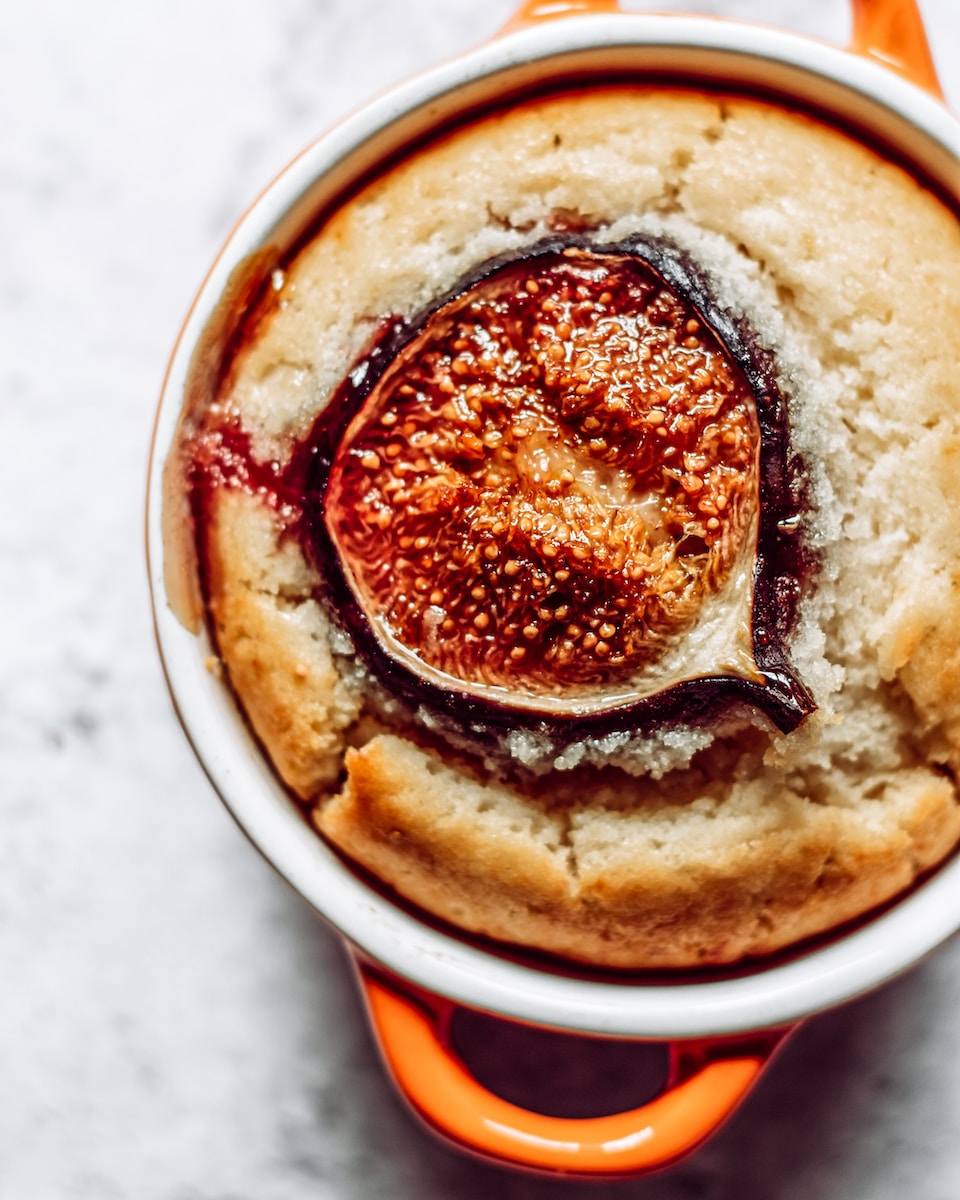
Sweet Potato Bites with Marshmallow Cream Cheese Recipe
Next up on our list of fall appetizers are these delicious sweet potato bites with marshmallow cream cheese. These bite-sized appetizers are perfect for any fall gathering or occasion, and are sure to impress your guests with their unique blend of sweet and savory flavors.
To get started, preheat your oven to 400°F and line a baking sheet with parchment paper. Then, peel and dice two large sweet potatoes into small cubes and toss them in a bit of olive oil and sea salt. Roast them in the oven for 20-25 minutes, or until they are tender and slightly crispy.
While the sweet potatoes are cooking, prepare the marshmallow cream cheese topping. In a medium bowl, mix together softened cream cheese, marshmallow fluff, and a pinch of cinnamon until smooth and creamy.
Once the sweet potatoes are finished, allow them to cool slightly before topping each one with a dollop of the marshmallow cream cheese mixture. Garnish with a sprinkle of chopped pecans or a drizzle of honey for extra fall flavor.
These sweet potato bites with marshmallow cream cheese are sure to be a hit at your next fall gathering. They are easy to make and packed with seasonal flavors that everyone will love. Enjoy!
Ingredients
For the Sweet Potato Bites: 2 large sweet potatoes
2 tablespoons olive oil
1 tablespoon maple syrup
1/2 teaspoon ground cinnamon
1/4 teaspoon ground nutmeg
Salt and pepper to taste
Fresh thyme leaves for garnish (optional)
For the Marshmallow Cream Cheese:
4 ounces cream cheese, softened
1/2 cup marshmallow fluff
1/2 teaspoon vanilla extract
Directions
Preparing the Sweet Potato Bites: Preheat the Oven: Start by preheating your oven to 400°F (200°C).
Peel and Dice Sweet Potatoes: Peel the sweet potatoes and cut them into bite-sized cubes or rounds, ensuring they are uniform in size for even cooking.
Season and Toss: In a mixing bowl, combine the sweet potato cubes with 2 tablespoons of olive oil, 1 tablespoon of maple syrup, 1/2 teaspoon of ground cinnamon, 1/4 teaspoon of ground nutmeg, salt, and pepper to taste. Toss to coat the sweet potatoes evenly.
Roast to Perfection: Spread the seasoned sweet potato cubes on a baking sheet lined with parchment paper.
Roast in the preheated oven for approximately 20-25 minutes, or until the sweet potatoes are tender and slightly caramelized. Be sure to flip them halfway through for even cooking.
Making the Marshmallow Cream Cheese
Prepare the Marshmallow Cream Cheese: In a separate mixing bowl, combine 4 ounces of softened cream cheese, 1/2 cup of marshmallow fluff, and 1/2 teaspoon of vanilla extract. Mix until you achieve a smooth and fluffy cream cheese mixture.
Assembling the Sweet Potato Bites:
Serve and Enjoy: Once the sweet potato cubes are out of the oven and have slightly cooled, use toothpicks or small forks to skewer each sweet potato cube.
Dip them into the luscious Marshmallow Cream Cheese mixture for a delightful pairing of sweet and savory flavors.
Garnish with Elegance: If you want to add a touch of elegance, garnish your Sweet Potato Bites with a sprinkle of fresh thyme leaves.
Pro Tip: Share a smile with your guests and tell them these sweet potato bites are so good, they’ll make you feel like you’re floating on marshmallow clouds!
Feel free to get creative with the presentation. You can arrange the skewered sweet potato bites on a platter or serve them individually. Enjoy your culinary adventure!
Instructions
Roast sweet potato rounds until tender.
Spread cream cheese, sprinkle brown sugar, and add marshmallows.
Broil until marshmallows are golden.
Sprinkle with cinnamon and serve your delightful sweet potato bites.
Fig and Prosciutto Flatbread Recipe
If you’re looking for a delicious and elegant fall flatbread appetizer, look no further than this fig and prosciutto creation. The sweet taste of figs pairs perfectly with the salty prosciutto, and the crispy flatbread is the perfect base for these complementary flavors.
To make this dish, start by preheating your oven to 425 degrees Fahrenheit. Roll out your flatbread dough onto a baking sheet and spread a thin layer of olive oil over the top. Next, sprinkle on some shredded mozzarella cheese, followed by thinly sliced figs and prosciutto.
Bake the flatbread in the oven for 10-12 minutes, or until the cheese is melted and bubbly and the crust is golden brown. Once it’s finished baking, remove the flatbread from the oven and sprinkle on some fresh arugula for an added pop of color and flavor.
Slice the flatbread into small, bite-sized pieces and serve immediately. Your guests will be impressed by the sophisticated flavor combination and the beautiful presentation of this fall flatbread appetizer.
Ingredients
- For the Flatbread: 1 pre-made flatbread or pizza dough
- 2 tablespoons olive oil
- 1/2 cup fig jam or preserves
- 1 1/2 cups shredded mozzarella cheese
- 4-6 fresh figs, thinly sliced
- 4 slices of prosciutto, torn into pieces
- Fresh arugula leaves for garnish
- Balsamic glaze for drizzling (optional)
- Salt and pepper to taste
Directions
Preparing the Flatbread: Preheat the Oven: Start by preheating your oven to 425°F (220°C).
Roll Out the Dough: If using pre-made flatbread, simply unroll it onto a baking sheet lined with parchment paper.
If using pizza dough, roll it out into your desired flatbread shape on a lightly floured surface and transfer it to the baking sheet.
Brush with Olive Oil: Brush the flatbread with 2 tablespoons of olive oil to create a deliciously crispy crust.
Spread the Fig Jam: Evenly spread 1/2 cup of fig jam or preserves over the olive oil-brushed flatbread.
Layer on the Goodness: Sprinkle 1 1/2 cups of shredded mozzarella cheese over the fig jam.
Add Fresh Figs and Prosciutto: Arrange the thinly sliced fresh figs and torn prosciutto pieces on top of the cheese, distributing them evenly.
Season to Perfection: Season your Fig and Prosciutto Flatbread with a pinch of salt and a dash of freshly ground black pepper.
Baking and Garnishing:Bake to Golden Perfection: Place the baking sheet in the preheated oven and bake for approximately 12-15 minutes, or until the flatbread is golden brown and the cheese is bubbly.
Fresh Arugula Topping: While the flatbread is baking, prepare a handful of fresh arugula leaves for garnish.
Drizzle with Balsamic Glaze (Optional): If desired, drizzle a bit of balsamic glaze over the Fig and Prosciutto Flatbread for a touch of elegance.
Serve and Enjoy: Presentation: Carefully remove the flatbread from the oven and let it cool slightly.
Slice and Share: Slice your Fig and Prosciutto Flatbread into wedges or squares, just like you would with a pizza.
Top with Fresh Arugula: Finish off your flatbread with a generous handful of fresh arugula leaves for a vibrant burst of flavor.
Pro Tip: Share a chuckle with your guests and tell them this flatbread is so good, it’ll have them “fig-hting” for the last slice!
Feel free to get creative with the toppings. You can add a sprinkle of crumbled goat cheese or a drizzle of honey for an extra layer of flavor. Enjoy your gourmet culinary adventure! ️
Pumpkin and Sage Arancini Recipe
One of my favorite fall appetizers is the delicious and savory pumpkin and sage arancini. These crispy risotto balls are the perfect addition to any party or gathering, and they’re sure to impress your guests with their unique blend of flavors.
To make these arancini, start by making a basic risotto with arborio rice, chicken broth, and white wine. Then, mix in some pureed pumpkin, fresh sage, and a blend of parmesan and mozzarella cheeses.
Once the risotto has cooled, use your hands to shape it into small balls. Roll each ball in breadcrumbs and then fry them in hot oil until they’re crispy and golden brown.
The result is a crunchy exterior that gives way to a creamy and flavorful center. These arancini are perfect for dipping in a spicy tomato sauce or even a sweet and tangy cranberry sauce.
And the best part? You can make them ahead of time and reheat them in the oven just before serving. Your guests will love these delicious pumpkin and sage arancini, and you’ll love how easy they are to make!
These crispy rice balls filled with creamy pumpkin and fragrant sage are a delightful treat.
Instructions
Spread fig jam on flatbread.
Layer with prosciutto and bake until crispy.
Top with arugula, drizzle balsamic glaze, and crumble goat cheese.
Slice and serve your mouthwatering fig and prosciutto flatbread.
Ingredients
- For the Pumpkin and Sage Risotto: 1 cup Arborio rice
- 1/2 cup pumpkin puree
- 4 cups chicken or vegetable broth
- 1/2 cup dry white wine
- 1/2 onion, finely chopped
- 2 cloves garlic, minced
- 2 tablespoons fresh sage leaves, chopped
- 2 tablespoons olive oil
- 2 tablespoons butter
- 1/2 cup grated Parmesan cheese
- Salt and pepper to taste
For Assembling and Frying: 2 cups breadcrumbs
- 2 large eggs, beaten
- Vegetable oil for frying
Directions
Making the Pumpkin and Sage Risotto:Prepare the Broth: In a saucepan, warm the chicken or vegetable broth over low heat. Keep it simmering while you prepare the risotto.
Saute the Aromatics: In a large skillet or pan, heat 2 tablespoons of olive oil and 2 tablespoons of butter over medium heat.
Add the finely chopped onion and minced garlic. Saute until they become translucent and fragrant.
Toast the Arborio Rice: Add the Arborio rice to the skillet and stir continuously for 2-3 minutes until the rice grains become translucent around the edges.
Deglaze with Wine: Pour in the white wine and stir until it’s mostly absorbed by the rice.
Add the Pumpkin and Sage: Stir in the pumpkin puree and chopped fresh sage leaves, allowing the flavors to meld together.
Cook the Risotto: Begin adding the simmering broth one ladle at a time, stirring continuously.
Continue adding broth and stirring until the rice is creamy and cooked al dente. This should take about 18-20 minutes.
Finish with Parmesan: Remove the risotto from heat and stir in the grated Parmesan cheese. Season with salt and pepper to taste.
Chill the Risotto: Spread the risotto on a baking sheet and let it cool in the refrigerator for at least 2 hours or until it’s firm.
Assembling and Frying the Arancini:Form the Arancini: Take a spoonful of the chilled pumpkin and sage risotto and shape it into a small ball, about the size of a golf ball.
Coat with Breadcrumbs: Roll each rice ball in the beaten eggs and then coat it in breadcrumbs, ensuring it’s evenly covered.
Heat the Oil: In a deep skillet or saucepan, heat enough vegetable oil to submerge the arancini to 350°F (180°C).
Fry to Golden Perfection: Carefully place the coated rice balls into the hot oil and fry until they become golden brown and crispy. This should take about 3-4 minutes.
Drain and Serve: Remove the arancini from the oil using a slotted spoon and place them on paper towels to drain excess oil.
Serve and Enjoy: Presentation: Your Pumpkin and Sage Arancini are ready to be served.
Garnish with Sage (Optional): For an extra touch of elegance, you can garnish with a few fresh sage leaves.
Pro Tip: Share a chuckle with your guests and tell them these arancini are so good, they’ll have them coming back for “sage” advice on making them!
Feel free to serve these delightful arancini with a dipping sauce of your choice, such as marinara or aioli. Enjoy your culinary adventure! ️
Instructions
Mix cooked risotto with canned pumpkin puree, chopped sage, and Parmesan cheese.
Shape into balls and roll in bread crumbs.
Fry until golden and crispy.
Serve your delectable pumpkin and sage arancini.
These appetizers are perfect for impressing your guests with a wide range of flavors and textures. Whether you choose the butternut squash crostini, caramelized onion and brie tartlets, bacon-wrapped Brussels sprouts, or any of the other delightful options, your gatherings will be filled with delectable delights. Enjoy! ️
Conclusion
I hope you enjoyed reading about these 7 fall appetizer recipesas much as I enjoyed sharing them with you. Whether you’re hosting a dinner party or just looking for a tasty snack, these appetizers will not disappoint. From the savory and cheesy Caramelized Onion and Brie Tartlets to the sweet and crispy Sweet Potato Bites with Marshmallow Cream Cheese, there’s something for everyone. I highly recommend trying the Spiced Butternut Squash Crostini and the Maple Glazed Bacon-Wrapped Brussels Sprouts for a true taste of fall. And don’t forget to end on a sweet note with the Pumpkin and Sage Arancini. So, gather your ingredients, turn on some music, and get ready to impress your guests with these delicious and easy-to-make fall appetizers. Happy cooking!
World Trade Center Footage | Webex Costs | Virtual Data Rooms | Structures Annuity Settlement | Sell Annuity Payment | Neuson | Online Classes | Nunavut Culture | Online College Course | Motor Replacements | Motor Insurance Quotes | Mortgage Adviser | Met Auto | Tax credit | Help desk software | Home refinancing | Urgent care | Marketing integration | Debt relief | Bitcoin | Fitness center software | Insurance | Gas | Electricity | Weight loss | Sell house for cash | Automotive repair | Loans | Internet marketing | Mortgage | Attorney | SEO specialist | Lawyer | Donate | Conference Call | Treatment | Degree | Software | Credit | Classes | Investing | Recovery | Trading | Rehab | Hosting | Cord Blood | Claim | Automotive warranty | Paintless dent repair | Mesothelioma Law Firm | Massage School Dallas Texas | Low Credit Line Credit Cards | Life Insurance Co Lincoln | Insurance Companies | Injury Lawyers | How to Donate A Car in California | Home Phone Internet Bundle | Holland Michigan College | Royalty-Free Images Stock | Register Free Domains | Psychic for Free | Ph.D. in Counseling Education | Personal Injury Lawyers | Personal Injury Law Firm | PaperPort Promotional Code | Online Stock Trading | Online Motor Insurance Quotes | Donate your Car for Money | Online Colleges | Health Records, Personal Health Record | Hard drive Data Recovery Services | Donate Old Cars to Charity | Forex Trading Platform | Forensics Online Course | Donate Car to Charity California | Donate Car for Tax Credit | Car Insurance Quotes PA | Email Bulk Service | Donating Used Cars to Charity | Donating a Car in Maryland | Donate Your Car Sacramento | Online Criminal Justice Degree | Donate Your Car for Kids | Futuristic Architecture | Donate Cars in MA | Data Recovery Raid | Mesothelioma | A car accident lawyer | Personal injury lawyer | AC repair | Lawsuit settlements | Car insurance | Flood recovery | Water damage restoration | Rehab doctors | Online degree | Online master’s degree | Doctoral programs | Hail car insurance