
Exploring the World of 7 French Bread
When we think of French cuisine, images of rich, creamy sauces and delicate pastries often come to mind. But there’s one humble yet essential component that holds a special place in the hearts of the French and food enthusiasts worldwide – French bread. Today, we embark on a delicious journey through the world of 7 French bread varieties.
The Origins of French Bread
To truly appreciate these bread varieties, we must first travel back in time to France, where it all began. The story of French bread is as rich as its flavor.
Baguette:This elongated classic, known as the “baguette,” emerged in the 19th century. Its slender shape and golden crust quickly made it an icon of French culture.
Pain de Campagne:If you prefer a heartier, rustic option, “Pain de Campagne” is your choice. Its origins trace back to French villages, and its robust flavor reflects the countryside.
Pain Complet:For a healthy twist, we have “Pain Complet.” This whole wheat delight is not only nutritious but also full of flavor.
Fougasse:If you’re looking for art on your plate, consider “Fougasse.” Its unique leaf-like shape and delicious toppings make it a true work of art.
Bâtard:The “Bâtard” is a shorter and plumper sibling of the baguette. With a soft center and crisp crust, it’s a delightful contrast.
Pain d’Épi:“Pain d’Épi” takes its inspiration from a wheat stalk, with a charming appearance and a subtle, earthy taste.
Pain Poilâne:Last but not least, we have “Pain Poilâne.” This slightly sweet bread is a delightful surprise with its unique combination of flavors.
The 7 Must-Try French Bread Recipes
Now, let’s roll up our sleeves and dive into the fun part – baking these 7 French bread varieties at home. These recipes will take your taste buds on a delectable journey.
Classic Baguette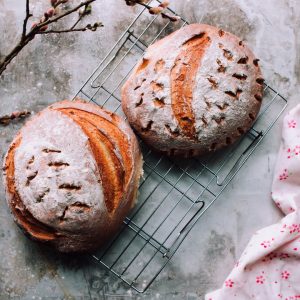
A baguette is a symbol of French bread, and making one at home is simpler than you might think.
Here’s what you need
Ingredients
500g of all-purpose flour
10g of salt
7g of active dry yeast
350ml of water
Directions
Activate the Yeast:In a small bowl, mix the active dry yeast with warm water (about 100°F or 37°C). Allow it to sit for a few minutes until it becomes frothy. This indicates that the yeast is active and ready for use.
Prepare the Dough:In a large mixing bowl, combine the all-purpose flour and salt. Make a well in the center of the flour mixture.
Incorporate the Yeast Mixture:Pour the activated yeast mixture into the well in the flour. Begin to mix, gradually incorporating the flour from the sides of the well. Continue mixing until a dough forms.
Click Here To Buy Our Healthy Cookbook For Only $27 Today!Knead the Dough:Turn the dough out onto a floured surface. Knead it for about 10-15 minutes, or until it becomes smooth and elastic. Use the heel of your hand to push the dough away from you, then fold it back towards you. Repeat this process.
First Rise:Place the kneaded dough in a lightly oiled bowl and cover it with a clean kitchen towel or plastic wrap. Let it rise in a warm, draft-free place for approximately 1 hour, or until it has doubled in size.
Shape the Baguette:After the first rise, gently punch down the dough to release any trapped air. Turn it out onto a floured surface. Divide the dough into two equal portions. Shape each portion into a baguette by flattening it into a rectangle, then folding it in thirds, and rolling it up tightly.
Second Rise:Place the shaped baguettes on a baking sheet lined with parchment paper or a baguette pan. Cover them with a clean kitchen towel and let them rise for another 30 minutes. Meanwhile, preheat your oven to 450°F (230°C).
Score the Baguettes:Using a sharp knife or a razor blade, make diagonal slashes on the tops of the baguettes. This helps the bread expand while baking and gives it that classic baguette appearance.
Bake:Place the baguettes in the preheated oven and bake for 25-30 minutes or until they are golden brown and have a crisp crust. To create a steamy environment that’s essential for the crust, you can also add a pan of hot water to the bottom of your oven.
Cool:Once baked, remove the baguettes from the oven and allow them to cool on a wire rack. It’s best to let them cool for about 15-20 minutes before slicing and serving.
Serve and Enjoy:Slice your classic baguette and savor it with your favorite toppings, or use it to create delightful sandwiches. The crisp crust and tender crumb make it a versatile and delicious addition to any meal.
Instructions
Mix the yeast with warm water and let it sit for a few minutes.
Combine the flour and salt in a large bowl.
Add the yeast mixture and knead the dough.
Let it rise for about 1 hour.
Shape the dough into a baguette.
Bake at 220°C for 25-30 minutes.
Rustic Pain de Campagne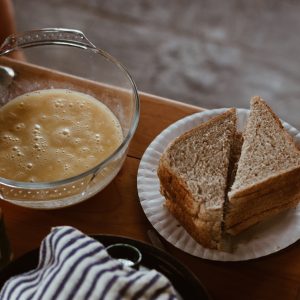
If you’re craving the hearty flavor of “Pain de Campagne,” here’s a recipe to transport you to the French countryside.
Ingredients
500g of bread flour
10g of salt
7g of active dry yeast
350ml of water
A handful of mixed seeds
Directions
Activate the Yeast:In a small bowl, mix the active dry yeast with warm water (about 100°F or 37°C). Let it sit for a few minutes until it becomes frothy, indicating that the yeast is active and ready to use.
Combine Flour and Salt:In a large mixing bowl, combine the bread flour and salt. If you’re using seeds for added flavor and texture, mix them in as well.
Incorporate the Yeast Mixture:Pour the activated yeast mixture into the dry ingredients. Stir and mix until the dough comes together.
Knead the Dough:Turn the dough out onto a floured surface. Knead it for about 10-15 minutes, or until it becomes smooth and elastic. Use the heel of your hand to push the dough away from you, then fold it back towards you. Repeat this process.
First Rise:Place the kneaded dough in a lightly oiled bowl and cover it with a clean kitchen towel or plastic wrap. Allow it to rise in a warm, draft-free place for approximately 1 hour, or until it has doubled in size.
Shape the Loaf:After the first rise, gently punch down the dough to release any trapped air. Shape it into a rustic loaf by folding the edges towards the center, then rolling it up tightly.
Second Rise:Place the shaped loaf on a baking sheet lined with parchment paper. Cover it with a clean kitchen towel and let it rise for another 30 minutes. Preheat your oven to 450°F (230°C) during this time.
Score the Loaf:Just before baking, use a sharp knife or razor blade to make a few diagonal slashes on the top of the loaf. This not only adds an artisanal look but also helps the bread expand while baking.
Bake:Place the loaf in the preheated oven and bake for 30-35 minutes, or until it’s golden brown and has a crisp crust. To create the steamy environment needed for a perfect crust, you can add a pan of hot water to the bottom of your oven.
Cool:Once baked, remove the Rustic Pain de Campagne from the oven and let it cool on a wire rack. It’s ideal to allow it to cool for about 20-30 minutes before slicing.
Serve and Enjoy:Slice your Rustic Pain de Campagne and savor its hearty, flavorful crumb. Pair it with your favorite soups or use it as a base for delectable open-faced sandwiches.
Instructions
Mix the yeast with warm water and let it sit for a few minutes.
Combine the flour, salt, and seeds in a large bowl.
Add the yeast mixture and knead the dough.
Let it rise for about 1 hour.
Shape the dough into a rustic loaf.
Bake at 200°C for 30-35 minutes.
Healthy Pain Complet
For a nutritious option, “Pain Complet” is a wonderful choice.
Here’s a straightforward recipe
Ingredients
500g of whole wheat flour
10g of salt
7g of active dry yeast
350ml of water
Directions
Activate the Yeast:In a small bowl, mix the active dry yeast with warm water (about 100°F or 37°C). Allow it to sit for a few minutes until it becomes frothy, indicating that the yeast is active and ready to use.
Combine Whole Wheat Flour and Salt:In a large mixing bowl, combine the whole wheat flour and salt. This whole grain flour will provide a delightful nutty flavor and added nutrition to your bread.
Incorporate the Yeast Mixture:Pour the activated yeast mixture into the bowl of dry ingredients. Mix until the dough comes together.
Knead the Dough:Turn the dough out onto a floured surface. Knead it for about 10-15 minutes, or until it becomes smooth and elastic. Use the heel of your hand to push the dough away from you, then fold it back towards you. Repeat this process.
First Rise:Place the kneaded dough in a lightly oiled bowl and cover it with a clean kitchen towel or plastic wrap. Let it rise in a warm, draft-free place for approximately 1 hour, or until it has doubled in size.
Shape the Loaf:After the first rise, gently punch down the dough to release any trapped air. Shape it into a loaf by folding the edges towards the center and then rolling it up tightly.
Second Rise:Place the shaped loaf on a baking sheet lined with parchment paper. Cover it with a clean kitchen towel and let it rise for another 30 minutes. During this time, preheat your oven to 190°C (375°F).
Score the Loaf:Just before baking, use a sharp knife or razor blade to make a few diagonal slashes on the top of the loaf. This not only adds an artisanal look but also helps the bread expand while baking.
Bake:Place the loaf in the preheated oven and bake for 35-40 minutes or until it’s golden brown and has a crisp crust. To create the steamy environment needed for a perfect crust, you can add a pan of hot water to the bottom of your oven.
Cool:Once baked, remove the Healthy Pain Complet from the oven and let it cool on a wire rack. It’s ideal to allow it to cool for about 20-30 minutes before slicing.
Serve and Enjoy:Slice your Healthy Pain Complet and savor its wholesome, nutty flavor. It’s perfect for sandwiches, toasts, or enjoyed on its own with your favorite toppings.
Instructions
Mix the yeast with warm water and let it sit for a few minutes.
Combine the whole wheat flour and salt in a large bowl.
Add the yeast mixture and knead the dough.
Let it rise for about 1 hour.
Shape the dough into a healthy loaf.
Bake at 190°C for 35-40 minutes.
Artful Fougasse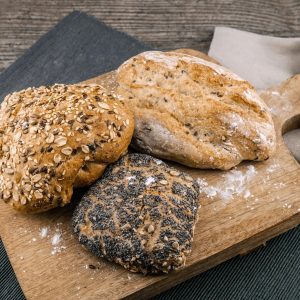
Creating an “artful” fougasse is a creative endeavor. You can let your imagination run wild with toppings like olives, herbs, and cheese.
Ingredients
500g of bread flour
10g of salt
7g of active dry yeast
350ml of water
Toppings of your choice (e.g., olives, rosemary, cheese)
Directions
Activate the Yeast:In a small bowl, mix the active dry yeast with warm water (about 100°F or 37°C). Allow it to sit for a few minutes until it becomes frothy, indicating that the yeast is active and ready to use.
Combine Flour and Salt:In a large mixing bowl, combine the bread flour and salt. These simple ingredients provide the canvas for your Fougasse masterpiece.
Incorporate the Yeast Mixture:Pour the activated yeast mixture into the bowl of dry ingredients. Mix until the dough comes together.
Knead the Dough:Turn the dough out onto a floured surface. Knead it for about 10-15 minutes, or until it becomes smooth and elastic. Use the heel of your hand to push the dough away from you, then fold it back towards you. Repeat this process.
First Rise:Place the kneaded dough in a lightly oiled bowl and cover it with a clean kitchen towel or plastic wrap. Let it rise in a warm, draft-free place for approximately 1 hour, or until it has doubled in size.
Shape the Fougasse:After the first rise, gently punch down the dough to release any trapped air. Divide it into two equal portions. Shape each portion into a leaf-like Fougasse by flattening it into an elongated shape, then creating diagonal slashes to resemble the veins of a leaf or the stalk of wheat.
Add Toppings:Get creative with your toppings. You can use ingredients like olives, rosemary, cheese, or any other herbs and spices that appeal to your taste buds. Sprinkle or press these toppings into the surface of the Fougasse.
Second Rise:Place the shaped Fougasses on a baking sheet lined with parchment paper. Cover them with a clean kitchen towel and let them rise for another 30 minutes. During this time, preheat your oven to 220°C (425°F).
Bake:Place the Fougasses in the preheated oven and bake for 20-25 minutes or until they are golden brown and have a crisp crust. To create a steamy environment essential for the crust, you can add a pan of hot water to the bottom of your oven.
Cool:Once baked, remove the Artful Fougasse from the oven and let it cool on a wire rack. It’s best to allow them to cool for about 15-20 minutes before slicing.
Serve and Enjoy:Slice your Artful Fougasse and savor its unique appearance and delightful combination of flavors and textures. It’s perfect as an appetizer, a side dish, or as a centerpiece for special occasions.
Instructions
Mix the yeast with warm water and let it sit for a few minutes.
Combine the flour and salt in a large bowl.
Add the yeast mixture and knead the dough.
Let it rise for about 1 hour.
Shape the dough into a leaf-like fougasse.
Add your chosen toppings.
Bake at 220°C for 20-25 minutes.
Plump Bâtard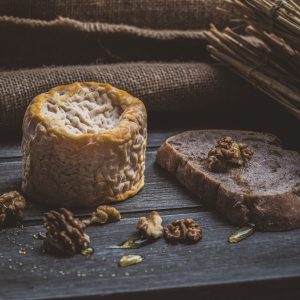
The “Bâtard” is a plump and delightful variation. It’s perfect for sandwiches, and here’s how you can make it.
Ingredients
500g of bread flour
10g of salt
7g of active dry yeast
350ml of water
Directions
Activate the Yeast:In a small bowl, mix the active dry yeast with warm water (about 100°F or 37°C). Let it sit for a few minutes until it becomes frothy, indicating that the yeast is active and ready for use.
Combine Flour and Salt:In a large mixing bowl, combine the bread flour and salt. These simple ingredients provide the foundation for your Plump Bâtard.
Incorporate the Yeast Mixture:Pour the activated yeast mixture into the bowl of dry ingredients. Mix until the dough comes together.
Knead the Dough:Turn the dough out onto a floured surface. Knead it for about 10-15 minutes, or until it becomes smooth and elastic. Use the heel of your hand to push the dough away from you, then fold it back towards you. Repeat this process.
First Rise:Place the kneaded dough in a lightly oiled bowl and cover it with a clean kitchen towel or plastic wrap. Let it rise in a warm, draft-free place for approximately 1 hour, or until it has doubled in size.
Shape the Bâtard:After the first rise, gently punch down the dough to release any trapped air. Shape it into a plump Bâtard by flattening it into an oval shape and folding the sides towards the center, then rolling it up tightly.
Second Rise:Place the shaped Bâtard on a baking sheet lined with parchment paper or a baguette pan. Cover it with a clean kitchen towel and let it rise for another 30 minutes. During this time, preheat your oven to 210°C (410°F).
Score the Bâtard:Just before baking, use a sharp knife or razor blade to make diagonal slashes on the top of the Bâtard. This not only adds an artisanal look but also helps the bread expand while baking.
Bake:Place the Bâtard in the preheated oven and bake for 30-35 minutes or until it’s golden brown and has a crisp crust. To create a steamy environment that’s essential for the crust, you can add a pan of hot water to the bottom of your oven.
Cool:Once baked, remove the Plump Bâtard from the oven and let it cool on a wire rack. It’s best to allow it to cool for about 20-30 minutes before slicing.
Serve and Enjoy:Slice your Plump Bâtard and savor its satisfying combination of a crisp crust and a tender crumb. It’s perfect for making sandwiches, for pairing with soups, or simply enjoying with your favorite toppings.
Instructions
Mix the yeast with warm water and let it sit for a few minutes.
Combine the flour and salt in a large bowl.
Add the yeast mixture and knead the dough.
Let it rise for about 1 hour.
Shape the dough into a plump bâtard.
Bake at 210°C for 30-35 minutes.
Charming Pain d’Épi
“Pain d’Épi” is not only charming in appearance but also in taste. Here’s how you can create this unique loaf.
Ingredients
500g of bread flour
10g of salt
7g of active dry yeast
350ml of water
Directions
Activate the Yeast:In a small bowl, mix the active dry yeast with warm water (about 100°F or 37°C). Let it sit for a few minutes until it becomes frothy, indicating that the yeast is active and ready for use.
Combine Flour and Salt:In a large mixing bowl, combine the bread flour and salt. These simple ingredients provide the foundation for your Charming Pain d’Épi.
Incorporate the Yeast Mixture:Pour the activated yeast mixture into the bowl of dry ingredients. Mix until the dough comes together.
Knead the Dough:Turn the dough out onto a floured surface. Knead it for about 10-15 minutes, or until it becomes smooth and elastic. Use the heel of your hand to push the dough away from you, then fold it back towards you. Repeat this process.
First Rise:Place the kneaded dough in a lightly oiled bowl and cover it with a clean kitchen towel or plastic wrap. Let it rise in a warm, draft-free place for approximately 1 hour, or until it has doubled in size.
Shape the Pain d’Épi:After the first rise, gently punch down the dough to release any trapped air. Shape it into a Pain d’Épi by dividing it into several smaller portions. Roll each portion into a long, thin rope, about 12-15 inches in length.
Create the Ear-like Extensions:Take two of the thin ropes and gently twist them around each other, creating a wheat stalk-like shape. Repeat this process for all the portions.
Second Rise:Place the shaped Pain d’Épi on a baking sheet lined with parchment paper. Cover them with a clean kitchen towel and let them rise for another 30 minutes. During this time, preheat your oven to 220°C (425°F).
Bake:Place the Pain d’Épi in the preheated oven and bake for 20-25 minutes or until they are golden brown and have a crisp crust. To create a steamy environment essential for the crust, you can add a pan of hot water to the bottom of your oven.
Cool:Once baked, remove the Charming Pain d’Épi from the oven and let them cool on a wire rack. It’s best to allow them to cool for about 15-20 minutes before serving.
Serve and Enjoy:Break off a piece of your Charming Pain d’Épi and savor its artistic appearance and delightful combination of textures. It’s a perfect complement to soups, salads, or your favorite spreads.
Instructions
Mix the yeast with warm water and let it sit for a few minutes.
Combine the flour and salt in a large bowl.
Add the yeast mixture and knead the dough.
Let it rise for about 1 hour.
Shape the dough into a wheat stalk (épi).
Bake at 200°C for 25-30 minutes.
Sweet Pain Poilâne
If you have a sweet tooth, “Pain Poilâne” is the perfect choice. It combines the goodness of bread with a hint of sweetness.
Ingredients
500g of bread flour
10g of salt
7g of active dry yeast
350ml of water
50g of honey
50g of whole wheat flour
50g of rye flour
Directions
Activate the Yeast:In a small bowl, mix the active dry yeast with warm water (about 100°F or 37°C). Let it sit for a few minutes until it becomes frothy, indicating that the yeast is active and ready for use.
Combine Dry Ingredients:In a large mixing bowl, combine the bread flour, salt, whole wheat flour, and rye flour. These ingredients provide the base for your Sweet Pain Poilâne.
Incorporate the Yeast Mixture:Pour the activated yeast mixture into the bowl of dry ingredients. Add the honey for a touch of sweetness. Mix until the dough comes together.
Knead the Dough:Turn the dough out onto a floured surface. Knead it for about 10-15 minutes, or until it becomes smooth and elastic. Use the heel of your hand to push the dough away from you, then fold it back towards you. Repeat this process.
First Rise:Place the kneaded dough in a lightly oiled bowl and cover it with a clean kitchen towel or plastic wrap. Let it rise in a warm, draft-free place for approximately 1 hour, or until it has doubled in size.
Shape the Pain Poilâne:After the first rise, gently punch down the dough to release any trapped air. Shape it into a round Pain Poilâne, giving it a charming, rustic appearance.
Second Rise:Place the shaped Pain Poilâne on a baking sheet lined with parchment paper. Cover it with a clean kitchen towel and let it rise for another 30 minutes. During this time, preheat your oven to 180°C (350°F).
Bake:Place the Pain Poilâne in the preheated oven and bake for 30-35 minutes or until it’s golden brown and has a crisp crust. To create a steamy environment essential for the crust, you can add a pan of hot water to the bottom of your oven.
Cool:Once baked, remove the Sweet Pain Poilâne from the oven and let it cool on a wire rack. It’s best to allow it to cool for about 15-20 minutes before slicing.
Serve and Enjoy:Slice your Sweet Pain Poilâne and savor its tender crumb and the delightful touch of honey. It’s perfect on its own or with a bit of butter and jam.
Instructions
Mix the yeast with warm water and let it sit for a few minutes.
Combine the bread flour, salt, honey, whole wheat flour, and rye flour in a large bowl.
Add the yeast mixture and knead the dough.
Let it rise for about 1 hour.
Shape the dough into a sweet “Pain Poilâne.”
Bake at 180°C for 30-35 minutes.
How to Savor 7 French Bread:Now that you’ve mastered these recipes, it’s time to savor the fruits of your labor. Here are some delightful ways to enjoy your homemade French bread:Breakfast with a Baguette:Slice a baguette and toast it. Spread some butter, jam, or honey for a simple, classic breakfast.
Picnic with Pain de Campagne:Pack a loaf of Pain de Campagne, a selection of cheeses, and some fresh fruits for a perfect picnic.
Health-conscious with Pain Complet:
Make a wholesome sandwich with Pain Complet. Add your favorite veggies and protein for a nutritious meal.
Impress at a Party with Fougasse:Fougasse is not just delicious; it’s also visually appealing. Serve it at your next gathering to impress your guests.
Hearty Sandwiches with Bâtard:The plump Bâtard is ideal for making hearty sandwiches. Fill it with your favorite ingredients and enjoy a satisfying meal.
Aesthetic Dinner with Pain d’Épi:Use Pain d’Épi as an elegant centerpiece for a special dinner. It not only looks charming but tastes wonderful too.
Dessert Delight with Pain Poilâne:Finish your meal with a slice of sweet Pain Poilâne. It’s the perfect dessert for those with a sweet tooth.
French Bread and Beyond:The love for French bread extends far beyond the dining table. It’s not just food; it’s culture. French bread has found its way into popular culture, from classic films where characters carry baguettes in picturesque Paris to art that features these iconic loaves.
Even beyond France’s borders, French bread has become a global favorite. The charm of a well-made baguette or the comfort of a hearty Pain de Campagne transcends language and borders.
But what makes French bread truly special is its versatility. While it shines on its own, it’s also a versatile ingredient in various dishes. Croutons, bread pudding, or even using it as a base for a creative pizza – the possibilities are endless.
Buying and Baking 7 French Bread:Now, if you’re not in the mood to bake your own French bread, you can always buy it. But how do you choose the right bakery or store? Here are some tips:
Authenticity:Look for a bakery that values tradition and authenticity. A good bakery takes pride in making their bread by hand, following time-honored recipes.
Variety:A reputable bakery should offer a variety of French bread, including the 7 varieties we’ve explored. This ensures you have options to choose from.
Freshness:The key to a great French bread is its freshness. Ask the bakery staff when the bread was baked, and choose the freshest one.
Appearance:Examine the bread. It should have a golden, crisp crust and a soft, airy interior. The aroma should be inviting.
Now, if you’re feeling adventurous and want to bake your own French bread, here’s a simple tip. Invest in a good-quality baguette pan to achieve that iconic shape. And don’t forget to preheat your oven – a hot oven is crucial for that perfect crust.
Conclusion
The world of 7 French bread varieties is a delightful journey through flavors and textures. From the classic Baguette to the sweet surprise of Pain Poilâne, each variety offers a unique experience.
Whether you choose to bake your own or buy from a bakery, French bread is a culinary treasure worth exploring. It’s not just a food but a symbol of culture and a testament to the art of bread-making.
So, go ahead, pick your favorite French bread variety, and savor the simple pleasure of a fresh, crusty loaf. Bon appétit!
World Trade Center Footage | Webex Costs | Virtual Data Rooms | Structures Annuity Settlement | Sell Annuity Payment | Neuson | Online Classes | Nunavut Culture | Online College Course | Motor Replacements | Motor Insurance Quotes | Mortgage Adviser | Met Auto | Tax credit | Help desk software | Home refinancing | Urgent care | Marketing integration | Debt relief | Bitcoin | Fitness center software | Insurance | Gas | Electricity | Weight loss | Sell house for cash | Automotive repair | Loans | Internet marketing | Mortgage | Attorney | SEO specialist | Lawyer | Donate | Conference Call | Treatment | Degree | Software | Credit | Classes | Investing | Recovery | Trading | Rehab | Hosting | Cord Blood | Claim | Automotive warranty | Paintless dent repair | Mesothelioma Law Firm | Massage School Dallas Texas | Low Credit Line Credit Cards | Life Insurance Co Lincoln | Insurance Companies | Injury Lawyers | How to Donate A Car in California | Home Phone Internet Bundle | Holland Michigan College | Royalty-Free Images Stock | Register Free Domains | Psychic for Free | Ph.D. in Counseling Education | Personal Injury Lawyers | Personal Injury Law Firm | PaperPort Promotional Code | Online Stock Trading | Online Motor Insurance Quotes | Donate your Car for Money | Online Colleges | Health Records, Personal Health Record | Hard drive Data Recovery Services | Donate Old Cars to Charity | Forex Trading Platform | Forensics Online Course | Donate Car to Charity California | Donate Car for Tax Credit | Car Insurance Quotes PA | Email Bulk Service | Donating Used Cars to Charity | Donating a Car in Maryland | Donate Your Car Sacramento | Online Criminal Justice Degree | Donate Your Car for Kids | Futuristic Architecture | Donate Cars in MA | Data Recovery Raid | Mesothelioma | A car accident lawyer | Personal injury lawyer | AC repair | Lawsuit settlements | Car insurance | Flood recovery | Water damage restoration | Rehab doctors | Online degree | Online master’s degree | Doctoral programs | Hail car insurance