
7 Spooktacular Halloween Cake Ideas That Will Haunt Your Taste Buds
Introduction
Welcome to the wickedly delicious world of Halloween cakes! Halloween is that time of year when creativity knows no bounds, and your culinary skills can shine. A fantastic Halloween cake is not only a treat for your taste buds but also a centerpiece that adds an extra layer of spookiness to your celebration.
In this article, we’re going to dive into 7 spine-tingling Halloween cake ideas that will make your guests scream with delight. From classic pumpkin spice to ghostly glow-in-the-dark cakes, we’ve got a cake for every ghoul and goblin. So, grab your apron and let’s get baking!
Classic Pumpkin Spice Delight Recipe
Our first Halloween cake idea is a true classic: the Pumpkin Spice Delight. Imagine a cake that not only tastes like fall but looks like it too. You can easily transform a simple round cake into a jack-o’-lantern masterpiece.
Carving a pumpkin face on your cake can be a hilarious adventure in itself. Who knew pumpkins could be so expressive? You can even add a funny touch by making your cake smile. After all, it’s Halloween – even cakes deserve to have a good time.
Ingredients
1 1/2 cups all-purpose flour
1 tsp baking powder
1/2 tsp baking soda
1/2 tsp salt
1 tsp ground cinnamon
1/2 tsp ground nutmeg
1/2 tsp ground cloves
1/4 tsp ground ginger
1/2 cup unsalted butter, softened
1 cup granulated sugar
2 large eggs
1 cup canned pumpkin puree
1 tsp vanilla extract
Directions
Preheat your oven to 350°F (175°C). Grease and flour a 9x5-inch loaf pan.

In a medium bowl, whisk together the flour, baking powder, baking soda, salt, cinnamon, nutmeg, cloves, and ginger. Set it aside.

In a large bowl, cream together the softened butter and granulated sugar until it's light and fluffy. This is where some elbow grease comes in handy!

Beat in the eggs one at a time, then stir in the pumpkin puree and vanilla extract. Your mixture might look a little curdled, but don't worry; it'll all come together.

Gradually add the dry ingredients to the wet mixture. Mix until everything is well combined. Be gentle; we don't want to overmix our delightful batter.

Pour the batter into the prepared loaf pan and smooth the top.

Bake in the preheated oven for about 60-70 minutes, or until a toothpick inserted into the center comes out clean. If it comes out with a few moist crumbs, that's okay; just no gooey batter.

Once it's done, remove it from the oven and let it cool in the pan for about 10 minutes.

After it has slightly cooled, transfer the pumpkin spice delight to a wire rack to cool completely. If you can resist the tempting aroma, that is!

Slice, serve, and savor the pumpkin goodness! You can enjoy it plain or with a dollop of whipped cream or a scoop of vanilla ice cream for an extra treat.
Pro Tip:Want to make it even more delightful? Add some chocolate chips or chopped nuts to the batter before baking.
Instructions
Preheat your oven to 350°F (175°C) and grease a baking pan.
In a mixing bowl, whisk together flour, baking powder, baking soda, salt, cinnamon, nutmeg, and cloves.
In a separate bowl, beat together the pumpkin puree, vegetable oil, eggs, vanilla extract, granulated sugar, and brown sugar until well combined.
Gradually add the dry ingredients to the wet ingredients and mix until the batter is smooth.
Pour the batter into the greased pan.
Bake for 25-30 minutes or until a toothpick inserted into the center comes out clean.
Let it cool and enjoy your classic pumpkin spice delight.
Mummy’s Marble Madness Cake Recipe
If you’re looking for a cake that’s both eerie and delicious, our Mummy’s Marble Madness is the way to go. This cake combines the rich flavor of marble cake with a spooky mummy twist.Wrapping your cake in mummy bandages is a piece of cake (pun intended). The edible googly eyes add a touch of humor to this spooky treat. Who knew mummies could be so tasty?
Ingredients
2 cups all-purpose flour
1 1/2 cups granulated sugar
1/2 cup unsweetened cocoa powder
1 tsp baking powder
1/2 tsp baking soda
1/2 tsp salt
1 cup buttermilk
1/2 cup vegetable oil
2 large eggs
2 tsp vanilla extract
1/2 cup hot water
1/4 cup strong brewed coffee
1/4 cup white chocolate chips
1/4 cup dark chocolate chips
Directions
Preheat your oven to 350°F (175°C). Grease and flour two 9-inch round cake pans.
In a large mixing bowl, combine the flour, sugar, cocoa powder, baking powder, baking soda, and salt. Mix well.
In another bowl, whisk together the buttermilk, vegetable oil, eggs, and vanilla extract until well combined.
Pour the wet ingredients into the dry ingredients and mix until the batter is smooth and well incorporated.
In a small saucepan, heat the hot water and brewed coffee until it’s hot but not boiling.
Gradually add the hot water-coffee mixture to the batter and stir until smooth. The batter will be thin, but that’s okay.
Divide the batter evenly between the two prepared cake pans.
Now, for the marble effect, sprinkle white chocolate chips and dark chocolate chips evenly over the batter in the pans.
Click Here To Buy Our Healthy Cookbook For Only $27 Today!Use a knife or a toothpick to gently swirl the chocolate chips into the batter, creating a marble pattern.
Bake in the preheated oven for 30-35 minutes or until a toothpick inserted into the center comes out clean.
Allow the cakes to cool in the pans for about 10 minutes, then remove them from the pans and place them on a wire rack to cool completely.
Once the cakes are completely cool, you can frost them with your favorite frosting. Cream cheese frosting or chocolate ganache works wonderfully with this cake.
And there you have it – a delightful Mummy’s Marble Madness cake that’s sure to impress your taste buds and your guests. Enjoy!
Instructions
Preheat your oven and prepare both chocolate and vanilla cake batters.
Pour the batters into a cake pan, alternating between the two.
Use a knife to create a marble effect by swirling the batters together.
Bake the cake according to the package instructions.
Once the cake is cool, frost it with white buttercream.
Add edible candy eyes to make mummy faces on the cake.
Graveyard Chocolate Fudge Recipe
Our Graveyard Chocolate Fudge cake is for serious chocolate lovers who also have a soft spot for the macabre. Picture a decadent chocolate fudge cake with edible tombstones – it’s a graveyard you’ll want to dig into.Creating a chocolatey graveyard is as easy as burying your cake in crushed cookies and adding edible tombstones. Plus, there’s something darkly humorous about eating dessert from a graveyard, don’t you think?
Ingredients
2 cups semi-sweet chocolate chips
1 can (14 ounces) sweetened condensed milk
1/4 cup unsalted butter
1 tsp vanilla extract
1 1/2 cups crushed chocolate sandwich cookies (like Oreo cookies)
1/2 cup white chocolate chips
1/2 cup milk chocolate chips
Tombstone decorations (edible tombstone-shaped candies)
Gummy worms
Directions
Line an 8×8-inch (20×20 cm) square baking pan with parchment paper, leaving some overhang on the sides for easy removal later.
In a microwave-safe bowl, combine the semi-sweet chocolate chips, sweetened condensed milk, and unsalted butter. Heat in the microwave in 30-second intervals, stirring each time until the mixture is smooth and well combined.
Stir in the vanilla extract.
Add the crushed chocolate sandwich cookies to the mixture and fold them in until evenly distributed.
Pour the fudge mixture into the prepared baking pan and spread it out evenly.
In a small microwave-safe bowl, melt the white chocolate chips and milk chocolate chips separately, in 20-second intervals, stirring until smooth.
Drizzle the melted white and milk chocolate over the fudge in a random, artistic manner to create a spooky graveyard effect.
Place tombstone decorations on top of the fudge while the chocolate is still slightly soft. You can use edible tombstone-shaped candies for this purpose.
Insert gummy worms partially into the fudge to create the appearance of worms crawling out of the “grave.”
Refrigerate the fudge for at least 2 hours or until it’s completely set.
Once the fudge is firm, use the parchment paper overhangs to lift it out of the pan. Place it on a cutting board.
Use a sharp knife to cut the fudge into squares or rectangles.
Your Graveyard Chocolate Fudge is ready to serve. It’s a spooky and delicious treat that’s perfect for Halloween parties or any time you want a bit of chocolatey fun. Enjoy the sweet scares!
Instructions
In a saucepan, combine sweetened condensed milk and chocolate chips.
Heat over low heat, stirring until the mixture is smooth.
Remove from heat and stir in vanilla extract.
Pour the fudge into a lined pan.
Sprinkle crushed chocolate sandwich cookies on top for a graveyard look.
Decorate with candy tombstones and gummy worms.
Allow it to cool and set before cutting into pieces.
Witch’s Hat Red Velvet Cupcakes Recipe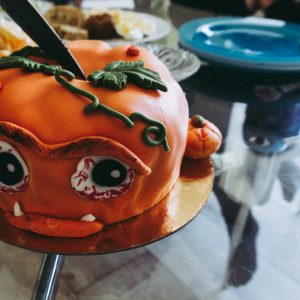
For those who prefer their Halloween cakes with a dash of enchantment, we present the Witch’s Hat Red Velvet cake. This bewitching cake not only tastes divine but also adds a magical touch to your Halloween spread.Decorating this cake is a spellbinding experience. The green icing and a black icing buckle give it that iconic witch’s hat look. And remember, witches get a sweet makeover during Halloween.
Ingredients
For the Cupcakes:1 1/2 cups all-purpose flour
1 1/2 cups granulated sugar
1 tsp baking powder
1/2 tsp baking soda
1/4 tsp salt
1/4 cup unsweetened cocoa powder
1/2 cup unsalted butter, softened
1 cup buttermilk
2 large eggs
1 tsp vanilla extract
1 tbsp red food coloring
For the Cream Cheese Frosting:8 oz cream cheese, softened
1/2 cup unsalted butter, softened
4 cups powdered sugar
1 tsp vanilla extract
For the Witch’s Hat Decorations:Chocolate wafer cookies (like Oreo cookies)
Chocolate Kisses candies
Orange or green icing gel
Directions
Preheat your oven to 350°F (175°C). Line a cupcake tin with cupcake liners.
In a bowl, sift together the flour, sugar, baking powder, baking soda, salt, and cocoa powder. Mix well and set aside.
In a separate large mixing bowl, cream together the softened butter and granulated sugar until light and fluffy.
Add the eggs, one at a time, mixing well after each addition. Stir in the vanilla extract.
Add the red food coloring to the buttermilk and mix until it’s evenly distributed, giving it that vibrant red hue.
Alternately add the dry ingredients and the red buttermilk mixture to the butter-sugar mixture, beginning and ending with the dry ingredients. Mix until just combined.
Fill each cupcake liner about two-thirds full with the red velvet batter.
Bake in the preheated oven for 18-20 minutes or until a toothpick inserted into the center of a cupcake comes out clean. Let them cool in the pan for a few minutes, then transfer them to a wire rack to cool completely.
While the cupcakes are cooling, prepare the cream cheese frosting. In a mixing bowl, beat the softened cream cheese and butter until smooth and creamy.
Gradually add the powdered sugar, one cup at a time, mixing well after each addition. Stir in the vanilla extract.
Once the cupcakes are completely cool, frost them with the cream cheese frosting, creating a nice swirl on top.
Click Here To Buy Our Healthy Cookbook For Only $27 Today!To create the Witch’s Hat decoration, carefully remove the top of a chocolate wafer cookie, leaving the bottom intact. This will be the base of the hat.
Place a chocolate Kisses candy, pointy side down, onto the center of the wafer cookie to form the pointy part of the hat.
Use orange or green icing gel to create a hatband around the base of the Kisses candy.
Gently press the Witch’s Hat decoration into the center of the cream cheese frosting on each cupcake.
Your Witch’s Hat Red Velvet Cupcakes are ready to bewitch your taste buds and your Halloween celebration. They’re not only spooky but also delicious. Enjoy the enchantment!
Instructions
Bake red velvet cupcakes according to the package instructions.
Once the cupcakes are cooled, frost them with green or black buttercream.
Turn ice cream sugar cones upside down and place one on each cupcake.
Add a piece of black licorice lace around the base to create the witch’s hatband.
Ghostly Glow-in-the-Dark Cake Recipe
Are you ready to take your Halloween cake to the next level? Our Ghostly Glow-in-the-Dark Cake is sure to leave your guests in awe. This cake literally glows in the dark, making it perfect for a spooktacular party.The secret to this cake’s eerie glow is edible luminous paint. It’s like magic on a plate! Just imagine the look on your guests’ faces when the lights go out, and your cake starts to shine. It’s a ghostly party in the dark.
Ingredients
For the Cake:2 cups all-purpose flour
1 3/4 cups granulated sugar
3/4 cup unsweetened cocoa powder
1 1/2 tsp baking powder
1 1/2 tsp baking soda
1 tsp salt
2 large eggs
1 cup buttermilk
1/2 cup vegetable oil
2 tsp vanilla extract
1 cup boiling water
2 tbsp glow-in-the-dark gel food coloring (available at specialty stores)
For the Ghostly Frosting:1 cup unsalted butter, softened
4 cups powdered sugar
2 tsp vanilla extract
1/4 cup heavy cream
1/2 cup white chocolate chips
1 tbsp glow-in-the-dark gel food coloring
Directions
Preheat your oven to 350°F (175°C). Grease and flour two 9-inch round cake pans.
In a large mixing bowl, sift together the flour, granulated sugar, cocoa powder, baking powder, baking soda, and salt. Mix well and set aside.
In another bowl, whisk together the eggs, buttermilk, vegetable oil, and vanilla extract until well combined.
Gradually add the wet ingredients to the dry ingredients and mix until the batter is smooth.
Stir in the boiling water until the batter is well combined. It will be thin; that’s okay.
Gently fold in the glow-in-the-dark gel food coloring until the batter takes on an eerie glow.
Pour the batter evenly into the prepared cake pans.
Bake in the preheated oven for 30-35 minutes or until a toothpick inserted into the center of the cakes comes out clean.
Allow the cakes to cool in the pans for about 10 minutes, then remove them from the pans and place them on a wire rack to cool completely.
While the cakes are cooling, prepare the Ghostly Frosting. In a mixing bowl, beat the softened butter until creamy.
Gradually add the powdered sugar, one cup at a time, mixing well after each addition. Stir in the vanilla extract.
Add the heavy cream and beat until the frosting is light and fluffy.
Melt the white chocolate chips and stir them into the frosting until well combined.
Add the glow-in-the-dark gel food coloring to the frosting and mix until you achieve a ghostly green glow.
Once the cakes are completely cool, spread a layer of the Ghostly Frosting on top of one cake layer. Place the second cake layer on top and frost the entire cake.
For a spooky touch, you can use additional glow-in-the-dark food coloring to create ghostly designs on the cake’s surface.
Turn off the lights and watch your cake glow eerily in the dark!
Your Ghostly Glow-in-the-Dark Cake is ready to mystify your guests and add an extra layer of excitement to your Halloween celebration. Enjoy the luminous spookiness!
Instructions
Prepare a white cake mix.
Divide the batter into portions and add glow-in-the-dark food coloring to one portion.
Create a cake with alternating layers of regular and glow-in-the-dark cake batter.
After baking and cooling, frost the cake with vanilla icing.
Turn off the lights and watch your cake glow in the dark for a spooky effect.
Haunted House Gingerbread Cake Recipe
If you’re a fan of gingerbread houses during the holidays, you’ll love our Haunted House Gingerbread Cake. This cake transforms a traditional gingerbread house into a spooky abode.Decorating this cake is like becoming the architect of your very own haunted house. Use candy and icing to create spooky windows, doors, and eerie inhabitants. Who knew that haunted real estate could be so tasty?
Ingredients
For the Gingerbread Cake:2 1/2 cups all-purpose flour
1 1/2 tsp baking soda
1 tsp ground cinnamon
1 tsp ground ginger
1/2 tsp ground cloves
1/2 tsp salt
1/2 cup unsalted butter, softened
1/2 cup granulated sugar
1/2 cup brown sugar, packed
2 large eggs
1 cup molasses
1 cup hot water
For the Royal Icing:3 large egg whites
4 cups powdered sugar
1/2 tsp cream of tartar
Black food coloring gel
For the Haunted House Decorations:Assorted Halloween-themed candies (gummy worms, candy eyes, etc.)
Candy corn
Licorice laces
Mini chocolate chips
Small Halloween-themed plastic figures (ghosts, skeletons, etc.)
Directions
For the Gingerbread Cake:Preheat your oven to 350°F (175°C). Grease and flour a 9×13-inch (23×33 cm) baking pan.
In a mixing bowl, whisk together the flour, baking soda, cinnamon, ginger, cloves, and salt. Set aside.
In another large mixing bowl, cream together the softened butter, granulated sugar, and brown sugar until light and fluffy.
Add the eggs one at a time, mixing well after each addition.
Stir in the molasses until well combined.
Gradually add the dry ingredients to the wet ingredients, alternating with the hot water. Begin and end with the dry ingredients. Mix until the batter is smooth.
Pour the gingerbread cake batter into the prepared baking pan and spread it out evenly.
Bake in the preheated oven for 35-40 minutes or until a toothpick inserted into the center comes out clean.
Allow the cake to cool in the pan for about 15 minutes, then transfer it to a wire rack to cool completely.
For the Royal Icing:In a clean, dry mixing bowl, beat the egg whites until frothy.
Gradually add the powdered sugar and cream of tartar, and continue to beat until the mixture forms stiff peaks.
Divide the royal icing into two portions. Leave one portion white and color the other portion with black food coloring gel to create black icing for decoration.
Assembling the Haunted House Cake:Once the gingerbread cake has cooled completely, use a serrated knife to level the top if necessary.
Cut the cake into the shape of a haunted house, using your creativity to make peaks, windows, and doors.
Spread a thin layer of white royal icing over the surface of the cake to create a base layer.
Use the black royal icing to pipe spooky details on the haunted house, such as windows, a door, and eerie patterns.
Decorate the haunted house with assorted Halloween-themed candies to create a spooky landscape.
Use candy corn for fence posts, licorice laces for spiderwebs, mini chocolate chips for shingles, and plastic Halloween figures to bring the scene to life.
For an added eerie effect, consider placing LED tea lights inside the cake to make it glow from within.
Your Haunted House Gingerbread Cake is now ready to amaze and spook your guests. It’s a delicious and visually stunning centerpiece for any Halloween gathering. Enjoy the spooky fun!
Instructions
Bake a gingerbread cake following the package instructions.
After it cools, use royal icing to assemble a haunted house with the cake pieces.
Decorate the house with assorted candies to create a spooky, edible abode.
Frankenstein’s Monster Cake Recipe
Last but not least, we have Frankenstein’s Monster Cake, a cake that’s a true masterpiece of delicious horror. This cake is shaped like the iconic monster and is as fun to decorate as it is to eat.Decorating this cake is a scream. Add green icing for that unmistakable Frankenstein look, complete with stitches and bolts. And don’t worry, this monster won’t bite – it’s too delicious!
Ingredients
For the Cake:2 1/2 cups all-purpose flour
1 1/2 tsp baking powder
1 1/2 tsp baking soda
1/2 tsp salt
1 1/2 cups granulated sugar
1/2 cup unsalted butter, softened
2 large eggs
1 tsp vanilla extract
1 1/2 cups buttermilk
Green food coloring gel
For the Frosting:1 1/2 cups unsalted butter, softened
4 cups powdered sugar
2 tsp vanilla extract
2-3 tbsp milk
Purple and black food coloring gel
For the Decoration:Frankenstein face decorations (edible or crafted from fondant)
Candy bolts (mini pretzel sticks dipped in silver candy melts)
Edible googly eyes
Chocolate chips (for the mouth)
Green sprinkles (optional, for hair)
Directions
For the Cake:Preheat your oven to 350°F (175°C). Grease and flour two 9-inch round cake pans.
In a bowl, whisk together the flour, baking powder, baking soda, and salt. Set aside.
In another large mixing bowl, cream together the softened butter and granulated sugar until light and fluffy.
Add the eggs one at a time, mixing well after each addition. Stir in the vanilla extract.
Gradually add the dry ingredients to the wet ingredients, alternating with the buttermilk. Begin and end with the dry ingredients. Mix until the batter is smooth.
Add green food coloring gel to the batter and mix until you achieve a Frankenstein-like green color.
Divide the batter evenly between the prepared cake pans.
Bake in the preheated oven for 25-30 minutes or until a toothpick inserted into the center of the cakes comes out clean.
Allow the cakes to cool in the pans for about 10 minutes, then remove them from the pans and place them on a wire rack to cool completely.
For the Frosting:In a mixing bowl, beat the softened butter until creamy.
Gradually add the powdered sugar, one cup at a time, mixing well after each addition. Stir in the vanilla extract.
Add milk, one tablespoon at a time, until you reach your desired frosting consistency.
Divide the frosting into two portions. Color one portion purple and the other black using food coloring gel.
Assembling Frankenstein’s Monster Cake:Once the cakes are completely cool, place one cake layer on a serving plate. Spread a layer of purple frosting over the top.
Place the second cake layer on top and frost the entire cake with the remaining purple frosting. This will be the base layer.
Use the black frosting to create Frankenstein’s hair, mouth, and any other details you like.
Attach edible googly eyes to the cake using a small amount of frosting.
Insert candy bolts into the sides of the cake to represent Frankenstein’s bolts.
Add the Frankenstein face decorations to the cake to complete the look.
If desired, sprinkle green sprinkles around the top of the cake to give Frankenstein a wild and untamed hairdo.
Your Frankenstein’s Monster Cake is now ready to come to life and amaze your Halloween guests. It’s a monstrously delicious treat that’s as fun to make as it is to eat. Enjoy the spooky sweetness!
Instructions
Bake a chocolate cake according to the package instructions.
After the cake cools, frost it with green buttercream.
Add chocolate chips or candy eyes for the monster’s eyes.
Use black icing gel to create Frankenstein’s facial features.
These Halloween recipes are spooktacular and sure to add a dose of fun to your celebrations. Enjoy making and savoring these eerie and delicious delights!
Conclusion
There you have it – 7 Halloween cake ideas that will elevate your spooky celebration. Whether you prefer classic pumpkin spice, mummy madness, or glow-in-the-dark ghostliness, these cakes are sure to be a hit. The best part? You don’t need to be a professional baker to create these eerie delights.
So, this Halloween, roll up your sleeves, don your apron, and get ready to impress your guests with your cake-baking skills. And remember, it’s not just about the taste; it’s about the fun, creativity, and laughter that come with making these spooky treats.
Final Thoughts:We hope this article has inspired you to get creative in the kitchen and make this Halloween truly memorable. From pumpkin smiles to ghostly glows, there’s a cake here for every Halloween enthusiast. So, go ahead and embrace your inner baker, and have a spooktacular and scrumptious Halloween. Happy Halloween Cake Baking!
World Trade Center Footage | Webex Costs | Virtual Data Rooms | Structures Annuity Settlement | Sell Annuity Payment | Neuson | Online Classes | Nunavut Culture | Online College Course | Motor Replacements | Motor Insurance Quotes | Mortgage Adviser | Met Auto | Tax credit | Help desk software | Home refinancing | Urgent care | Marketing integration | Debt relief | Bitcoin | Fitness center software | Insurance | Gas | Electricity | Weight loss | Sell house for cash | Automotive repair | Loans | Internet marketing | Mortgage | Attorney | SEO specialist | Lawyer | Donate | Conference Call | Treatment | Degree | Software | Credit | Classes | Investing | Recovery | Trading | Rehab | Hosting | Cord Blood | Claim | Automotive warranty | Paintless dent repair | Mesothelioma Law Firm | Massage School Dallas Texas | Low Credit Line Credit Cards | Life Insurance Co Lincoln | Insurance Companies | Injury Lawyers | How to Donate A Car in California | Home Phone Internet Bundle | Holland Michigan College | Royalty-Free Images Stock | Register Free Domains | Psychic for Free | Ph.D. in Counseling Education | Personal Injury Lawyers | Personal Injury Law Firm | PaperPort Promotional Code | Online Stock Trading | Online Motor Insurance Quotes | Donate your Car for Money | Online Colleges | Health Records, Personal Health Record | Hard drive Data Recovery Services | Donate Old Cars to Charity | Forex Trading Platform | Forensics Online Course | Donate Car to Charity California | Donate Car for Tax Credit | Car Insurance Quotes PA | Email Bulk Service | Donating Used Cars to Charity | Donating a Car in Maryland | Donate Your Car Sacramento | Online Criminal Justice Degree | Donate Your Car for Kids | Futuristic Architecture | Donate Cars in MA | Data Recovery Raid | Mesothelioma | A car accident lawyer | Personal injury lawyer | AC repair | Lawsuit settlements | Car insurance | Flood recovery | Water damage restoration | Rehab doctors | Online degree | Online master’s degree | Doctoral programs | Hail car insurance