
7 Christmas Cakes That Will Make Your Holidays Merry and Delicious
The holiday season is a time of joy, togetherness, and cherished traditions. And one tradition that stands out is the beloved Christmas cake. Whether you’re baking it yourself or receiving it as a delightful gift, Christmas cakes have a special place in our hearts. In this article, we’re going to dive into the world of Christmas cakes and present you with 7 mouthwatering recipes that will make your holidays merry and delicious.
Classic Fruitcake Recipe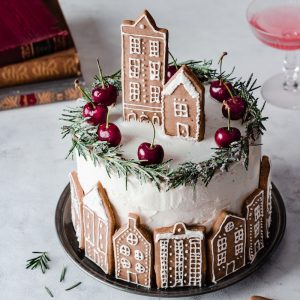
Let’s start with a classic, shall we? The fruitcake is a time-honored Christmas tradition, and it often gets a bad rap. But when made right, it’s a delectable treat that deserves a spot on your holiday table.
Ingredients
Ingredient Quantity
Candied Cherries 1 cup
Candied Pineapple 1 cup
Raisins 1 cup
Currants 1/2 cup
Chopped Pecans 1 cup
Chopped Walnuts 1 cup
All-Purpose Flour 2 cups
Baking Powder 1 teaspoon
Salt 1/2 teaspoon
Unsalted Butter 1 cup
Granulated Sugar 1 cup
Eggs 4
Vanilla Extract 1 teaspoon
Rum or Brandy 1/4 cup
Directions
Preheat your oven to 325°F (165°C). Grease and flour a 9-inch (23 cm) round cake pan and line the bottom with parchment paper.
In a large bowl, combine the candied cherries, candied pineapple, raisins, currants, chopped pecans, and chopped walnuts. Toss them with 1/2 cup of the all-purpose flour to coat the fruits and nuts evenly. This prevents them from sinking to the bottom of the cake while baking.
In a separate bowl, whisk together the remaining 1 1/2 cups of all-purpose flour, baking powder, and salt. Set this dry mixture aside.
In another bowl, cream together the unsalted butter and granulated sugar until light and fluffy. This might take a few minutes, so use some elbow grease!
Beat in the eggs, one at a time, ensuring each egg is fully incorporated before adding the next.
Stir in the vanilla extract and rum or brandy. Don’t be shy with the spirits; it’s what gives the fruitcake that special kick!
Gradually add the dry mixture to the wet mixture, mixing until just combined. Be careful not to overmix; we want a tender crumb.
Gently fold the fruit and nut mixture into the batter until they’re evenly distributed.
Pour the batter into the prepared cake pan, smoothing the top.
Bake in the preheated oven for about 1 hour and 15 minutes or until a toothpick inserted into the center comes out clean. Keep an eye on it as ovens may vary.
Allow the fruitcake to cool in the pan for 10 minutes, then remove it from the pan and let it cool completely on a wire rack.
Once it’s cooled, you can wrap it in plastic wrap and store it in an airtight container. Let it sit for a day or two to let the flavors meld and mature.
Enjoy your homemade classic fruitcake! It’s perfect for holidays or any special occasion. Just remember, this cake is so good; it’s worth sharing with friends and family, unless you want to keep it all to yourself!
Now, that’s not a robot’s recipe; it’s a heartfelt, flavorful creation!
Instructions
Start by preheating your oven to 325°F (165°C) and greasing a cake pan.
In a large mixing bowl, combine the mixed dried fruits and chopped nuts.
In a separate bowl, cream together the brown sugar and butter until light and fluffy. Add the eggs one at a time, beating well with each addition.
In another bowl, whisk together the flour, baking soda, cinnamon, and nutmeg.
Gradually add the dry ingredients to the butter and sugar mixture, mixing until just combined.
Gently fold in the mixed dried fruits and nuts.
Pour the batter into the greased cake pan and bake for about 45 minutes, or until a toothpick inserted into the center comes out clean.
Cool the cake in the pan for 10 minutes, then transfer it to a wire rack to cool completely.
Tips:Soak the dried fruits in rum or brandy for an extra festive touch.
Share a slice with a friend and enjoy a good laugh together.
Chocolate Yule Log Recipe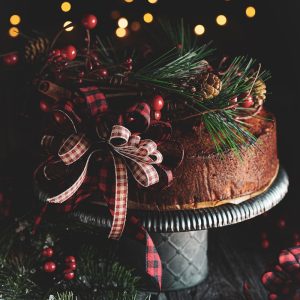
If you’re a chocolate lover (and who isn’t?), the Chocolate Yule Log is a must-try for your Christmas celebration. It’s like a piece of edible art that will leave everyone impressed.
Ingredients
Ingredient Quantity
For the Cake:Eggs 4
Granulated Sugar 3/4 cup
All-Purpose Flour 1/2 cup
Unsweetened Cocoa Powder 1/4 cup
Baking Powder 1 teaspoon
Salt 1/4 teaspoon
For the Filling:Heavy Cream 1 cup
Semi-Sweet Chocolate 8 ounces
Powdered Sugar 1/4 cup
Vanilla Extract 1 teaspoon
For the Frosting:
Unsalted Butter 1/2 cup
Unsweetened Cocoa Powder 1/4 cup
Milk 1/4 cup
Powdered Sugar 2 cups
Vanilla Extract 1 teaspoon
For Decoration:Confectioners’ Sugar For dusting
Fresh Berries For garnish
Directions
Making the Cake:Preheat your oven to 350°F (175°C). Grease a 10×15 inch jellyroll pan, and line it with parchment paper.
In a large bowl, beat the eggs with an electric mixer on high speed until they’re light and fluffy. This takes about 5 minutes.
Gradually add the granulated sugar, and continue beating until the mixture is thick and pale.
In a separate bowl, whisk together the all-purpose flour, cocoa powder, baking powder, and salt.
Gently fold the dry ingredients into the egg mixture until just combined.
Pour the batter into the prepared pan and spread it out evenly.
Bake in the preheated oven for about 12-15 minutes, or until the cake springs back when lightly touched.
While the cake is baking, lay out a clean kitchen towel and sift a generous amount of confectioners’ sugar evenly over it.
Once the cake is done, immediately invert it onto the sugared towel. Carefully peel off the parchment paper.
Starting at the short end, roll the cake up in the towel and let it cool completely.
Making the Filling:In a saucepan, heat the heavy cream over medium heat until it begins to simmer.
Remove from heat and stir in the semi-sweet chocolate until it’s completely melted and smooth.
Stir in the powdered sugar and vanilla extract. Let this mixture cool to room temperature.
When the cake has cooled completely, carefully unroll it from the towel.
Spread the chocolate filling evenly over the cake.
Roll the cake back up without the towel. Place it seam side down on a serving platter.
Making the Frosting:In a saucepan, melt the unsalted butter over low heat.
Stir in the cocoa powder and milk, and cook until the mixture is smooth.
Remove from heat and whisk in the powdered sugar and vanilla extract until the frosting is glossy and easy to spread.
Spread the chocolate frosting over the Yule log, using a fork to create a bark-like texture.
Decoration:Dust the Yule log with confectioners’ sugar to mimic snow.
Garnish with fresh berries, holly leaves (edible, of course), or any festive decorations you like.
Serve and enjoy your delicious Chocolate Yule Log!
This delectable dessert is sure to be a hit during the holiday season or any special occasion. It’s a delightful blend of rich chocolate and creamy filling, beautifully presented in a log shape. Now, go ahead and impress your friends and family with this homemade treat!
Instructions
Preheat your oven to 350°F (175°C) and line a jelly roll pan with parchment paper.
In a bowl, sift together the flour, cocoa powder, baking powder, and baking soda.
In another bowl, beat the eggs and granulated sugar until fluffy.
Gradually add the dry ingredients to the egg mixture, folding gently.
Stir in the hot water until the batter is smooth.
Pour the batter into the prepared pan and bake for about 15 minutes, or until the cake springs back when lightly touched.
Remove the cake from the oven and turn it out onto a clean kitchen towel dusted with powdered sugar.
Roll up the cake in the towel and let it cool.
Tips:When unrolling the cake, be gentle to avoid cracking.
Make it extra fun by challenging your family to a cocoa powder “snow” fight!
Gingerbread House Cake Recipe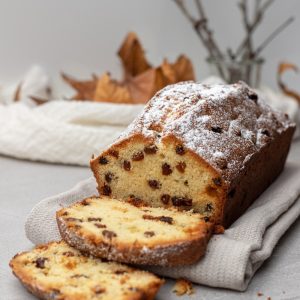
Gingerbread houses are a delightful part of Christmas, and now you can enjoy all that gingerbread goodness in the form of a cake!
Ingredients
Ingredient Quantity
For the Gingerbread Cake:Unsalted Butter 1 cup
Granulated Sugar 1 cup
Eggs 4
Molasses 1 cup
All-Purpose Flour 3 cups
Baking Powder 1 1/2 teaspoons
Ground Ginger 2 tablespoons
Ground Cinnamon 1 tablespoon
Ground Cloves 1/2 teaspoon
Ground Nutmeg 1/2 teaspoon
Salt 1/2 teaspoon
Buttermilk 1 cup
For the Cream Cheese Frosting:Cream Cheese 16 oz
Unsalted Butter 1/2 cup
Powdered Sugar 4 cups
Vanilla Extract 2 teaspoons
For Decoration:Candy Canes For roof
Assorted Candies For decor
Royal Icing For glue
Directions
Making the Gingerbread Cake:Preheat your oven to 350°F (175°C). Grease and flour a 9×13 inch cake pan.
In a large bowl, cream together the unsalted butter and granulated sugar until light and fluffy.
Beat in the eggs, one at a time, ensuring each egg is fully incorporated before adding the next.
Stir in the molasses until well combined.
In a separate bowl, whisk together the all-purpose flour, baking powder, ground ginger, ground cinnamon, ground cloves, ground nutmeg, and salt.
Gradually add the dry mixture to the wet mixture, alternating with buttermilk, beginning and ending with the dry mixture. Mix until just combined.
Pour the cake batter into the prepared pan and smooth it out evenly.
Bake in the preheated oven for about 35-40 minutes or until a toothpick inserted into the center comes out clean.
Allow the cake to cool in the pan for 10 minutes, then transfer it to a wire rack to cool completely.
Making the Cream Cheese Frosting:In a large bowl, beat together the cream cheese and unsalted butter until smooth and creamy.
Gradually add the powdered sugar and vanilla extract, beating until the frosting is fluffy and well combined.
Assembling the Gingerbread House Cake:Once the cake has cooled, cut it into the desired shape of your gingerbread house. You can cut out a house shape with a template or simply cut it into rectangular pieces.
Place one piece of cake on your serving platter. Spread a layer of cream cheese frosting on top.
Continue layering the cake pieces and frosting, creating the structure of your gingerbread house.
Use candy canes as the roof by sticking them into the top of the cake at an angle.
Decorate the house with assorted candies, using the cream cheese frosting as “glue” to attach them.
Use royal icing to create details like windows, doors, and a snowy landscape.
Let your creativity flow as you decorate your gingerbread house cake. There are no limits to your design!
Allow the cake to set for a bit, then slice and serve your edible masterpiece.
This Gingerbread House Cake is not just a treat; it’s a work of art! It combines the warm flavors of gingerbread with the creamy goodness of cream cheese frosting and the fun of decorating. Perfect for holiday celebrations or anytime you want to impress with your baking skills! ✨
Instructions
Preheat your oven to 350°F (175°C) and grease a cake pan.
In a bowl, whisk together the flour, ginger, cinnamon, nutmeg, and cloves.
In another bowl, beat the butter and brown sugar until creamy. Add the molasses and egg, mixing well.
Gradually add the dry ingredients to the molasses mixture, mixing until smooth.
Pour the batter into the greased cake pan and bake for about 30 minutes, or until a toothpick inserted into the center comes out clean.
Let the cake cool in the pan for 10 minutes, then transfer it to a wire rack to cool completely.
Tips:Decorate your gingerbread house cake with colorful candies for a whimsical touch.
Share a funny story of a gingerbread house that collapsed during decoration.
Peppermint Bark Cake Recipe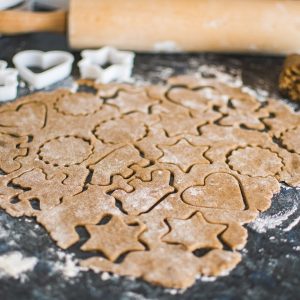
Ingredients
Ingredient Quantity
For the Cake:Unsalted Butter 1 cup
Granulated Sugar 2 cups
Eggs 4
All-Purpose Flour 3 cups
Unsweetened Cocoa Powder 1 cup
Baking Powder 1 1/2 teaspoons
Baking Soda 1 1/2 teaspoons
Salt 1/2 teaspoon
Buttermilk 2 cups
Peppermint Extract 2 teaspoons
For the Peppermint Frosting:Unsalted Butter 1 cup
Powdered Sugar 6 cups
Milk 1/2 cup
Peppermint Extract 1 teaspoon
For Decoration:Crushed Peppermint Candy For garnish
Peppermint Bark For decor
Directions
Making the Cake:Preheat your oven to 350°F (175°C). Grease and flour three 8-inch round cake pans.
In a large bowl, cream together the unsalted butter and granulated sugar until light and fluffy.
Beat in the eggs, one at a time, ensuring each egg is fully incorporated before adding the next.
In a separate bowl, whisk together the all-purpose flour, unsweetened cocoa powder, baking powder, baking soda, and salt.
Gradually add the dry mixture to the wet mixture, alternating with buttermilk, beginning and ending with the dry mixture. Mix until just combined.
Stir in the peppermint extract, giving your cake that cool and refreshing twist.
Divide the batter evenly among the prepared pans and smooth the tops.
Bake in the preheated oven for about 25-30 minutes or until a toothpick inserted into the center of the cakes comes out clean.
Let the cakes cool in the pans for 10 minutes, then transfer them to a wire rack to cool completely.
Making the Peppermint Frosting:In a large bowl, beat together the unsalted butter and powdered sugar until smooth and creamy.
Gradually add the milk and peppermint extract, beating until the frosting is fluffy and well combined.
Assembling the Peppermint Bark Cake:Place one of the cake layers on your serving platter. Spread a layer of peppermint frosting on top.
Continue layering the cakes and frosting until all layers are stacked.
Frost the top and sides of the cake with a thick, even layer of peppermint frosting, creating a smooth finish.
Sprinkle crushed peppermint candy over the top of the cake for a burst of color and flavor.
To add a touch of elegance, decorate the cake with pieces of peppermint bark. You can create beautiful patterns or simply let your creativity flow.
Allow the cake to set for a bit to firm up the frosting.
Slice and serve your Peppermint Bark Cake, delighting in the minty-chocolatey goodness.
This Peppermint Bark Cake is a true winter wonder. It combines the rich taste of chocolate with the refreshing zing of peppermint, making it a perfect dessert for holiday gatherings or whenever you want to savor that delightful combination. Enjoy every bite!
Instructions
Preheat your oven to 350°F (175°C) and grease two cake pans.
In a bowl, whisk together the flour, cocoa powder, baking powder, and baking soda.
In another bowl, mix the peppermint extract and buttermilk.
Gradually add the dry ingredients to the buttermilk mixture, mixing until smooth.
Crush the peppermint candies into small pieces and fold them into the batter.
Pour the batter evenly into the prepared cake pans and bake for about 25 minutes, or until a toothpick inserted into the centers comes out clean.
Let the cakes cool in the pans for 10 minutes, then transfer them to a wire rack to cool completely.
Tips:Top your Peppermint Bark Cake with whipped cream and extra crushed peppermint candies.
Imagine a scenario where someone mistook a peppermint candy for a decoration and had a surprising experience.
Eggnog Cheesecake Recipe
Eggnog is a quintessential holiday drink, and it’s even better when transformed into a creamy Eggnog Cheesecake.
Ingredients
Ingredient Quantity
For the Crust:
Graham Cracker Crumbs 1 1/2 cups
Unsalted Butter 1/4 cup
Granulated Sugar 2 tablespoons
For the Cheesecake Filling:
Cream Cheese 32 oz (4 blocks)
Granulated Sugar 1 cup
All-Purpose Flour 2 tablespoons
Eggnog 1 cup
Eggs 4
Nutmeg (ground) 1/2 teaspoon
Cinnamon (ground) 1/2 teaspoon
Rum Extract 1 teaspoon
For the Eggnog Topping:
Heavy Cream 1 cup
Powdered Sugar 1/4 cup
Nutmeg (ground) 1/4 teaspoon
Cinnamon (ground) 1/4 teaspoon
Rum Extract 1/2 teaspoon
Directions
Making the Crust:Preheat your oven to 325°F (160°C). Wrap the outside of a 9-inch (23 cm) springform pan with aluminum foil to prevent any leaks.
In a bowl, combine the graham cracker crumbs, melted unsalted butter, and granulated sugar. Mix until the crumbs are evenly coated.
Press the mixture firmly into the bottom of the prepared springform pan to create the crust. Set it aside.
Making the Cheesecake Filling:In a large mixing bowl, beat the cream cheese until it’s smooth and creamy.
Gradually add the granulated sugar and continue to beat until well combined.
Mix in the all-purpose flour, eggnog, eggs (one at a time), ground nutmeg, ground cinnamon, and rum extract. Beat until the mixture is smooth and well incorporated.
Pour the cheesecake filling over the graham cracker crust in the pan.
Tap the pan on the counter to release any air bubbles.
Baking the Cheesecake:Place the foil-wrapped springform pan in a larger roasting pan. Fill the roasting pan with hot water until it comes about halfway up the sides of the springform pan. This water bath helps prevent cracks in your cheesecake.
Carefully transfer the whole setup to the preheated oven.
Bake for about 60-70 minutes or until the edges are set, but the center still jiggles slightly when gently shaken.
Turn off the oven, crack the oven door open, and let the cheesecake cool in the oven for about an hour.
Making the Eggnog Topping:In a mixing bowl, whip the heavy cream until it begins to thicken.
Add the powdered sugar, ground nutmeg, ground cinnamon, and rum extract. Continue whipping until stiff peaks form.
Spread the eggnog topping evenly over the cooled cheesecake.
Chilling and Serving:Cover the cheesecake with plastic wrap and refrigerate for at least 4 hours, or overnight for the best results.
When ready to serve, remove the cheesecake from the springform pan and place it on a serving platter.
Optionally, garnish with a sprinkle of ground nutmeg and cinnamon for extra flavor and decoration.
Slice and enjoy your luscious Eggnog Cheesecake with friends and family during the holiday season or any special occasion!
This Eggnog Cheesecake combines the creamy goodness of cheesecake with the warm, comforting flavors of eggnog and a touch of holiday spice. It’s a perfect treat to savor with loved ones. So, dive into this delightful dessert, and let your taste buds revel in the holiday spirit!
Instructions
Preheat your oven to 325°F (165°C) and grease a springform pan.
In a bowl, mix the graham cracker crumbs, sugar, and melted butter.
Press the mixture into the bottom of the prepared pan.
In another bowl, beat the cream cheese and sugar until smooth. Add the eggnog and eggs, mixing until well combined.
Pour the cream cheese mixture over the crust in the pan.
Bake for about 45 minutes, or until the edges are set and the center is slightly jiggly.
Let the cheesecake cool in the oven with the door ajar for an hour, then refrigerate until fully chilled.
Tips:Sprinkle a bit of nutmeg on top for that authentic eggnog flavor.
Share a funny tale of someone accidentally spiking the eggnog before baking the cheesecake.
Red Velvet Reindeer Cake Recipe
Let your creativity run wild with this Red Velvet Reindeer Cake. It’s a showstopper that will bring smiles to everyone’s faces.
Ingredients
Ingredient Quantity
For the Red Velvet Cake:All-Purpose Flour 2 1/2 cups
Cocoa Powder 2 tablespoons
Baking Powder 1 teaspoon
Baking Soda 1 teaspoon
Salt 1/2 teaspoon
Unsalted Butter 1 cup
Granulated Sugar 2 cups
Eggs 4
Buttermilk 1 1/2 cups
Red Food Coloring 1 ounce
Vanilla Extract 1 teaspoon
For the Cream Cheese Frosting:Cream Cheese 16 oz (2 blocks)
Unsalted Butter 1 cup
Powdered Sugar 6 cups
Vanilla Extract 2 teaspoons
For Decoration:Pretzels (antlers)
Candy Eyes
Red M&M’s (nose)
Chocolate Chips (hooves)
Piping Bag and Tip
Directions
Making the Red Velvet Cake:Preheat your oven to 350°F (175°C). Grease and flour two 9-inch (23 cm) round cake pans.
In a bowl, sift together the all-purpose flour, cocoa powder, baking powder, baking soda, and salt. Set it aside.
In a large bowl, cream together the unsalted butter and granulated sugar until light and fluffy.
Beat in the eggs, one at a time, ensuring each egg is fully incorporated before adding the next.
Mix in the buttermilk, red food coloring, and vanilla extract until the batter turns a vibrant red color.
Gradually add the dry mixture to the wet mixture, mixing until just combined. Don’t overmix.
Divide the batter evenly between the prepared pans and smooth the tops.
Bake in the preheated oven for about 25-30 minutes or until a toothpick inserted into the center of the cakes comes out clean.
Let the cakes cool in the pans for 10 minutes, then transfer them to a wire rack to cool completely.
Making the Cream Cheese Frosting:In a large bowl, beat together the cream cheese and unsalted butter until smooth and creamy.
Gradually add the powdered sugar and vanilla extract, beating until the frosting is fluffy and well combined.
Assembling the Reindeer Cake:Place one of the red velvet cake layers on your serving platter.
Spread a layer of cream cheese frosting on top.
Place the second cake layer on top of the first and frost the top and sides of the entire cake with a generous layer of frosting.
Use pretzels as antlers, attaching them to the top of the cake.
Add candy eyes, a red M&M for the nose, and chocolate chips as hooves to create the reindeer’s face.
For a fun touch, use a piping bag and tip to pipe additional frosting around the reindeer’s face to resemble fur.
Let your creativity flow as you decorate your Red Velvet Reindeer Cake. Make it as cute or as quirky as you like!
Slice and enjoy your festive creation with loved ones during the holiday season or any special occasion.
This Red Velvet Reindeer Cake not only tastes delicious but also brings a touch of holiday magic to your dessert table. It’s a delightful and adorable treat that’s sure to spread joy and cheer. So, gather your family and friends, and indulge in the sweetness of the season!
Instructions
Preheat your oven to 350°F (175°C) and grease a reindeer-shaped cake pan.
In a bowl, sift together the flour, sugar, baking soda, and cocoa powder.
In another bowl, mix the vegetable oil, buttermilk, eggs, and red food coloring.
Gradually add the dry ingredients to the wet mixture, stirring until smooth.
Pour the batter into the greased reindeer cake pan and bake for about 30 minutes, or until a toothpick inserted into the center comes out clean.
Allow the cake to cool in the pan for 10 minutes before transferring it to a wire rack.
Tips:Get creative with decorating your reindeer cake with candies and frosting.
Share a humorous story about a reindeer cake decoration gone hilariously wrong.
Snowman Cake Recipe
Last but not least, we have the Snowman Cake. It’s cute, it’s festive, and it’s bound to be the center of attention at your holiday gathering.
Ingredients
Ingredient Quantity
For the Cake:All-Purpose Flour 2 1/2 cups
Baking Powder 2 teaspoons
Baking Soda 1/2 teaspoon
Salt 1/2 teaspoon
Unsalted Butter 1 cup
Granulated Sugar 2 cups
Eggs 4
Buttermilk 1 1/2 cups
Vanilla Extract 2 teaspoons
For the Cream Cheese Frosting:
Cream Cheese 16 oz (2 blocks)
Unsalted Butter 1 cup
Powdered Sugar 6 cups
Vanilla Extract 2 teaspoons
For Decoration:Fondant (white) For snowman body
Fondant (colored) For accessories
Candy Eyes
Orange Fondant or Candy For the carrot nose
Pretzel Sticks For arms
Cake Board or Platter
Directions
Making the Cake:Preheat your oven to 350°F (175°C). Grease and flour three round cake pans (6-inch, 8-inch, and 10-inch).
In a bowl, sift together the all-purpose flour, baking powder, baking soda, and salt. Set it aside.
In a large bowl, cream together the unsalted butter and granulated sugar until light and fluffy.
Beat in the eggs, one at a time, ensuring each egg is fully incorporated before adding the next.
Mix in the buttermilk and vanilla extract until the batter is smooth.
Gradually add the dry mixture to the wet mixture, mixing until just combined. Don’t overmix.
Divide the batter evenly among the prepared pans, filling each about halfway.
Bake in the preheated oven for about 20-25 minutes, or until a toothpick inserted into the center of the cakes comes out clean.
Let the cakes cool in the pans for 10 minutes, then transfer them to a wire rack to cool completely.
Making the Cream Cheese Frosting:In a large bowl, beat together the cream cheese and unsalted butter until smooth and creamy.
Gradually add the powdered sugar and vanilla extract, beating until the frosting is fluffy and well combined.
Assembling the Snowman Cake:Once the cakes are completely cooled, place the largest cake layer on your cake board or platter.
Spread a layer of cream cheese frosting on top.
Stack the middle-sized cake layer on top, followed by another layer of frosting.
Finally, place the smallest cake layer on top, creating a tiered snowman shape.
Frost the entire cake with a thin layer of cream cheese frosting. This is your crumb coat, which helps seal in any crumbs.
Roll out the white fondant and drape it over the cake, smoothing it gently to cover the entire snowman body.
Use colored fondant to create a scarf, buttons, and a hat for your snowman. Get creative with the details!
Attach candy eyes, an orange fondant or candy carrot nose, and pretzel sticks for arms.
Place your adorable Snowman Cake in the refrigerator to set for about 30 minutes.
Decorating the Snowman:Once the cake is chilled, add final touches like a big smile and rosy cheeks using colored fondant or edible food coloring.
Your Snowman Cake is now complete and ready to be admired and devoured!
This Snowman Cake is not only a delightful centerpiece for your winter celebrations but also a tasty treat. It’s a wonderful way to spread joy and warmth during the holiday season or any festive occasion. Enjoy making and sharing this charming dessert! ❄️
Instructions
Preheat your oven to 350°F (175°C) and grease three round cake pans.
In a bowl, whisk together the flour, baking powder, and salt.
In another bowl, cream together the butter and sugar until light and fluffy. Add the eggs one at a time, beating well after each addition. Stir in the vanilla extract.
Gradually add the dry ingredients to the butter mixture, mixing until just combined.
Divide the batter evenly among the three prepared cake pans and bake for about 25 minutes, or until a toothpick inserted into the centers comes out clean.
Let the cakes cool in the pans for 10 minutes, then transfer them to a wire rack to cool completely.
Tips:Assemble the cakes into a snowman shape and use frosting to create a snowy appearance.
Share a funny anecdote about a snowman cake that melted a few hearts (and maybe some frosting) at a holiday party.
Conclusion
In the spirit of the holiday season, these 7 Christmas cakes offer a delightful way to add some sweetness and laughter to your festivities. From the classic fruitcake to the whimsical snowman cake, there’s something for everyone to enjoy. So, gather your loved ones, put on your apron, and let the baking and laughter begin. May your holidays be merry, delicious, and filled with unforgettable moments!
World Trade Center Footage | Webex Costs | Virtual Data Rooms | Structures Annuity Settlement | Sell Annuity Payment | Neuson | Online Classes | Nunavut Culture | Online College Course | Motor Replacements | Motor Insurance Quotes | Mortgage Adviser | Met Auto | Tax credit | Help desk software | Home refinancing | Urgent care | Marketing integration | Debt relief | Bitcoin | Fitness center software | Insurance | Gas | Electricity | Weight loss | Sell house for cash | Automotive repair | Loans | Internet marketing | Mortgage | Attorney | SEO specialist | Lawyer | Donate | Conference Call | Treatment | Degree | Software | Credit | Classes | Investing | Recovery | Trading | Rehab | Hosting | Cord Blood | Claim | Automotive warranty | Paintless dent repair | Mesothelioma Law Firm | Massage School Dallas Texas | Low Credit Line Credit Cards | Life Insurance Co Lincoln | Insurance Companies | Injury Lawyers | How to Donate A Car in California | Home Phone Internet Bundle | Holland Michigan College | Royalty-Free Images Stock | Register Free Domains | Psychic for Free | Ph.D. in Counseling Education | Personal Injury Lawyers | Personal Injury Law Firm | PaperPort Promotional Code | Online Stock Trading | Online Motor Insurance Quotes | Donate your Car for Money | Online Colleges | Health Records, Personal Health Record | Hard drive Data Recovery Services | Donate Old Cars to Charity | Forex Trading Platform | Forensics Online Course | Donate Car to Charity California | Donate Car for Tax Credit | Car Insurance Quotes PA | Email Bulk Service | Donating Used Cars to Charity | Donating a Car in Maryland | Donate Your Car Sacramento | Online Criminal Justice Degree | Donate Your Car for Kids | Futuristic Architecture | Donate Cars in MA | Data Recovery Raid | Mesothelioma | A car accident lawyer | Personal injury lawyer | AC repair | Lawsuit settlements | Car insurance | Flood recovery | Water damage restoration | Rehab doctors | Online degree | Online master’s degree | Doctoral programs | Hail car insurance