
7 Christmas Baking Delights: A Festive Guide
The holiday season is upon us, and what better way to spread cheer than through the sweet aroma of freshly baked Christmas treats? In this festive guide, we’re going to explore seven delightful Christmas baking ideas that will leave your taste buds tingling with joy. So, roll up your sleeves, put on your apron, and let’s get baking!
Classic Sugar Cookies Recipe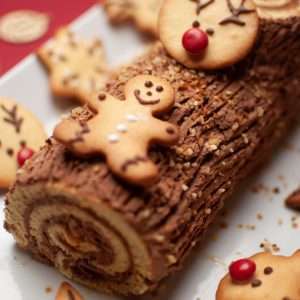
Our journey through Christmas baking begins with a timeless favorite – classic sugar cookies. These buttery, melt-in-your-mouth delights are the perfect canvas for your creative holiday designs. Here’s how to whip up a batch:
Ingredients:
1 cup (2 sticks) unsalted butter, softened
1 1/2 cups granulated sugar
2 large eggs
2 teaspoons vanilla extract
3 1/2 cups all-purpose flour
1 teaspoon baking powder
1/2 teaspoon salt
Directions:
Preheat Your Oven:Begin by preheating your oven to 350°F (180°C). Get that oven fired up!
Cream the Butter and Sugar:In a large mixing bowl, cream together the softened butter and granulated sugar until it’s light and fluffy. This is the secret to deliciously tender sugar cookies.
Add the Eggs and Vanilla:Beat in the eggs, one at a time, ensuring each is well incorporated. Then, mix in the vanilla extract for that extra burst of flavor.
Combine Dry Ingredients:In a separate bowl, whisk together the all-purpose flour, baking powder, and salt. This step ensures even distribution of leavening agents.
Gradually Add Dry Ingredients:Gradually add the dry ingredient mixture to the butter and sugar mixture. Mix until the dough comes together. Don’t overmix; you want your cookies to be tender, not tough.
Chill the Dough:Wrap the dough in plastic wrap and chill it in the refrigerator for at least 1 hour. This makes it easier to handle and roll out.
Roll and Cut:After chilling, roll out the dough on a floured surface to your desired thickness (usually about 1/4 inch). Use cookie cutters to create fun shapes.
Bake:
Place the cut-out cookies on a parchment-lined baking sheet. Bake for 8-10 minutes, or until the edges are lightly golden. Keep a close eye on them; you don’t want to overbake.
Cool and Decorate:Let the cookies cool on the baking sheet for a few minutes, then transfer them to a wire rack to cool completely. Once they’re cool, it’s time to get creative with your decorations. Frost, sprinkle, or ice as you like!
Enjoy!:Grab a glass of milk and savor the delightful sweetness of your homemade classic sugar cookies. Share them with friends and family or keep them all to yourself!
Now, that’s how you whip up a batch of classic sugar cookies that will have everyone craving more. Happy baking!
And hey, if you’ve got any leftover cookies, they make excellent bribes for getting help with the dishes.
Click Here To Buy Our Healthy Cookbook For Only $27 Today!Instructions
In a bowl, whisk together the flour, baking soda, and baking powder.
In another bowl, cream together the butter and sugar until smooth.
Beat in the egg and vanilla.
Gradually add the dry ingredients and mix until a dough forms.
Roll out the dough and use festive cookie cutters to create shapes.
Bake at 375°F (190°C) for 8-10 minutes.
Let them cool, then get creative with icing and decorations!
Tips:When decorating, let your imagination run wild. Santa-shaped cookies? Why not! And remember, don’t be surprised if Santa requests an extra batch!
Gingerbread House Extravaganza Recipe
How-to:Building a gingerbread house is like crafting a tiny edible winter wonderland. Here’s your step-by-step guide to gingerbread house magic:
Ingredients
For the Gingerbread Dough:3 cups all-purpose flour
1 teaspoon baking powder
1/2 teaspoon baking soda
1/4 teaspoon salt
1 tablespoon ground ginger
2 teaspoons ground cinnamon
1/2 teaspoon ground cloves
1/2 cup (1 stick) unsalted butter, softened
1/2 cup granulated sugar
1 large egg
3/4 cup molasses
For the Royal Icing:
3 large egg whites
4 cups powdered sugar
1/2 teaspoon cream of tartar
Directions
Making the Gingerbread Dough:Sift Dry Ingredients:In a large bowl, sift together the flour, baking powder, baking soda, salt, ground ginger, cinnamon, and cloves. Set this aromatic mixture aside.
Cream the Butter and Sugar:In another large mixing bowl, cream together the softened butter and granulated sugar until it’s fluffy and creamy. This step ensures a smooth gingerbread dough.
Add the Egg and Molasses:Beat in the egg and molasses until the mixture is well combined. Your kitchen will be filled with the rich scent of molasses – it’s a good sign!
Gradually Add Dry Ingredients:Gradually add the dry ingredients to the molasses mixture. Mix until a dough forms. This dough will become the foundation of your gingerbread house.
Chill the Dough:Divide the dough into two equal portions, wrap them in plastic wrap, and chill in the refrigerator for at least 2 hours or until firm. Chilled dough is easier to work with.
Baking and Assembling the Gingerbread House:Preheat Your Oven:Preheat your oven to 350°F (180°C) while you roll out the gingerbread dough.
Roll Out the Dough:Roll out one portion of the dough on a floured surface to about 1/4 inch thickness. Use templates or your own creativity to cut out the walls and roof pieces for your gingerbread house.
Bake the Pieces:Place the gingerbread pieces on a parchment-lined baking sheet and bake for about 10-12 minutes or until they’re firm but not overly browned. Keep an eye on them; they can brown quickly!
Cool Thoroughly:Let the gingerbread pieces cool completely on a wire rack. This is crucial before assembling your masterpiece.
Prepare Royal Icing:While your gingerbread pieces are cooling, prepare the royal icing by whisking the egg whites until frothy, then gradually adding the powdered sugar and cream of tartar. Beat until the icing is stiff and glossy.
Assemble the House:Use the royal icing as your “glue” to assemble the walls and roof of your gingerbread house. Be creative! Decorate with candies, icing, and all your favorite edible decorations.
Let It Set:Allow your gingerbread house to set for at least a few hours, preferably overnight, to ensure everything is firmly in place.
Admire and Share:Once your gingerbread house extravaganza is complete, take a moment to admire your sweet creation. Then, invite friends and family to enjoy this delicious work of art.
And there you have it – a gingerbread house that’s not only a treat for the taste buds but also a feast for the eyes. Happy gingerbread house decorating!
Pro tip:If you have leftover candies, sneak a few for yourself while you work. It’s a gingerbread house builder’s privilege!
Instructions
Assemble your gingerbread pieces using royal icing as glue.
Let your creativity shine as you decorate with candies and icing.
Wait for it to set, and your masterpiece is ready!
Tradition:Did you know that gingerbread houses have a rich history dating back to the 19th century in Germany? It’s a tradition that brings families together, much like building snowmen in the yard. Share your gingerbread house memories with loved ones.
Yummy Fruitcake Recipe
Now, let’s debunk the myth of the dreaded fruitcake with a recipe that’ll have everyone asking for seconds. What’s the secret? It’s all in the ingredients.
Ingredients
For the Fruitcake:1 cup unsalted butter, softened
2 cups granulated sugar
4 large eggs
3 cups all-purpose flour
1 teaspoon baking powder
1/2 teaspoon baking soda
1/2 teaspoon salt
1 teaspoon ground cinnamon
1/2 teaspoon ground nutmeg
1/2 teaspoon ground allspice
1/2 cup buttermilk
1/4 cup orange juice
1/4 cup rum (or orange juice for a non-alcoholic version)
2 cups mixed candied fruit
1 cup raisins
1 cup chopped pecans or walnuts
For the Glaze:1/4 cup rum (or orange juice for a non-alcoholic version)
1/4 cup apricot preserves
Directions
Making the Fruitcake:Preheat Your Oven:Preheat your oven to 325°F (160°C). Get that oven warmed up and ready for baking.
Prepare the Pan:Grease and flour a 10-inch tube pan or bundt pan. This ensures your fruitcake won’t stick.
Cream the Butter and Sugar:In a large mixing bowl, cream together the softened butter and granulated sugar until it’s light and fluffy. This is the foundation of your delicious fruitcake.
Add Eggs, One at a Time:Beat in the eggs, one at a time, ensuring each is well incorporated before adding the next.
Combine Dry Ingredients:In a separate bowl, whisk together the flour, baking powder, baking soda, salt, cinnamon, nutmeg, and allspice.
Alternate Wet and Dry Ingredients:Gradually add the dry ingredients to the butter and sugar mixture, alternating with the buttermilk. Begin and end with the dry ingredients.
Mix in Liquids:Mix in the orange juice and rum (or orange juice if you prefer a non-alcoholic version). These liquids add a burst of flavor.
Fold in Fruits and Nuts:Gently fold in the candied fruit, raisins, and chopped nuts. This is where the fruitcake gets its delicious texture and sweetness.
Bake:Pour the batter into the prepared pan and smooth the top. Bake for 75-90 minutes or until a toothpick inserted into the center comes out clean. Keep an eye on it; you don’t want to overbake.
Cool in Pan:Let the fruitcake cool in the pan for 10 minutes, then remove it from the pan and place it on a wire rack.
Making the Glaze:Prepare the Glaze:In a small saucepan, heat the rum (or orange juice) and apricot preserves over low heat until the preserves are melted. This creates a delightful glaze for your fruitcake.
Brush the Glaze:Brush the warm glaze over the top of the fruitcake. This adds a wonderful shine and flavor.
Cool and Enjoy:Allow the fruitcake to cool completely before slicing and savoring. It’s best to let it sit for a day or two to let the flavors meld together.
And there you have it – a yummy fruitcake that’s perfect for holidays or any special occasion. It’s a true classic that will have everyone coming back for seconds!
Pro tip:If you have any leftover fruitcake, it makes a terrific midnight snack. Just don’t blame us if you start dreaming of sugarplums!
Click Here To Buy Our Healthy Cookbook For Only $27 Today!Instructions
Preheat your oven to 325°F (165°C).
In a bowl, combine candied fruit and pecans with 1/2 cup of the flour.
In another bowl, whisk together the remaining flour, baking powder, and salt.
Cream together butter and sugar until fluffy.
Beat in eggs one at a time.
Add the dry ingredients in three parts, alternating with orange juice.
Fold in the fruit and nut mixture.
Pour the batter into a prepared pan and bake for 70-75 minutes.
If desired, drizzle with rum while still warm for a delightful kick.
Taste Test:Try serving this revamped fruitcake to the skeptics in your family. They might just change their tune!
Peppermint Hot Cocoa:When the weather outside is frightful, there’s nothing like a cozy cup of peppermint hot cocoa to warm your soul.
Peppermint Hot Cocoa Recipe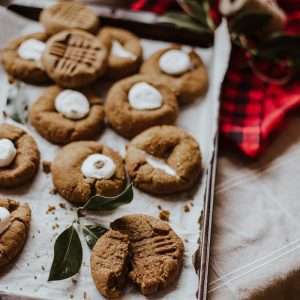
Ingredients
2 cups whole milk
1/2 cup heavy cream
1/4 cup granulated sugar
1/4 cup unsweetened cocoa powder
1/2 cup semisweet chocolate chips
1/2 teaspoon pure vanilla extract
1/2 teaspoon peppermint extract
Whipped cream, for topping
Crushed candy canes or peppermint candies, for garnish
Directions
Mix Cocoa and Sugar:In a medium saucepan, whisk together the cocoa powder and granulated sugar. This forms the base of your cocoa.
Add Milk and Cream:Gradually pour in the whole milk and heavy cream while continuing to whisk. Keep the heat on medium-low.
Heat and Stir:Heat the mixture over medium-low heat, stirring constantly until it’s hot but not boiling. You want it to be steamy and smooth.
Add Chocolate Chips:Once the mixture is hot, add the semisweet chocolate chips. Keep stirring until they melt completely into the cocoa. This adds a rich, velvety texture.
Flavor with Extracts:Stir in the pure vanilla extract and peppermint extract. The peppermint gives it that delightful holiday twist.
Serve and Garnish:Pour your peppermint hot cocoa into mugs. Top each mug with a dollop of whipped cream and a sprinkle of crushed candy canes or peppermint candies.
Sip and Enjoy!:Now, it’s time to cozy up with your delicious peppermint hot cocoa. Sip slowly and savor the warmth and minty sweetness.
This peppermint hot cocoa is a crowd-pleaser, whether you’re cuddled up by the fireplace, watching your favorite holiday movie, or simply enjoying a quiet evening. It’s like a hug in a mug!
Pro tip:If you’re feeling extra festive, you can add a splash of peppermint schnapps for the adults or a drop of extra peppermint extract for an extra minty kick. Just be sure to enjoy responsibly!
Now, go ahead and spread some warmth and joy with this delightful peppermint hot cocoa. It’s sure to become a holiday tradition in no time! ☕
Instructions
In a saucepan, whisk together milk, cocoa powder, and sugar over medium heat.
Stir until hot, but do not boil.
Remove from heat and add peppermint extract.
Pour into mugs, top with whipped cream, and sprinkle with crushed candy canes.
Sip and Savor: Wrap yourself in a blanket, sit by the fireplace, and enjoy the comforting warmth of cocoa. It’s like a hug from the inside!
Festive Cranberry Muffins:Start your mornings with a burst of holiday flavor with these festive cranberry muffins. They’re tangy, sweet, and oh-so-delicious.
Festive Cranberry Muffins Recipe
Ingredients
2 cups all-purpose flour
1 cup granulated sugar
1 1/2 teaspoons baking powder
1/2 teaspoon baking soda
1/2 teaspoon salt
1/2 cup unsalted butter, melted
1 cup buttermilk
2 large eggs
1 teaspoon pure vanilla extract
1 1/2 cups fresh cranberries
1/2 cup chopped pecans or walnuts (optional)
Zest of 1 orange
For the Streusel Topping:1/4 cup all-purpose flour
1/4 cup granulated sugar
2 tablespoons unsalted butter, softened
1/2 teaspoon ground cinnamon
Directions
Making the Muffin Batter:Preheat Your Oven:Preheat your oven to 375°F (190°C) and line a muffin tin with paper liners. Get ready to bake!
Mix Dry Ingredients:In a large mixing bowl, whisk together the all-purpose flour, granulated sugar, baking powder, baking soda, and salt. This forms the dry mix for your muffins.
Combine Wet Ingredients:In another bowl, mix the melted unsalted butter, buttermilk, eggs, and pure vanilla extract until well combined.
Mix Wet and Dry Ingredients:Pour the wet ingredients into the dry ingredients and stir until just combined. Don’t overmix; a few lumps are okay.
Fold in Cranberries and Nuts:Gently fold in the fresh cranberries, chopped pecans or walnuts (if using), and the zest of one orange. This adds a burst of flavor and texture to your muffins.
Fill Muffin Cups:Divide the muffin batter evenly among the muffin cups, filling each about two-thirds full.
Creating the Streusel Topping:Prepare Streusel Mixture:In a small bowl, mix together the all-purpose flour, granulated sugar, softened unsalted butter, and ground cinnamon. This creates a delightful streusel topping.
Sprinkle Streusel:Sprinkle a generous amount of the streusel mixture over the muffin batter in each cup. This adds a sweet and crunchy topping.
Baking and Enjoying:Bake:Bake the muffins in the preheated oven for about 18-20 minutes or until a toothpick inserted into the center comes out clean or with a few crumbs. The streusel should be golden brown.
Cool and Serve:Allow the muffins to cool in the pan for a few minutes, then transfer them to a wire rack to cool completely.
Serve and Enjoy!:These festive cranberry muffins are best enjoyed fresh out of the oven or with a warm cup of tea or coffee. Share them with friends and family, and savor the festive flavors.
These cranberry muffins are a delightful addition to your holiday brunch or a cozy afternoon treat. They’re sure to bring a smile to your face and the aroma of the season to your home!
Pro tip:If you have any leftover muffins, they make a great on-the-go breakfast. Just grab one and head out the door – it’s the perfect start to your day!
Instructions
Preheat your oven to 375°F (190°C) and line muffin cups.
In a bowl, whisk together flour, sugar, baking powder, and salt.
In another bowl, mix melted butter, milk, and egg.
Combine wet and dry ingredients, then fold in the cranberries.
Fill muffin cups and bake for 20-25 minutes.
Morning Delight:These cranberry muffins are a cheerful way to start your day during the holiday season. Pair them with a hot cup of coffee for extra warmth.
Holiday Pie Showdown
The Great Holiday Pie Showdown
Pie #1: Classic Pumpkin Pie
Ingredients
1 9-inch pie crust (store-bought or homemade)
1 15-ounce can of pumpkin puree
1 cup granulated sugar
1 teaspoon ground cinnamon
1/2 teaspoon ground ginger
1/4 teaspoon ground cloves
1/2 teaspoon salt
2 large eggs
1 12-ounce can of evaporated milk
Directions
Preheat Your Oven:Preheat your oven to 425°F (220°C). Your pumpkin pie needs a toasty home.
Prepare the Filling:In a large mixing bowl, whisk together the pumpkin puree, granulated sugar, ground cinnamon, ground ginger, ground cloves, and salt.
Add Eggs and Milk:Beat in the eggs and gradually stir in the evaporated milk until the mixture is smooth.
Fill the Pie Crust:Pour the pumpkin mixture into the pie crust.
Bake:Bake at 425°F (220°C) for 15 minutes, then reduce the oven temperature to 350°F (175°C) and continue baking for 40-50 minutes, or until a knife inserted into the center comes out clean.
Cool and Serve:Let your classic pumpkin pie cool completely before slicing and serving. Top with whipped cream for that finishing touch.
Let the Pie Showdown Begin!:Now that you have both pies ready, it’s time for the Holiday Pie Showdown! Gather your friends and family, serve up slices of both pies, and let the taste test commence. Which pie will win the title of the ultimate holiday dessert in your household?
Pro tip:A little friendly competition can make your holiday gatherings even more memorable. And don’t forget to take a vote – it’s all about fun and deliciousness!
May the best pie win, and may your holidays be filled with sweet moments and joyful gatherings. Happy pie showdown!
Options Galore:Ah, the classic pie showdown! Pecan, pumpkin, or apple – which pie reigns supreme on your holiday table? The debate is as fierce as the competition itself.
Pie Master:Achieving the perfect pie is an art. From flaky crusts to perfectly spiced fillings, there’s a lot to master. But don’t fret; practice makes pie-fect!
Friendly Competition:Consider turning your holiday dessert into a friendly competition. Have family members bake their signature pies, and let the taste test begin. It’s all in good fun and delicious flavor!
Chocolate Peppermint Bark Recipe
Last but not least, let’s wrap up our Christmas baking adventure with a sweet and minty treat – chocolate peppermint bark.
Ingredients
12 ounces (about 2 cups) high-quality semi-sweet chocolate chips
12 ounces (about 2 cups) high-quality white chocolate chips
1/2 teaspoon pure peppermint extract
1/2 cup crushed candy canes or peppermint candies
Directions
Preparing the Chocolate Layers:Line a Baking Pan:Line a 9×13-inch baking pan with parchment paper, leaving some overhang on the sides. This makes it easier to remove the bark later.
Melt the Semi-Sweet Chocolate:In a microwave-safe bowl, melt the semi-sweet chocolate chips in 30-second intervals, stirring between each interval until smooth. Be careful not to overheat; chocolate can burn.
Add Peppermint Extract:Stir in 1/4 teaspoon of pure peppermint extract into the melted semi-sweet chocolate. This adds that delightful minty flavor.
Spread in Pan:Pour the melted semi-sweet chocolate into the prepared baking pan and spread it evenly using a spatula. Make sure it reaches the edges.
Chill:Place the pan in the refrigerator for about 15-20 minutes or until the chocolate layer has set.
Adding the White Chocolate Layer:Melt the White Chocolate:In a separate microwave-safe bowl, melt the white chocolate chips in the same manner as before. Stir in the remaining 1/4 teaspoon of pure peppermint extract.
Pour Over Semi-Sweet Layer:Carefully pour the melted white chocolate over the set semi-sweet chocolate layer, spreading it evenly.
Creating the Peppermint Swirl:Swirl with a Toothpick:While the white chocolate is still soft, take a toothpick or skewer and create swirls by dragging it through the white and semi-sweet chocolate layers. This gives your bark a marbled appearance.
Adding the Peppermint Topping:Sprinkle Crushed Peppermints:Sprinkle the crushed candy canes or peppermint candies evenly over the top of the chocolate layers. Press them gently into the chocolate.
Let It Set:Chill Until Firm:Return the pan to the refrigerator and chill for at least 1 hour, or until the bark is completely firm.
Break into Pieces:Once set, use the parchment paper overhang to lift the chocolate peppermint bark out of the pan. Place it on a cutting board and break it into bite-sized pieces using your hands or a knife.
Serve and Enjoy:Indulge and Share:Serve your homemade chocolate peppermint bark on a festive platter or package it up in pretty bags for gifting. It’s a delightful treat to enjoy and share during the holiday season.
Pro tip:Store any leftover peppermint bark in an airtight container in the refrigerator to keep it fresh. But let’s be honest, it’s so delicious it might not last long!
Now, savor the sweet, minty goodness of your homemade Chocolate Peppermint Bark. It’s the perfect addition to your holiday celebrations and makes for wonderful homemade gifts. Enjoy!
Instructions
Line a baking sheet with parchment paper.
Melt semi-sweet chocolate in a microwave-safe bowl, stirring every 30 seconds until smooth.
Spread it onto the parchment paper.
Melt white chocolate in the same manner, adding peppermint extract.
Pour white chocolate over the semi-sweet layer.
Swirl with a knife and sprinkle crushed candy canes on top.
Let it cool and harden, then break into pieces.
Gift Idea:Package your chocolate peppermint bark as festive gifts for friends and family. It’s a delightful treat that spreads holiday cheer.
Holiday Movie Night:Enjoy your peppermint bark while watching classic holiday films. The combination of sweet treats and heartwarming movies is a recipe for joy!
Conclusion
As we conclude our journey through these seven Christmas baking delights, we hope you’ve been inspired to embark on your own holiday baking adventure. Whether you’re crafting sugar cookies, building gingerbread houses, or mastering the art of the perfect pie, remember that the joy is in the process and the delicious results.
So, gather your loved ones, don your aprons, and let the spirit of Christmas baking fill your home with warmth, laughter, and the irresistible scent of freshly baked treats. Happy baking, and may your holidays be filled with sweetness and joy!
World Trade Center Footage | Webex Costs | Virtual Data Rooms | Structures Annuity Settlement | Sell Annuity Payment | Neuson | Online Classes | Nunavut Culture | Online College Course | Motor Replacements | Motor Insurance Quotes | Mortgage Adviser | Met Auto | Tax credit | Help desk software | Home refinancing | Urgent care | Marketing integration | Debt relief | Bitcoin | Fitness center software | Insurance | Gas | Electricity | Weight loss | Sell house for cash | Automotive repair | Loans | Internet marketing | Mortgage | Attorney | SEO specialist | Lawyer | Donate | Conference Call | Treatment | Degree | Software | Credit | Classes | Investing | Recovery | Trading | Rehab | Hosting | Cord Blood | Claim | Automotive warranty | Paintless dent repair | Mesothelioma Law Firm | Massage School Dallas Texas | Low Credit Line Credit Cards | Life Insurance Co Lincoln | Insurance Companies | Injury Lawyers | How to Donate A Car in California | Home Phone Internet Bundle | Holland Michigan College | Royalty-Free Images Stock | Register Free Domains | Psychic for Free | Ph.D. in Counseling Education | Personal Injury Lawyers | Personal Injury Law Firm | PaperPort Promotional Code | Online Stock Trading | Online Motor Insurance Quotes | Donate your Car for Money | Online Colleges | Health Records, Personal Health Record | Hard drive Data Recovery Services | Donate Old Cars to Charity | Forex Trading Platform | Forensics Online Course | Donate Car to Charity California | Donate Car for Tax Credit | Car Insurance Quotes PA | Email Bulk Service | Donating Used Cars to Charity | Donating a Car in Maryland | Donate Your Car Sacramento | Online Criminal Justice Degree | Donate Your Car for Kids | Futuristic Architecture | Donate Cars in MA | Data Recovery Raid | Mesothelioma | A car accident lawyer | Personal injury lawyer | AC repair | Lawsuit settlements | Car insurance | Flood recovery | Water damage restoration | Rehab doctors | Online degree | Online master’s degree | Doctoral programs | Hail car insurance